Home
>
Reprappers
>
Topic
Chunky Aluminium Profile Build
Posted by yippykaiyay012
|
Chunky Aluminium Profile Build July 08, 2016 11:56AM |
Registered: 7 years ago Posts: 23 |
Thought I'd make a little build log of my from scratch printer.
The frame is made of chunky 4545 aluminium profiles.
So far frame is assembled and feels rigid.
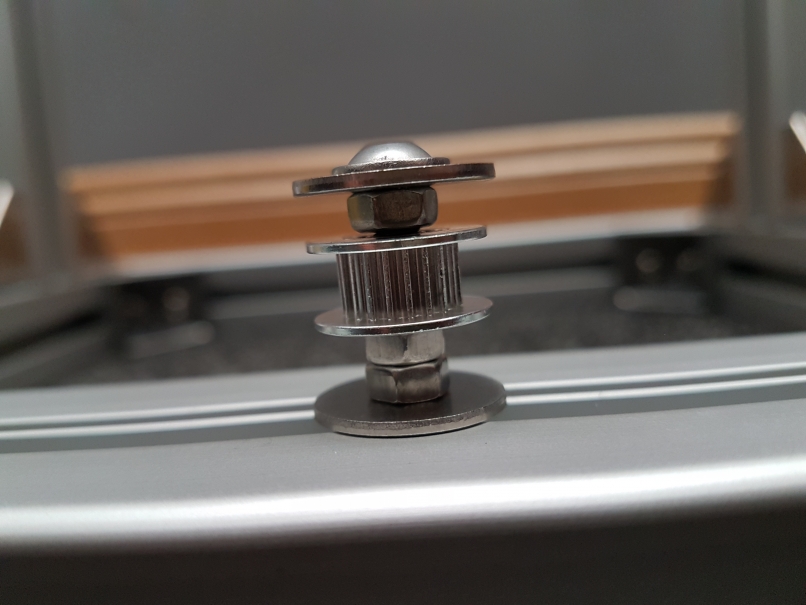
Managed to MacGyver together an idler assembly for the belt. Again feels rigid and bearing moves smoothly.
The idea here was to use all off the shelf parts so i can replace super easy if need be, and to try keep cost as low as feasible, without sacrificing quality.
Now the wait for china deliveries...
Only problem ill need to think of a solution for is how to attach the SK10 (http://www.ebay.co.uk/itm/SK10-SK20-Motor-Chrome-Linear-Rail-Shaft-Guide-Support-Bracket-Bearing-Step-New-/262302470449?var=&hash=item3d12721131:m:mcOqrvkcPwR0iQPKaGTAKKw)
to the bottom part of the z-axis profile. just because of where the holes lie. if anyone knows another part with the holes perhaps vertically instead of horizontally then i wouldn't mind if you chip in. Even another solution you can think of!
The frame is made of chunky 4545 aluminium profiles.
So far frame is assembled and feels rigid.
Managed to MacGyver together an idler assembly for the belt. Again feels rigid and bearing moves smoothly.
The idea here was to use all off the shelf parts so i can replace super easy if need be, and to try keep cost as low as feasible, without sacrificing quality.
Now the wait for china deliveries...
Only problem ill need to think of a solution for is how to attach the SK10 (http://www.ebay.co.uk/itm/SK10-SK20-Motor-Chrome-Linear-Rail-Shaft-Guide-Support-Bracket-Bearing-Step-New-/262302470449?var=&hash=item3d12721131:m:mcOqrvkcPwR0iQPKaGTAKKw)
to the bottom part of the z-axis profile. just because of where the holes lie. if anyone knows another part with the holes perhaps vertically instead of horizontally then i wouldn't mind if you chip in. Even another solution you can think of!
|
Re: Chunky Aluminium Profile Build July 09, 2016 09:39AM |
Registered: 7 years ago Posts: 84 |
I actually made a printer very similar to what you are doing, I will post pics of how I set up the Z axis with a piece of 2in x2in x 1/8in aluminum angle bracket.
Edited 1 time(s). Last edit at 07/09/2016 10:16AM by Trexation.
Edited 1 time(s). Last edit at 07/09/2016 10:16AM by Trexation.
|
Re: Chunky Aluminium Profile Build July 09, 2016 10:16AM |
Registered: 7 years ago Posts: 23 |
Looks good man. I'm mainly in this for the experience of building something from scratch, so not gonna be heartbroken if it doesn't give good prints. But out of curiosity you get good results?
Currently thinking through placements for easiest construction and will throw an occasional progress photo up every now and then. Itching for these deliverys from China!
Currently thinking through placements for easiest construction and will throw an occasional progress photo up every now and then. Itching for these deliverys from China!
|
Re: Chunky Aluminium Profile Build July 09, 2016 10:20AM |
Registered: 7 years ago Posts: 84 |
|
Re: Chunky Aluminium Profile Build July 09, 2016 10:26AM |
Registered: 7 years ago Posts: 23 |
|
Re: Chunky Aluminium Profile Build July 09, 2016 04:24PM |
Registered: 11 years ago Posts: 1,049 |
|
Re: Chunky Aluminium Profile Build July 09, 2016 04:28PM |
Registered: 7 years ago Posts: 84 |
Quote
cozmicray
45mm beams on a 225mm span?
looks like build volume will only be 150 x 150 x 150 mm
Why not a bigger build area?
Will you be supporting a 1 ton extruder?
A sturdy frame would allow it to print far faster and would allow the ability for easier transportation though it is a little overkill. 2020 would have worked about the same.
Edited 1 time(s). Last edit at 07/09/2016 04:29PM by Trexation.
|
Re: Chunky Aluminium Profile Build July 09, 2016 05:19PM |
Registered: 7 years ago Posts: 23 |
|
Re: Chunky Aluminium Profile Build July 10, 2016 07:53AM |
Registered: 11 years ago Posts: 5,780 |
Congratulations! You have stumbled onto the first factor in quality prints- the one that is missing from about 99% of printers- a rigid frame.
I recently made NEMA-17 motor mounts using 2" and 1.5" square aluminum tubing. The tubing keeps the mount very rigid and square. The motor (depending on length, of course) can be mounted inside the tube with the shaft sticking out, or outside the tube with the shaft inside the tube. It can be attached to the machine frame on either side or the bottom by drilling appropriate holes. The whole thing can be made using a hack saw and a hand drill (with a hole saw for the large hole for the motor).
The corner brackets are completely unnecessary in your printer. People use those for smaller cross section area extrusions because they can't be joined rigidly without them (or flat plates). You can tap the axial hole in the extrusion and use button head cap screws to bolt the pieces together. See: [www.instructables.com]
Since you're off to a good start, look into linear guides for the bearings, and be sure you use lead screws, not threaded rods, for the Z axis.
Edited 1 time(s). Last edit at 07/10/2016 08:23AM by the_digital_dentist.
Ultra MegaMax Dominator 3D printer: [drmrehorst.blogspot.com]
I recently made NEMA-17 motor mounts using 2" and 1.5" square aluminum tubing. The tubing keeps the mount very rigid and square. The motor (depending on length, of course) can be mounted inside the tube with the shaft sticking out, or outside the tube with the shaft inside the tube. It can be attached to the machine frame on either side or the bottom by drilling appropriate holes. The whole thing can be made using a hack saw and a hand drill (with a hole saw for the large hole for the motor).

The corner brackets are completely unnecessary in your printer. People use those for smaller cross section area extrusions because they can't be joined rigidly without them (or flat plates). You can tap the axial hole in the extrusion and use button head cap screws to bolt the pieces together. See: [www.instructables.com]
Since you're off to a good start, look into linear guides for the bearings, and be sure you use lead screws, not threaded rods, for the Z axis.
Edited 1 time(s). Last edit at 07/10/2016 08:23AM by the_digital_dentist.
Ultra MegaMax Dominator 3D printer: [drmrehorst.blogspot.com]
|
Re: Chunky Aluminium Profile Build July 10, 2016 09:36AM |
Registered: 7 years ago Posts: 23 |
Your builds are the bomb man. I'm just out of uni so money's a bit tight so I've got lead screws on order and 10mm rails on order. Hoping that will be sturdy enough to start with. Obviously with these designs components can be very easily swapped out so maybe down the road it gets extended and upgraded etc.
|
Re: Chunky Aluminium Profile Build July 10, 2016 11:08AM |
Registered: 11 years ago Posts: 5,780 |
As long as you start with a rigid frame as yours appears to be, it's easy and worthwhile to upgrade other parts as finances allow. If the frame is bad, it's hard to justify spending money on upgrades.
If you have more of that material, you might consider building a cubic frame. It will be more rigid (though it's probably going to be rigid enough as is) and much easier to enclose should you decide you want to print ABS. In case you aren't aware, you can't reliably print anything but small parts with ABS without enclosing the machine and warming the enclosure to 45-50C. You also need a heated bed at 105C to get ABS prints to stick. Look for a heater that delivers 0.4 W/cm^2 or more, or you'll be waiting a long time for it to reach 105C (if it ever does). Use a three point bed leveling system.
If you can, use a single motor to lift the Z axis. That will require a closed loop belt and pulleys on the Z axis drive screws. It will probably cost a little more than a dual motor system, but it will save you a lot of headaches and screwing around. Lifting the X axis for maintenance (cleaning the extruder, etc.) is as easy as pulling on the belt. The Z axis screws will never get out of sync so you won't have to keep realigning the X axis.
Ultra MegaMax Dominator 3D printer: [drmrehorst.blogspot.com]
|
Re: Chunky Aluminium Profile Build July 10, 2016 03:58PM |
Registered: 11 years ago Posts: 1,049 |
Is there one bolt in extrusion track?
So one bolt head in an extrusion track makes a solid connection?
Is the bolt head made to work and not spin in extrusion track
I hope end is straight and flat, was it milled?
--- 45 x 45mm contact area good

So one bolt head in an extrusion track makes a solid connection?
Is the bolt head made to work and not spin in extrusion track
I hope end is straight and flat, was it milled?
--- 45 x 45mm contact area good
Quote
Digital_Dentist
The corner brackets are completely unnecessary in your printer. People use those for smaller cross section area extrusions because they can't be joined rigidly without them (or flat plates). You can tap the axial hole in the extrusion and use button head cap screws to bolt the pieces together
|
Re: Chunky Aluminium Profile Build July 12, 2016 08:53AM |
Registered: 7 years ago Posts: 23 |
Hey guys if anyone sees this I have a question. Been scouting around for an extruder and hot end at a reasonable price. Im having difficulty finding anything aside from the ebay geeetech and sintron things. Im in the UK and it seems scarce. Anyone have good websites to browse? Ideally after an extruder that will accommodate an e3d style fitting without any other attachment hassle. Wanting to mount the extruder directly onto a vertical piece of aluminium plate.
|
Re: Chunky Aluminium Profile Build July 12, 2016 09:06AM |
Registered: 7 years ago Posts: 84 |
|
Re: Chunky Aluminium Profile Build July 12, 2016 09:22AM |
Registered: 7 years ago Posts: 23 |
|
Re: Chunky Aluminium Profile Build July 12, 2016 09:24AM |
Registered: 7 years ago Posts: 84 |
|
Re: Chunky Aluminium Profile Build July 12, 2016 09:33AM |
Registered: 7 years ago Posts: 23 |
|
Re: Chunky Aluminium Profile Build July 12, 2016 09:38AM |
Registered: 7 years ago Posts: 84 |
I would start with the genuine e3d hotend then go for the titan when you have the money..
I have a greg's wade reloaded extruder and when I first started printing I was using a cheap ebay clone hotend and I couldn't finish a 30min print without a jam. Once I got a genuine e3d metal replacement parts kit it started working flawlessly, I have not had a hotend / extruder jam yet.
Please don't buy a hotend from ebay, but if you have to buy one from ebay, buy a ptfe one.
Edited 3 time(s). Last edit at 07/12/2016 09:42AM by Trexation.
|
Re: Chunky Aluminium Profile Build July 12, 2016 09:42AM |
Registered: 7 years ago Posts: 23 |
|
Re: Chunky Aluminium Profile Build July 12, 2016 09:45AM |
Registered: 7 years ago Posts: 84 |
|
Re: Chunky Aluminium Profile Build July 14, 2016 02:37PM |
Registered: 7 years ago Posts: 23 |
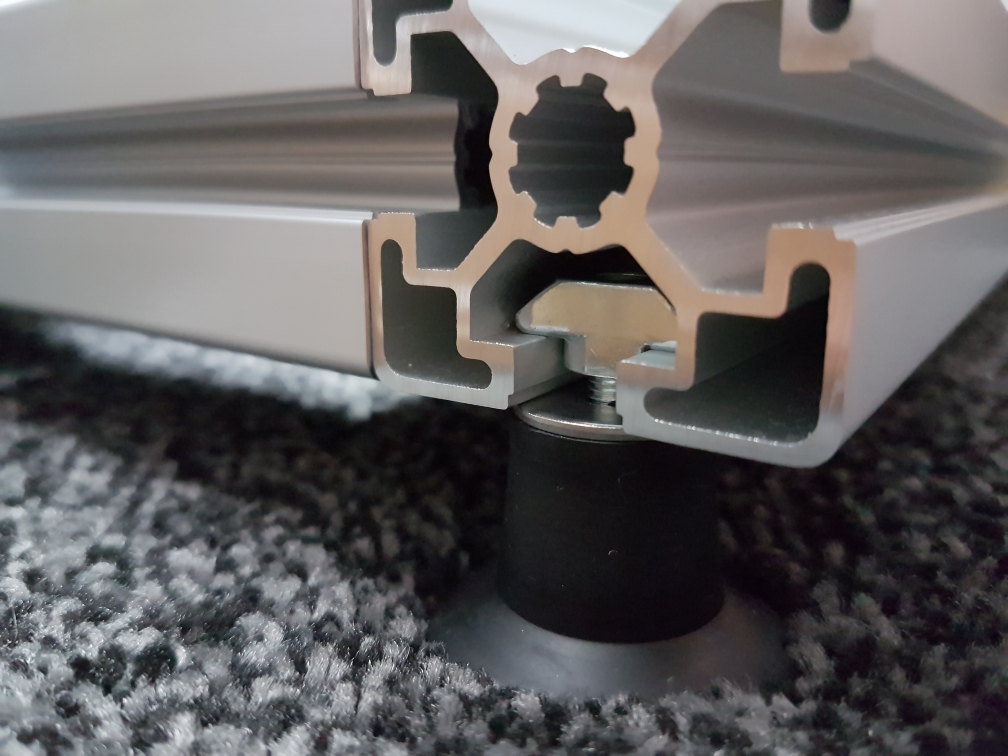
China deliveries have started arriving, filed down a motor bracket to allow an m5 screw to pass through. have now noticed that because my steppers are so tall i will need feet for the unit. Is there an easy cheap way of raising the printer? found some m5 threaded feet on ebay for £15. Just now this seems like the best option.
|
Re: Chunky Aluminium Profile Build July 14, 2016 02:44PM |
Registered: 7 years ago Posts: 84 |
I used compressor shock absorber things for the feet on my printer, but your solution seems far better...
Link to pads
Link to pads
|
Re: Chunky Aluminium Profile Build July 14, 2016 03:09PM |
Registered: 7 years ago Posts: 23 |
went ahead and got those feet. was worried about stability but if screwed in hard enough dont see it being an issue.
[www.ebay.co.uk]
[www.ebay.co.uk]
|
Re: Chunky Aluminium Profile Build July 16, 2016 04:11PM |
Registered: 7 years ago Posts: 23 |
|
Re: Chunky Aluminium Profile Build July 20, 2016 12:17PM |
Registered: 7 years ago Posts: 23 |
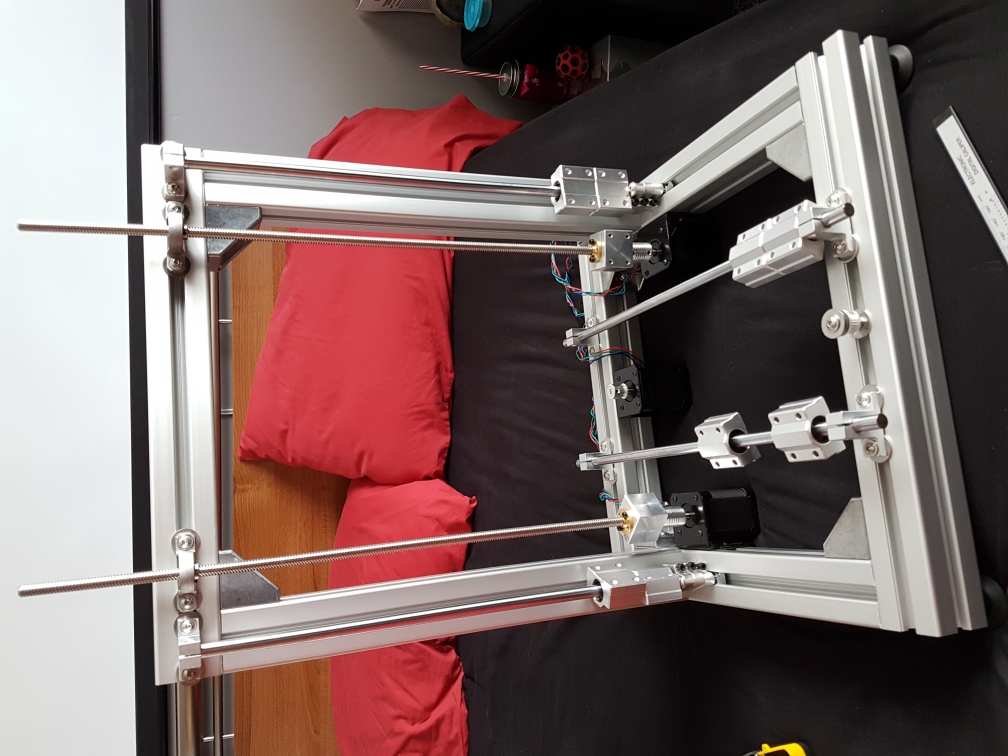
Quick update. Not too much progress since a delivery seems to have gone missing. Also showing these feet which were perfect. Also shows a 200x200mm build area since someone ealrier said it was too small.
Edited 1 time(s). Last edit at 07/20/2016 12:18PM by yippykaiyay012.
Edited 1 time(s). Last edit at 07/20/2016 12:18PM by yippykaiyay012.
|
Re: Chunky Aluminium Profile Build July 23, 2016 12:37PM |
Registered: 7 years ago Posts: 23 |
Just stole this for £1.20
[www.ebay.co.uk]
any use?
Any advice on wiring and thermister etc?
even if its worthless £1.20 isnt gonna kill me haha
[www.ebay.co.uk]
any use?
Any advice on wiring and thermister etc?
even if its worthless £1.20 isnt gonna kill me haha
|
Re: Chunky Aluminium Profile Build July 25, 2016 02:54PM |
Registered: 7 years ago Posts: 23 |
Lead screws have arrived. Post man decided to try push them through the letter box and one came falling out the package before he finished. Ridiculous. Was slightly bent but think I've bent it back close enough.
I have a question regarding arduino and ramps. Is there a way to power the arduino off the main DC power input instead of through the USB? The screen only comes on when the USB is connected.
I have a question regarding arduino and ramps. Is there a way to power the arduino off the main DC power input instead of through the USB? The screen only comes on when the USB is connected.
|
Re: Chunky Aluminium Profile Build July 25, 2016 03:58PM |
Registered: 7 years ago Posts: 84 |
|
Re: Chunky Aluminium Profile Build July 25, 2016 06:09PM |
Admin Registered: 13 years ago Posts: 7,008 |
"Is there a way to power the arduino off the main DC power input instead of through the USB?" Yes
Remove D1 from the ramps, this is what feeds power from the ramps to the mega
Power the DC jack from 7-12V, cannot use 5v as it goes threw a regulator
If you want to use 5v regulated then you need to wire that to a 5v line part after voltage regulator
Remove D1 from the ramps, this is what feeds power from the ramps to the mega
Power the DC jack from 7-12V, cannot use 5v as it goes threw a regulator
If you want to use 5v regulated then you need to wire that to a 5v line part after voltage regulator
|
Re: Chunky Aluminium Profile Build July 26, 2016 02:28AM |
Registered: 7 years ago Posts: 23 |

Sorry, only registered users may post in this forum.