My first printer Geeetech i3 Pro (review so far)
Posted by Tigreen
|
Re: My first printer Geeetech i3 Pro (review so far) May 20, 2015 08:39PM |
Registered: 9 years ago Posts: 476 |
Quote
XYZM
I did make sure of that.
The GT2560 has two extruder connections, I tried both and the same result. I will try measuring voltage and resistance at the hotend.
I don't think it is the hotend issue, it has to do with your thermistor, don't want to be sound rude but, could you start a new thread instead of discussing about your thermistor problem here?
Either within specific electronic or within prusa i3 variant. However I do suggest you create a new thread in specific electronics
|
Re: My first printer Geeetech i3 Pro (review so far) May 22, 2015 01:50AM |
Registered: 9 years ago Posts: 55 |
Hi
I had some direct request for the modification's on my GEEETECH, i prefer post them here directly for everyone with pictures.
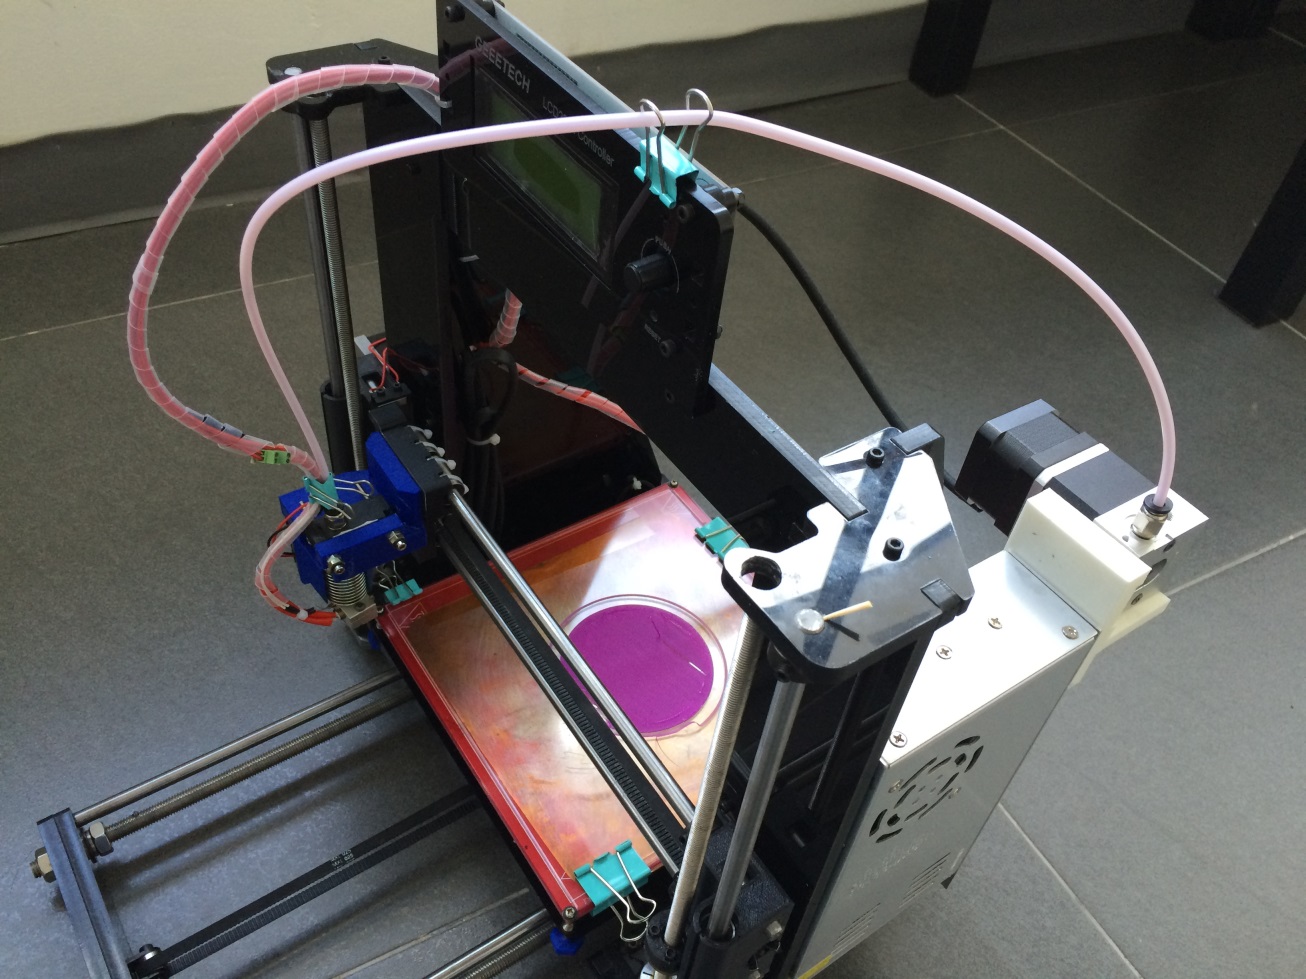
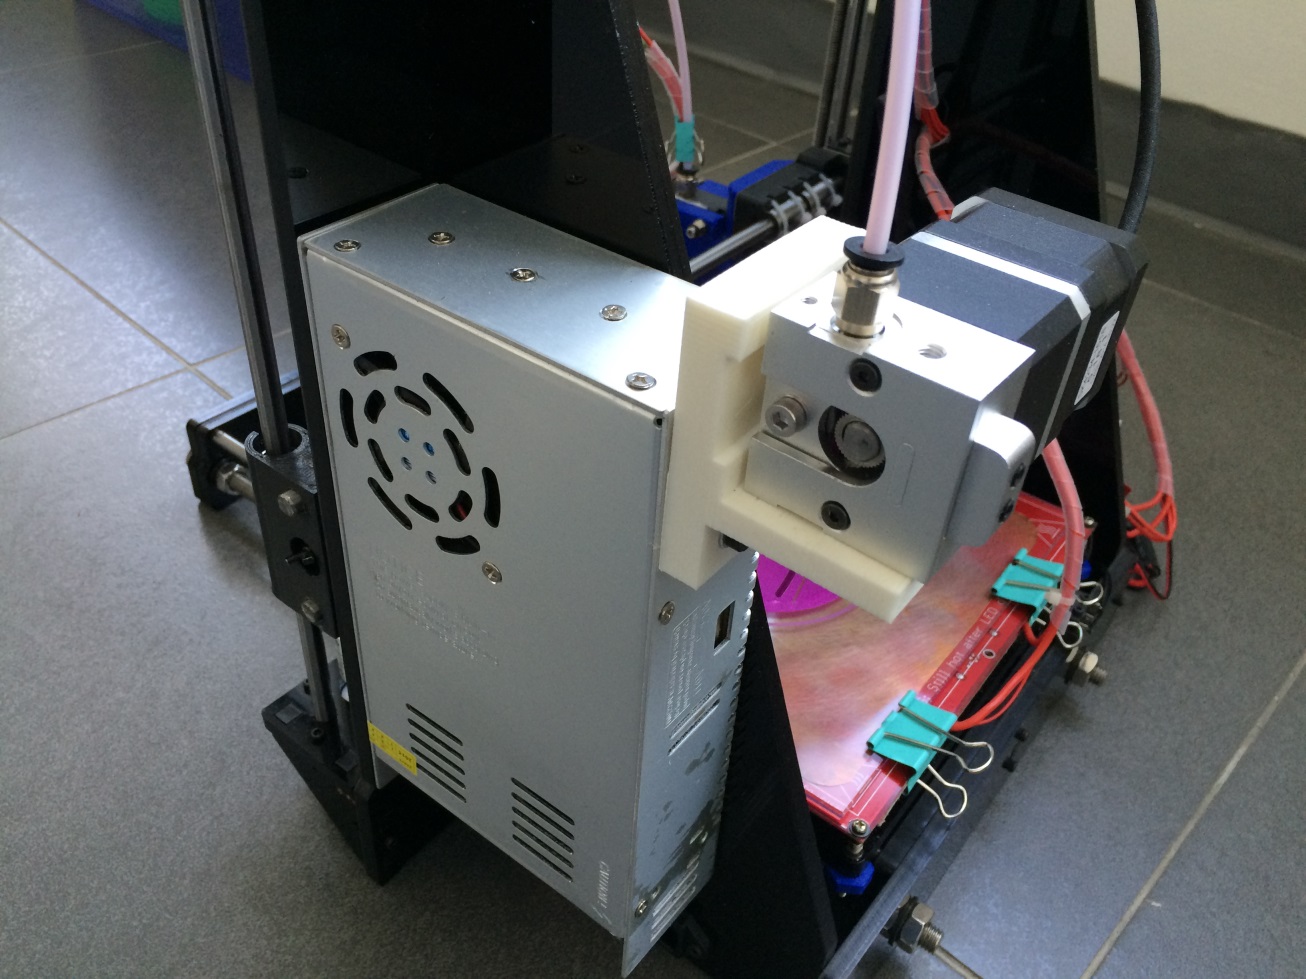
For the Bowden: i have a XL motor attached at the back of the printer on the power supply, still have 2 screws left for this. No need to drill your acrilyc.
The filament enter at the bottom of the motor, guided in the PET TUB untill the E3D on the carriage
with this i can print very nice pièces at 60mm/s in ABS.
In Bowden, i use XL motor , It have a speed reductor, and have more smooth filament delivery. The motor must run 5 times faster to send the same amount of material that the direct extruder.
when running, if you take your filament between 2 fingers, near the direct drive, you will feel small vibrations due to the stepper motor not running fast enough but with steps. so your print will have some small surface waves.
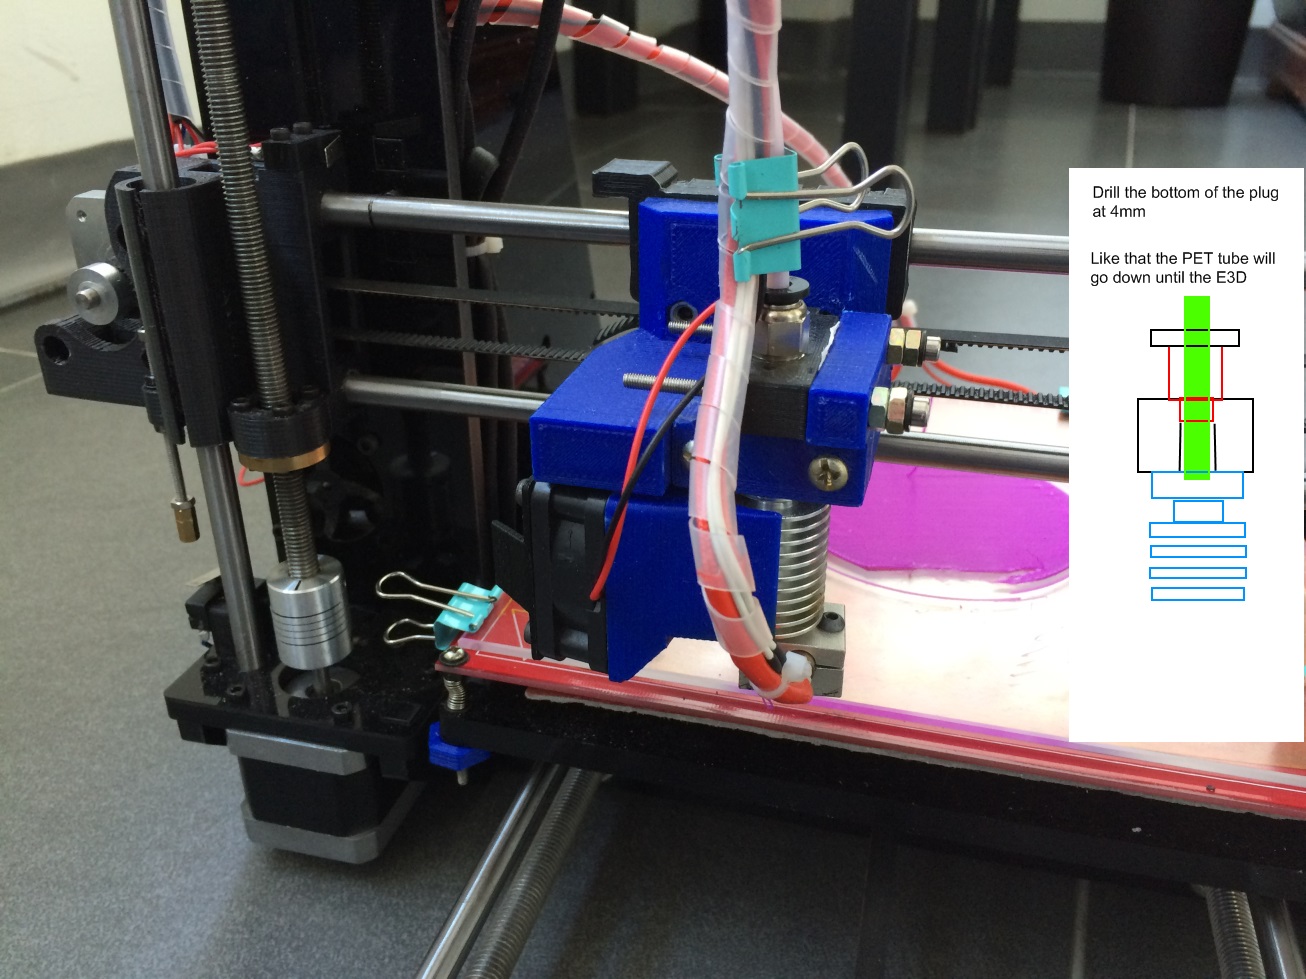
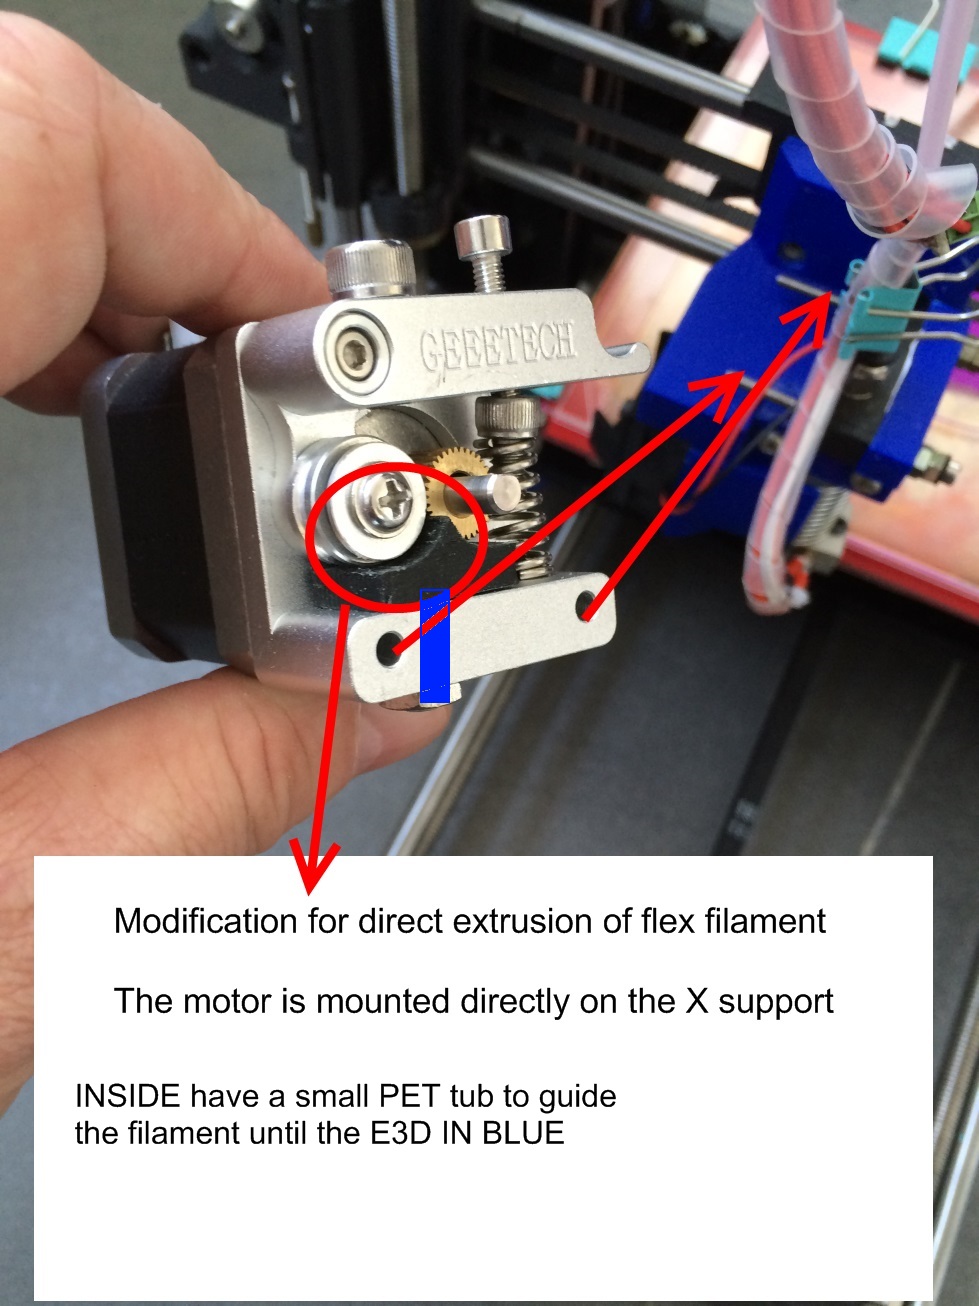
For the Direct drive: When i want to print Flex or PET filament (soft), i remove the PET tub and the fast PET tub plug (in black on the X cariage), place the GEEETECH motor on the X carriage, the filament enter directly on the top of the GEEETECH.
In the GEEETECH motor, i have placed a small device Under the wheels to ensure the filament pass through without jaming. and Under a small PET tub to guide the filament until the E3D.
Check the pictures for more explanation's.
I had some direct request for the modification's on my GEEETECH, i prefer post them here directly for everyone with pictures.
For the Bowden: i have a XL motor attached at the back of the printer on the power supply, still have 2 screws left for this. No need to drill your acrilyc.
The filament enter at the bottom of the motor, guided in the PET TUB untill the E3D on the carriage
with this i can print very nice pièces at 60mm/s in ABS.
In Bowden, i use XL motor , It have a speed reductor, and have more smooth filament delivery. The motor must run 5 times faster to send the same amount of material that the direct extruder.
when running, if you take your filament between 2 fingers, near the direct drive, you will feel small vibrations due to the stepper motor not running fast enough but with steps. so your print will have some small surface waves.
For the Direct drive: When i want to print Flex or PET filament (soft), i remove the PET tub and the fast PET tub plug (in black on the X cariage), place the GEEETECH motor on the X carriage, the filament enter directly on the top of the GEEETECH.
In the GEEETECH motor, i have placed a small device Under the wheels to ensure the filament pass through without jaming. and Under a small PET tub to guide the filament until the E3D.
Check the pictures for more explanation's.
|
Re: My first printer Geeetech i3 Pro (review so far) May 22, 2015 03:03AM |
Registered: 9 years ago Posts: 55 |
Hi Sarf2K4,
a 0.1mm caliper is also OK. you have a 0.5mm nozzle. so for this you must get walls at arround 0.5x1.2=0.6mm.
For you Wobble problem, a thread rod is never straigth. even if looks ok with eyes.
You say you have 1 to 2mm waves, but in fact you have wave half of this, because the position will be moving left to right everytime you increase the high of the layer.
i explaine myself: at start, the first layert is uncenter to the left side by 0.5mm, then you up Z by 0.5mm , now your print is centered. you up again next layer 0.5mm now you are uncenter to the right side, next layer up 0.5mm and so on...... A M8 rod have pitch of 1mm, so it is for that you have waves of 1 or 2mm if your layer high is 0.5mm. will be less if you print at 0.4mm.
Do as follow and you will (i wish ) remove this problem.
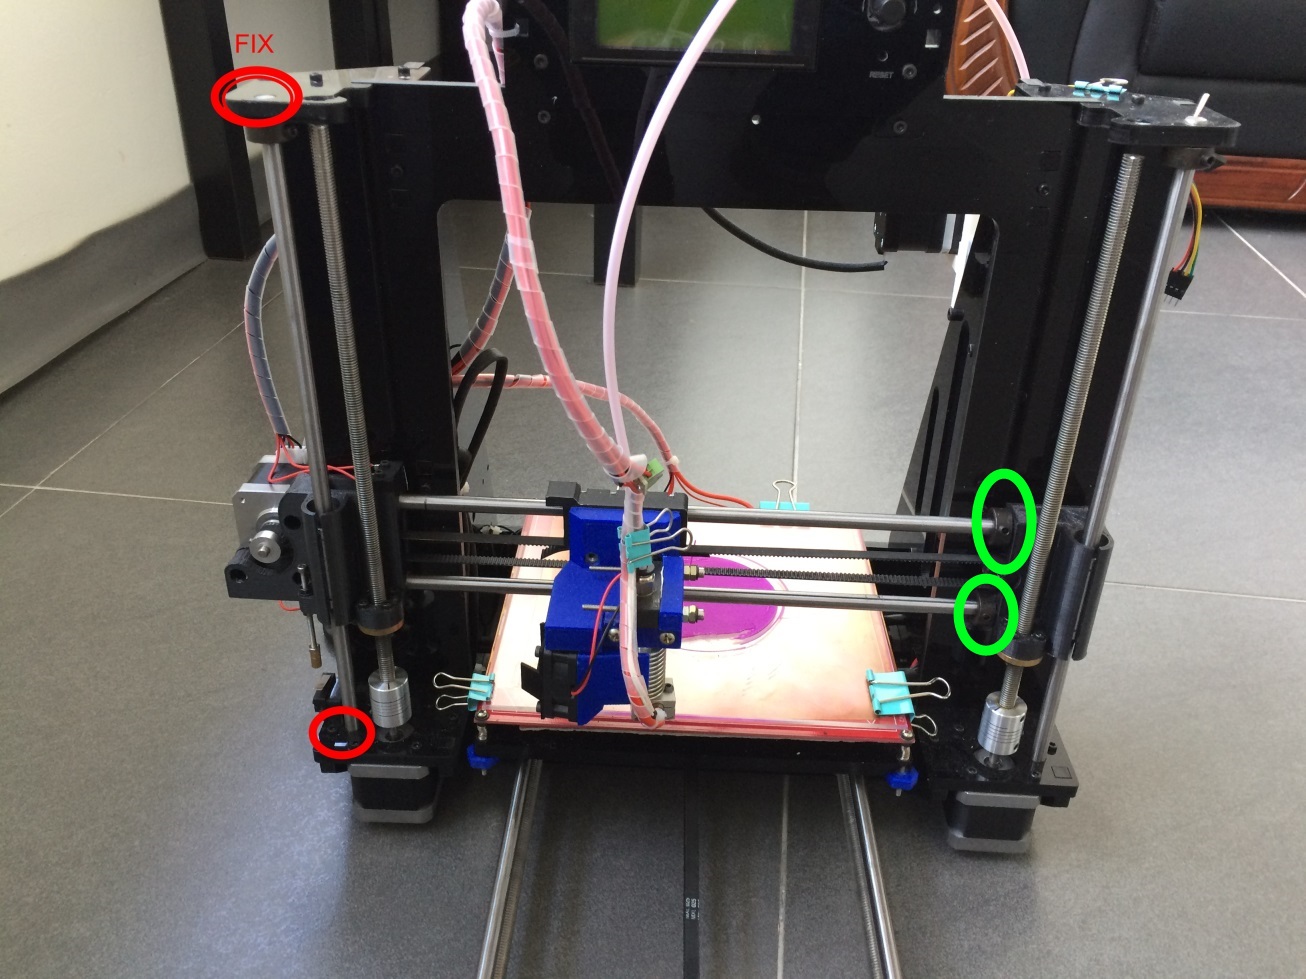
Pic1: Fix with tooth pic the left smooth rod. This will be your fix mechanical guide. the right side can have very little play, if too much fix it also.
Unscrew the 2 stoppers (in green) and push them in contact on the plastic with light pressure, and tight them again.
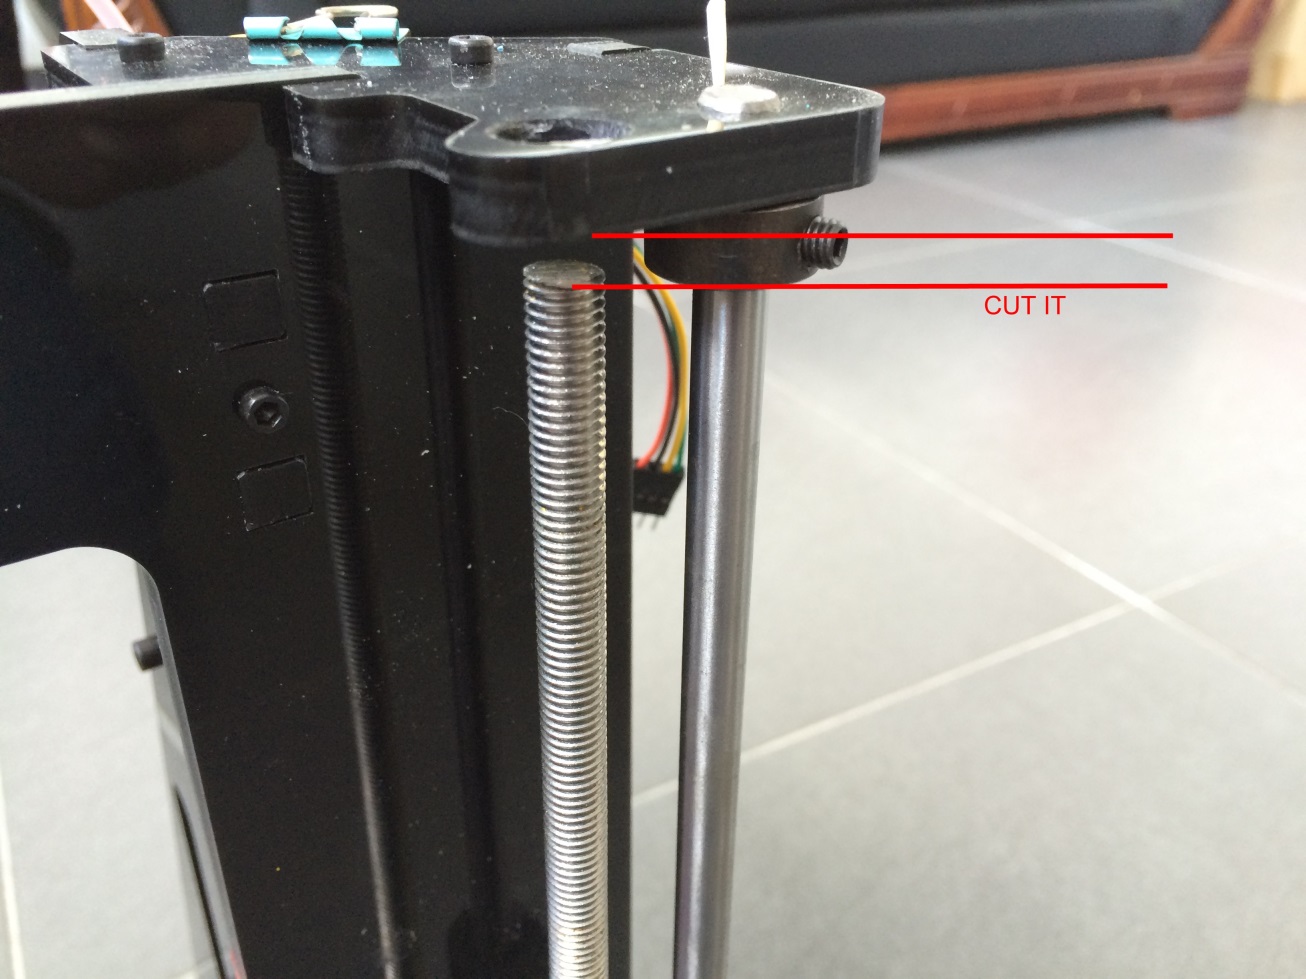
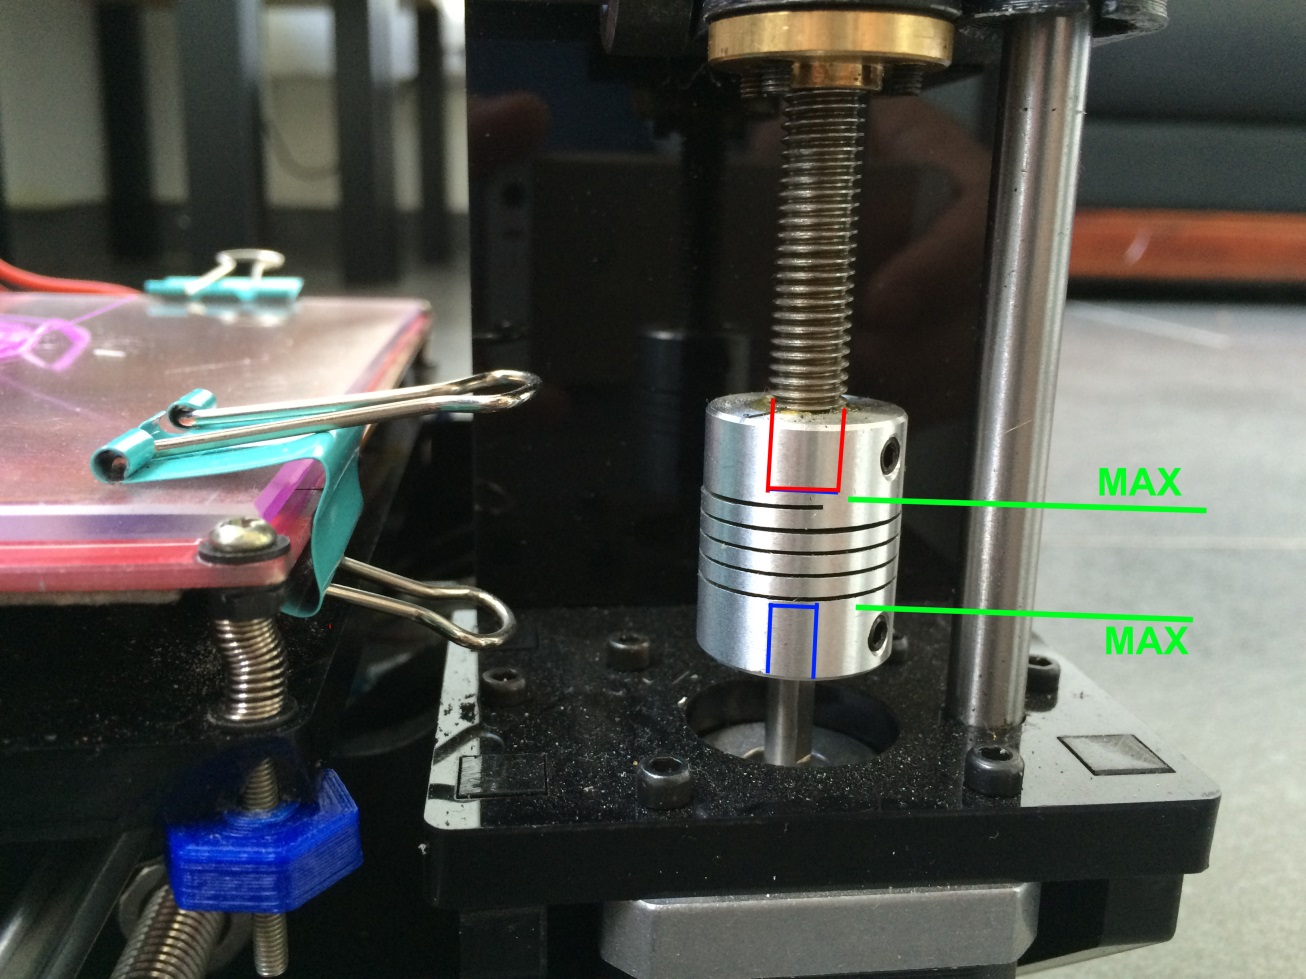
Pic2 and 3: Cut your threaded rod to have space on the top and at the bottom. this is where is your problem.
At bottom, you have a MAX limit , do not over pass this or your sprint will be usless.
At top, you can see i have drilled hole much bigger and still have the wobble problem. Cut it short.
X belt, must be tighten "like guitar cord" , not that thight but nearly, do not asked me what key it play
reduce in your config the jerk value to 15 or 10.
TRY your machine.
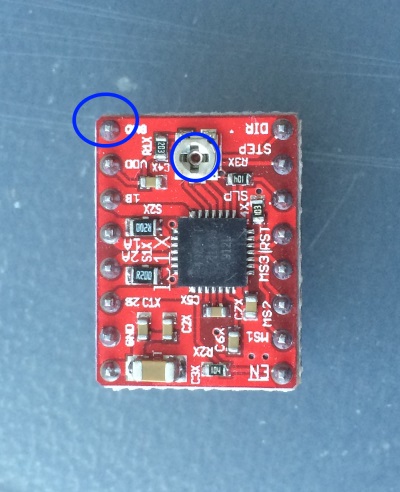
if you still have problem, then you can reduce the voltage on the drivers. CARE less voltage you will miss steps but TOO MUCH will have spring effect = wobble and over heat.
Measure voltage ~0.6 Volts between GND pin and directly over the potentiometer. care not shot the other pins...
try print at 40mm/s, it must be OK. if not better give us your configH and pic of your machine...
For nozzle cleaning, this is what we do on injection machine and it is very clean. take your nozzle with metal plier, and place it over the gas oven to burn all the plastic outside and Inside. for 4mn. it will became black but after with brush easy to clean. Inside clean with needle.
For PTFE Tube, for 1.75mm filament, your tub must be diameter 4mm outside and 2mm Inside. If bigger, then you will have problems printing and your filament will became a spring Inside your tub, and it will be out of extruder not smoothly, but by steps.
Good luck
a 0.1mm caliper is also OK. you have a 0.5mm nozzle. so for this you must get walls at arround 0.5x1.2=0.6mm.
For you Wobble problem, a thread rod is never straigth. even if looks ok with eyes.
You say you have 1 to 2mm waves, but in fact you have wave half of this, because the position will be moving left to right everytime you increase the high of the layer.
i explaine myself: at start, the first layert is uncenter to the left side by 0.5mm, then you up Z by 0.5mm , now your print is centered. you up again next layer 0.5mm now you are uncenter to the right side, next layer up 0.5mm and so on...... A M8 rod have pitch of 1mm, so it is for that you have waves of 1 or 2mm if your layer high is 0.5mm. will be less if you print at 0.4mm.
Do as follow and you will (i wish ) remove this problem.
Pic1: Fix with tooth pic the left smooth rod. This will be your fix mechanical guide. the right side can have very little play, if too much fix it also.
Unscrew the 2 stoppers (in green) and push them in contact on the plastic with light pressure, and tight them again.
Pic2 and 3: Cut your threaded rod to have space on the top and at the bottom. this is where is your problem.
At bottom, you have a MAX limit , do not over pass this or your sprint will be usless.
At top, you can see i have drilled hole much bigger and still have the wobble problem. Cut it short.
X belt, must be tighten "like guitar cord" , not that thight but nearly, do not asked me what key it play
reduce in your config the jerk value to 15 or 10.
TRY your machine.
if you still have problem, then you can reduce the voltage on the drivers. CARE less voltage you will miss steps but TOO MUCH will have spring effect = wobble and over heat.
Measure voltage ~0.6 Volts between GND pin and directly over the potentiometer. care not shot the other pins...
try print at 40mm/s, it must be OK. if not better give us your configH and pic of your machine...
For nozzle cleaning, this is what we do on injection machine and it is very clean. take your nozzle with metal plier, and place it over the gas oven to burn all the plastic outside and Inside. for 4mn. it will became black but after with brush easy to clean. Inside clean with needle.
For PTFE Tube, for 1.75mm filament, your tub must be diameter 4mm outside and 2mm Inside. If bigger, then you will have problems printing and your filament will became a spring Inside your tub, and it will be out of extruder not smoothly, but by steps.
Good luck
|
Re: My first printer Geeetech i3 Pro (review so far) May 22, 2015 03:10AM |
Registered: 9 years ago Posts: 476 |
Quote
Laopa
Hi
I had some direct request for the modification's on my GEEETECH, i prefer post them here directly for everyone with pictures.
For the Bowden: i have a XL motor attached at the back of the printer on the power supply, still have 2 screws left for this. No need to drill your acrilyc.
The filament enter at the bottom of the motor, guided in the PET TUB untill the E3D on the carriage
with this i can print very nice pièces at 60mm/s in ABS.
In Bowden, i use XL motor , It have a speed reductor, and have more smooth filament delivery. The motor must run 5 times faster to send the same amount of material that the direct extruder.
when running, if you take your filament between 2 fingers, near the direct drive, you will feel small vibrations due to the stepper motor not running fast enough but with steps. so your print will have some small surface waves.
For the Direct drive: When i want to print Flex or PET filament (soft), i remove the PET tub and the fast PET tub plug (in black on the X cariage), place the GEEETECH motor on the X carriage, the filament enter directly on the top of the GEEETECH.
In the GEEETECH motor, i have placed a small device Under the wheels to ensure the filament pass through without jaming. and Under a small PET tub to guide the filament until the E3D.
Check the pictures for more explanation's.
Thank you for the explanation, I would go for directdrive. I ordered some e3d v6 knockoff per se, and I am unsure whether it can be used or not since the ptfe tubing goes all the way into the heater block. And dismantling them would requires me to recalibrate again
 . But I printed the parts for smaller lm8uu and e3d mount already.
 Just that I am unsure whether if it safe to use the knockoff since there is quite a gap probably 1mm gap between the filament (1.75mm) and the ptfe tubing
|
Re: My first printer Geeetech i3 Pro (review so far) May 22, 2015 03:45AM |
Registered: 9 years ago Posts: 476 |
Quote
Laopa
Hi Sarf2K4,
a 0.1mm caliper is also OK. you have a 0.5mm nozzle. so for this you must get walls at arround 0.5x1.2=0.6mm.
For you Wobble problem, a thread rod is never straigth. even if looks ok with eyes.
You say you have 1 to 2mm waves, but in fact you have wave half of this, because the position will be moving left to right everytime you increase the high of the layer.
i explaine myself: at start, the first layert is uncenter to the left side by 0.5mm, then you up Z by 0.5mm , now your print is centered. you up again next layer 0.5mm now you are uncenter to the right side, next layer up 0.5mm and so on...... A M8 rod have pitch of 1mm, so it is for that you have waves of 1 or 2mm if your layer high is 0.5mm. will be less if you print at 0.4mm.
Do as follow and you will (i wish ) remove this problem.
Pic1: Fix with tooth pic the left smooth rod. This will be your fix mechanical guide. the right side can have very little play, if too much fix it also.
Unscrew the 2 stoppers (in green) and push them in contact on the plastic with light pressure, and tight them again.
Pic2 and 3: Cut your threaded rod to have space on the top and at the bottom. this is where is your problem.
At bottom, you have a MAX limit , do not over pass this or your sprint will be usless.
At top, you can see i have drilled hole much bigger and still have the wobble problem. Cut it short.
X belt, must be tighten "like guitar cord" , not that thight but nearly, do not asked me what key it play
reduce in your config the jerk value to 15 or 10.
TRY your machine.
if you still have problem, then you can reduce the voltage on the drivers. CARE less voltage you will miss steps but TOO MUCH will have spring effect = wobble and over heat.
Measure voltage ~0.6 Volts between GND pin and directly over the potentiometer. care not shot the other pins...
try print at 40mm/s, it must be OK. if not better give us your configH and pic of your machine...
For nozzle cleaning, this is what we do on injection machine and it is very clean. take your nozzle with metal plier, and place it over the gas oven to burn all the plastic outside and Inside. for 4mn. it will became black but after with brush easy to clean. Inside clean with needle.
For PTFE Tube, for 1.75mm filament, your tub must be diameter 4mm outside and 2mm Inside. If bigger, then you will have problems printing and your filament will became a spring Inside your tub, and it will be out of extruder not smoothly, but by steps.
Good luck
Thank you for the tips, is there a model to replace the top end that does not bind threaded rods? Somehow I don't wanna touch or cut the threaded rods. If i remember correctly the hole for threaded rod top end are quite loose as well and the wobble can be seen clearly on my left threaded rod. I tried to source but still hasn't found any m8 yet. I only found 3/8 inch which the 'idiot' storekeeper said "just use this threaded rod instead, its just a machine and you just pair it with a compatible nuts". To be honest, my place here somewhat lacking the understanding of PRECISION and these kind of PRECISION MACHINES.
I printed an anti wobble z coupler since the aluminum coupler that came with the kit were too big, with around 0.2mm gap even tightening the side screws of the coupler also won't clamp the threaded rods. I opened an issue with the geeetech forum about this and kept convincing me there are 2 grub screw that need to be tightened. I am waiting the reply for this since i sent them gif image of my coupler I rotate to let them see the lack of grub screw thingy.
That aside, I also gonna be receiving my newly ordered 0.01mm caliper tomorrow (hopefully) and it turns out to be that my nozzle size is 0.4mm. @nophead suggested that extrude the plastic at 1mm/s that you are able to find the nozzle size by extruding very slowly.
The x belt are quite loose because I wanted to avoid the bottom part from rubbing with the looped belt on top of it. When eyeballing it, the bottom belt sits at the center of the gaps there.
I will post the picture of my printer probably tomorrow. I really need to redo the wiring on the extruder part.
Edit:
Somehow I don't really know how to should i go with the extruder cable management, probably i follow yours @laopa, from above
Edited 1 time(s). Last edit at 05/22/2015 04:49AM by sarf2k4.
|
Re: My first printer Geeetech i3 Pro (review so far) May 22, 2015 01:34PM |
Registered: 9 years ago Posts: 55 |
Hi sarf2k4
If you go direct drive, the 1 mm gap is not a problem because the distance between the feeder and the nozzle is short.
The filament is strong enough to avoid spring effect.
There is a part can be printed to avoid wobble without cutting short the threaded rod, I will post them soon when I will redraw it. And can be used later for auto bed leveling!
Edited 1 time(s). Last edit at 05/22/2015 01:50PM by Laopa.
|
Re: My first printer Geeetech i3 Pro (review so far) May 23, 2015 09:08AM |
Registered: 9 years ago Posts: 476 |
Quote
Laopa
Hi sarf2k4
If you go direct drive, the 1 mm gap is not a problem because the distance between the feeder and the nozzle is short.
The filament is strong enough to avoid spring effect.
There is a part can be printed to avoid wobble without cutting short the threaded rod, I will post them soon when I will redraw it. And can be used later for auto bed leveling!
The parts for the all metal j-head hotend were your design was it? could you move it to the center since it is kinda off to the right side

I got a major improvement after I printed and changed the z axis top holder. but the only small issues is just somewhat the ripple effect on the y axis, was it too high on jerk or what? I remember correctly I set the xy jerk to around 10.
I still using cura and last night before I printed the z axis top holder, print some kind of vast that many retractions, the parameter as follows:
retraction setting:
speed 150
length 4.5
The problem was that the gear grinding on to the filament last night. I don't think changing the spring tension would do any good
Here is the pictures about my printer including the z axis top holder, I am going to test the z axis holder that I adjusted to have a good measurement. Because the first measurement, I gave it extra 1mm size and after installing it, there's a gap of 1mm on the slot, so I just done with the readjustment and I will try again to see if it really fits. I will upload to thingiverse or somewhere else later after I've done doing test fit on it. The idea on that is to avoid from cutting down the threaded rod
Picture here [imgur.com]
|
Re: My first printer Geeetech i3 Pro (review so far) May 23, 2015 12:05PM |
Registered: 9 years ago Posts: 55 |
Hi sarf2K4
Your top Z threaded rod is good like that. be sure the rod never touch the white plastic part when it spin.
my E3D is not center because my direct drive is on the left, opposite as yours. also to avoid the extruder getting out of the bed too far when homing.
Ripple is due to jerk (you can even down it) or speed too high or belt not tight enough.
for direct extrusion the retraction must be ~0.5 to 1.5mm and speed of 300, 4.5mm is good for Bowden.
Better attached your wires on the carriage, or pretty soon your connection will became lose or your contact will be cut.
Gear grinding, if it is not your retraction it may be you are feeding too fast. did you do the extruder speed calibration? ask it to feed 100mm and measure if it give you 100mm?
Here are the parts to also avoid wobbling and picture for example. I have also modified one hole to install the automatic bed leveling following this guy test.
[www.thingiverse.com]
Edited 1 time(s). Last edit at 05/23/2015 12:10PM by Laopa.
|
Re: My first printer Geeetech i3 Pro (review so far) May 24, 2015 07:17AM |
Registered: 9 years ago Posts: 476 |
Quote
Laopa
Hi sarf2K4
Your top Z threaded rod is good like that. be sure the rod never touch the white plastic part when it spin.
my E3D is not center because my direct drive is on the left, opposite as yours. also to avoid the extruder getting out of the bed too far when homing.
Ripple is due to jerk (you can even down it) or speed too high or belt not tight enough.
for direct extrusion the retraction must be ~0.5 to 1.5mm and speed of 300, 4.5mm is good for Bowden.
Better attached your wires on the carriage, or pretty soon your connection will became lose or your contact will be cut.
Gear grinding, if it is not your retraction it may be you are feeding too fast. did you do the extruder speed calibration? ask it to feed 100mm and measure if it give you 100mm?
Here are the parts to also avoid wobbling and picture for example. I have also modified one hole to install the automatic bed leveling following this guy test.
[www.thingiverse.com]
Can I request from you to make it at the center? The mount should be strong enough to support the weight though. Because I already set my nozzle to travel up to about 180mm and that is from edge to edge of the glass (I don't know how to explain). By shifting the nozzle to right that would mean I will lose a bit of print area for x axis.
I don't really tighten the x belt thing because I don't wanna break the acrylic plate. But it is somewhat tight I think only that the x axis belt
When I print something, with left side of the top axis printed, at certain height the wobble occurs again but not as much as before.
I'm unsure what you mean about attach on the carriage though.
It only grinds whenever there is a lot of retraction occurs. But I did calibrate the extruder but not extruder speed calibration, never came into that kind thing as speed calibration.
Currently I ran into problems about the z top axis holder, the hole for the smooth rod, somehow were off and hard for me to get the thing right, so I probably would just shift hole inwards by about 1mm later
edit:
Why don't you just make the surface slightly wide almost as wide like the original mount for the mk8?
Also my z threaded rod bent so badly can be seen in this video link here [www.mediafire.com]
Edited 2 time(s). Last edit at 05/24/2015 08:36AM by sarf2k4.
|
Re: My first printer Geeetech i3 Pro (review so far) May 25, 2015 03:54AM |
Registered: 15 years ago Posts: 40 |
A question on the geeetech extruder. I broke the threaded tube which runs from the extruder gear to the hotend - I tightened the lock nut with a wrench and the thread cracked.
I've made a new one (its just a 30mm length of stainless m6 threaded rod drilled out 4mm to a depth of 27mm with a 2mm hole through the remainder and a PTFE insert - easy to remake in a drill press by clamping the thread in the chuck and holding the bit in a vice (or same idea with lathe). (alternatively they can be found on ebay searching "nozzle throat stainless")
However when disassembling it I didn't pay attention to whether the 2mm hole (ie 'closed' end) is at the top - by the toothed pinchwheel, or at the bottom - in the heater block.
Can anyone tell me which way up it goes? At the moment I've guessed closed end up - as per attached photos - I've looked for instructions/images of makerbot extruders, and can't figure it out.
Cheers
David
Edited 2 time(s). Last edit at 05/25/2015 04:09AM by dgm3333.
Setup: Prusa/Ramps 1.4 running Marlin v1.1.9 firmware. Hosted by XenialPup64 7.5 (Linux) running Repetier-host v2.1.3. Slicing: Cura. Design: OpenSCAD 2018.09.05, Blender, Inkscape. Mesh Repair: Meshlab, Netfab Basic.
I've made a new one (its just a 30mm length of stainless m6 threaded rod drilled out 4mm to a depth of 27mm with a 2mm hole through the remainder and a PTFE insert - easy to remake in a drill press by clamping the thread in the chuck and holding the bit in a vice (or same idea with lathe). (alternatively they can be found on ebay searching "nozzle throat stainless")
However when disassembling it I didn't pay attention to whether the 2mm hole (ie 'closed' end) is at the top - by the toothed pinchwheel, or at the bottom - in the heater block.
Can anyone tell me which way up it goes? At the moment I've guessed closed end up - as per attached photos - I've looked for instructions/images of makerbot extruders, and can't figure it out.


Cheers
David
Edited 2 time(s). Last edit at 05/25/2015 04:09AM by dgm3333.
Setup: Prusa/Ramps 1.4 running Marlin v1.1.9 firmware. Hosted by XenialPup64 7.5 (Linux) running Repetier-host v2.1.3. Slicing: Cura. Design: OpenSCAD 2018.09.05, Blender, Inkscape. Mesh Repair: Meshlab, Netfab Basic.
|
Re: My first printer Geeetech i3 Pro (review so far) May 25, 2015 04:29AM |
Registered: 9 years ago Posts: 476 |
I bought replacement for it last time because I overtightened the one that came with the kit in the end can't be opened anymore, I put it the open end at top then I saw the teflon tube pushed upwards towards the gear and rendered the original one useless. The replacement came however, has open end at the top while close end at the bottom which makes me thinking, which way is the correct one anyway. So I use the one that I bought, close end at the top.
If you can drill it your own, why not try drilling for 2mm hole only without the use of teflon tubing inside? Without teflon you may able to go up beyond 260'c
edit:
@laopa, I still get the wobbling upon reaching certain height, I think I need to replace my z threaded rod
Edited 1 time(s). Last edit at 05/25/2015 08:44PM by sarf2k4.
|
Re: My first printer Geeetech i3 Pro (review so far) May 27, 2015 04:31AM |
Registered: 9 years ago Posts: 476 |
Here is the link to the z axis top bracket, leaving the threaded rod open [www.thingiverse.com]
psu cover for extra safety [www.thingiverse.com]
psu cover for extra safety [www.thingiverse.com]
|
Re: My first printer Geeetech i3 Pro (review so far) May 27, 2015 09:57AM |
Registered: 9 years ago Posts: 55 |
Hi dmg333
The close tub goes to the top and this is why:
your PTFE tub must be just little longer~0.5mm out of the stainless steel threaded rod, like that when you assemble it and tighten on the nozzle, you will have no gap.
If PTFE is too short, so you may have gap inside your assembly, the melted plastic will stay there for very long time, deteriorate and goes piece by piece in your print.
If PTFE is too long, when you tight it, it will reduce in diameter and have to force to feed the filament...not good.
If you not lock it at the top of the thread rod, the PTFE will move up when retract and you will get the first problem.
|
Re: My first printer Geeetech i3 Pro (review so far) May 27, 2015 10:04AM |
Registered: 9 years ago Posts: 55 |
Hi SAF2k4
I will not touch the tread rod, it will not solve your wobble after all you have done, but I will have a look at the smooth rod and the bearings.
In GEEETECH, the bearing are very cheap and often "missing some balls inside". and the smooth rods, who are not stretch rod but grinded.
-You better measure your rod diameter and they must be at 7.98mm minimum. In my first post that was my frst problem, my rods where at 7.94mm.
-when you have your slider bearing on good rod, it cannot spin!!!!!! if it can spin, then you have some play and you cannot control the position.
also cheaper way to try first, use my Z wobble part previous message, if this do not solve, then measure your rods.
good luck
Edited 1 time(s). Last edit at 05/27/2015 10:07AM by Laopa.
|
Re: My first printer Geeetech i3 Pro (review so far) May 27, 2015 08:56PM |
Registered: 9 years ago Posts: 476 |
Quote
Laopa
Hi SAF2k4
I will not touch the tread rod, it will not solve your wobble after all you have done, but I will have a look at the smooth rod and the bearings.
In GEEETECH, the bearing are very cheap and often "missing some balls inside". and the smooth rods, who are not stretch rod but grinded.
-You better measure your rod diameter and they must be at 7.98mm minimum. In my first post that was my frst problem, my rods where at 7.94mm.
-when you have your slider bearing on good rod, it cannot spin!!!!!! if it can spin, then you have some play and you cannot control the position.
also cheaper way to try first, use my Z wobble part previous message, if this do not solve, then measure your rods.
good luck
I didn't see to your solution about z wobble except cutting it shorter than the bracket, mine already excluded the threaded rod hole. I'm sorry I can be a bit of hard headed, I actually can confirm that the wobble really occurs upon reaching certain height and beyond, because I'm able to see the belt on the x carriage are rocking back and forth at upper layer compared to lower, initial layers around 30mm and below. I will try to take photo of some prints about the thing.
Also I ran out of abs and now going for pla, one trivial thing is the bed, I fire it up at 70'c, I had to set marlin offsets to z-0.8 then I'm able to see the initial layer of the plastic on the bed, is this normal?
My pla is black and the wobble are not so visible due to black colour, hiding those wobble edges
Also after printing something last night, on top flat surface I can see the surface somehow showing something like square bubble as if it is ready to be popped, the bond and infill structure also can be seen. It is a fully closed top wall but the squared structure of the infill can be seen. I wonder if this is normal, I printed it with 225'c/70'c for extruder/bed. I probably should go lower.
Edited 1 time(s). Last edit at 05/27/2015 09:00PM by sarf2k4.
|
Re: My first printer Geeetech i3 Pro (review so far) May 28, 2015 11:03AM |
Registered: 9 years ago Posts: 55 |
Hi
Look up I have a post with " Z Anti wobble support". Those parts remove the connection from thread rods and the rest of the machine. Have a picture.
Sorry but I never try PLA, but as all plastic I would try first a parts going up and changing the temperature down every 5 layers to find my material temp.
You have some tips on Internet about temperature control parts. cube 1 wall 20x20 but with hight of 100mm. And modify code to change temperature.
|
Re: My first printer Geeetech i3 Pro (review so far) May 29, 2015 04:19AM |
Registered: 9 years ago Posts: 476 |
Quote
Laopa
Hi
Look up I have a post with " Z Anti wobble support". Those parts remove the connection from thread rods and the rest of the machine. Have a picture.
Sorry but I never try PLA, but as all plastic I would try first a parts going up and changing the temperature down every 5 layers to find my material temp.
You have some tips on Internet about temperature control parts. cube 1 wall 20x20 but with hight of 100mm. And modify code to change temperature.
I bought an m8 threaded rod earlier for cheap, yesterday one of the storekeeper gave me wrong saying it is m8 but when I got home it is actually an m10.
I will try switching it with the one I bought hopefully will fit. I bought m10 for usd4 with cutting service of 30cm each while m8 I got around usd2 same length. Both I can get up to 6 of them. I asked for lower price for m8 since one of the storekeeper from yesterday gave me wrong one and the manager agreed to it
I will try with the temp calibration later after I'm done with switching the threaded rod then calibration again
|
Re: My first printer Geeetech i3 Pro (review so far) May 29, 2015 12:43PM |
Registered: 9 years ago Posts: 4 |
Please help diagnose my Geeetech printing problem. I have attached 2 photos. The first is before cutting the threaded rods short, the other is after. There are still a fair amount of jagged edges, however it has improved. I have slowed down acceleration, and jerk. I also printed with various extrusion rates and with a layer height of both .24 and .12 . It is always the same result. You can see moire on the second phot that is in the first, but it is just not as visible because the rough edges are hiding it.


|
Re: My first printer Geeetech i3 Pro (review so far) May 30, 2015 09:25AM |
Registered: 9 years ago Posts: 55 |
Hi dhmclean
If you cut the rods, and still have that, then you have some play else where.
Tighten the belts x and y
The smooth rods must be well fixed, cannot move or rotate. look for all 6 of them. Me I have used some tooth pick to lock them at each extremities.
Also for the belts, they have this Blacked aluminum U, be sure that your beltS to dot touch the sharp edges. Better round all the sharp edges where the belt passes.
If you want good prints, you better sure you have nice movement of your axes and no play.
One more important thing, grease the threaded rod and move up/down few times.
Also your glass heat bed have springs supports, tight them at 70%, to avoid the bed vibrate at each curves.
If you check the comments up, be sure you fix the rod correctly with the motors, only insert the 8mm and tight strong.
Send pics of your machine if still have problems.
Edited 1 time(s). Last edit at 05/30/2015 09:29AM by Laopa.
|
Re: My first printer Geeetech i3 Pro (review so far) May 31, 2015 02:59AM |
Registered: 9 years ago Posts: 476 |
Somehow, after I tried to switch the m8 thread rod I bought which has different pitch, and I put the original threaded rod again. When I was detaching the threaded rod I had slight problem at the bottom side where it got hard to spin except to use a pliers. When I put it again I turn it upside down, it can be twisted much easier without problem then I printed the temp calibration object, surprised to see that I don't have nay z wobble issue anymore
It turned out to be that one end of the threaded rod really got bent. Now I got no problem with z wobble, only with the initial layer problem when printing pla because the platform tend to warp at around 0.1mm and had to play a bit with the home offset for z axis
@dhmclean
Are you sure that you used the correct layer height with your threaded rod size? If you are using an m8 thread rod paired with 0.24mm, that is not an optimal layer can be seen here [prusaprinters.org]. Because 0.24mm I think are suitable for something like imperial type threaded rod, not metric based
|
Re: My first printer Geeetech i3 Pro (review so far) June 01, 2015 01:32AM |
Registered: 9 years ago Posts: 55 |
|
Re: My first printer Geeetech i3 Pro (review so far) June 01, 2015 01:07PM |
Registered: 9 years ago Posts: 4 |
Quote
sarf2k4
@dhmclean
Are you sure that you used the correct layer height with your threaded rod size? If you are using an m8 thread rod paired with 0.24mm, that is not an optimal layer can be seen here [prusaprinters.org]. Because 0.24mm I think are suitable for something like imperial type threaded rod, not metric based
Thanks for the link. I didn't realize there were optimal layer heights for different lead screws. I will try it out tonight.
|
Re: My first printer Geeetech i3 Pro (review so far) June 01, 2015 09:25PM |
Registered: 9 years ago Posts: 476 |
Quote
Laopa
HI Sarf2K4
Good you finaly solve that.
I just Wonder who can sell you a Rod with Inch thread
But somehow it is an M8 thread rod, I wonder why It didn't fit on the existing... erm... rounded brass nut? I think I better find another that thing 'brass nut' whatever it is called.
But I opened the other end of the threaded rod, on top of it with the parts that I created last time. Even tried to have a stress print of a vase 8h 30m, turned out to be great only that starting to get somewhat roughy edges on the holes, it's a voronoi style vase, I guess that is normal as well and here is the pictures, [imgur.com] the smaller one is a hair clip I tried to print it at 0.05mm took me 2 hours and I am unsure about that horizontal artifact there, somehow it occurs on that particular layer only
Another thing is I get the wall shrinked right after few layers then it became normal afterwards, Probably due to drastic cooling because this printer is directly below my living room ceiling fan. I think I'm going to design a hinge/mount for cardboard/corroplast to make a chamber for it, I'm unsure how I'm going to do that yet
I also think that I'm going to design a geeetech carriage compatible extruder mount for groove style, possibly the j-head and e3d hot end types but based on the original, sits at the center and I will extend the plastic only, I will be modelling it based on your groove mount @laopa
edit 1
I still somewhat having slight problems with bed heating until 70'c for pla, bed are not perfectly leveled because the initial layer are inconsistent, furthermore, I did put some glue stick, the first 2 layer of glue stick made the bed flat as they were 110'c during my bed leveling calibration, then after several prints, it literally lifted by about 0.1-0.4mm and I am playing with z-home offsets here. Then I put on some glue stick at the center since it is the main area of the prints, somewhat the left side has a good initial layer thickness, while the right side didn't, about 0.05mm only as well as the center of the platform. The reason I put glue stick is to make the object sticks better because without it the pla would curl nonetheless.
edit 2
I am thinking of getting a gt2560 to replace my current very limited feature sanguino because the g2560 also has the same power input connector as sanguino, this should ease the assembly and required cable even more. I think I'm going to buy from geeetech as well, quite cheap for $40, I already got some other thing such as drv8825 and full graphic too, would it be a good thing @laopa?
edit 3
I don't know how should I go with the flow rate calibration, I tried from solidoodle and set it to 0.56 for wall and 0.4mm layer height, turn out to be the layers are not aligned together and I can't get a good reading at it, I wonder if I could just use an electronic scale and do some kind of weight? But I don't think that would help alot since different plastic has different densities. I am using 0.4mm nozzle
Edited 3 time(s). Last edit at 06/01/2015 10:45PM by sarf2k4.
|
Re: My first printer Geeetech i3 Pro (review so far) June 02, 2015 06:52AM |
Registered: 9 years ago Posts: 55 |
Hi sarf2K4
For 1st, I sometime use pad to print at the bottom, mean you design full circle of diameter 20mm, and when you place your object, you placce beside the object this pads as much as you want. This will increase your bed contact surface and they will be the first one to lift if problems. And when they start, you can place glue under.
For PLA I never used so no much help sorry. but one thing sure, No Wind for abs. Even running arround the machine.
2nd, I use a lot arduino 2560 because they are very strong and you still have empty port, so later you can place led to see better your print, or double extruder....
For the DRV8825' it will help you to smooth your curves, only if you have sharp angles or corners. But no use for the Z. One thing is good to know, when you design part, make it 2 times bigger, when you convert it in STL, it will convert all the curve in straight lines. And when you want print, reduce 50%. All this small lines help for the smoothing.
For the flow rate, [www.thingiverse.com]
And temperature [www.thingiverse.com]
Edited 1 time(s). Last edit at 06/02/2015 08:49AM by Laopa.
|
Re: My first printer Geeetech i3 Pro (review so far) June 02, 2015 09:51PM |
Registered: 9 years ago Posts: 476 |
I don't really understand much from the flow rate calibration explanation there, because he somewhat uses skeinforge and some jargons
I don't really prefer to use lots of software though
I also would think that I don't wanna print in pla anymore or I think I'm going to have pla as something like printing a parts and test whether if it fits or not. I printed a direwolf with tail support, it broke when I remove the supports, the legs I mean.
I am almost done with creating a stock geeetech compatible groove mount adapter paired with mk8 extruder, it's also compatible with yours @laopa, only some minor tweaks to strengthen the mount. It is however at the center, I just flip it following from your design, also need to tweak the mounting holes left
Here is the all metal j-head I bought, also the ptfe hose is 3mm and fit right through the heat break, I think I can't really use this with 1.75mm filament but I got spare teflon tube I salvaged from the previous broken hotend though. I think also going to buy original e3d after I switched to gt 2560 board, like you said, a lot of expansion, I got spare lcd lying around which sangui can't use
I'm also going to design another groove mount that should be compatible with the stock geeetech mk8 mount. The only thing is it's not centered, I have to slowly measure it without dismantling my hot end to avoid another bed leveling process again. This is to make it easier without printing more parts, or make another carriage based on yours that has 2 mounting points.
Here is the centered e3d or j-head mount that I copied from your design [www.thingiverse.com]. As of now I'm not going to change into these until I change to gt2560 and original e3d v6. I am going to make another design as well that would be compatible with the original geeetech extruder mount without much modicifactions
Update:
I did flow calibration with self supervision especially the layer height and other thing by using cura, now my flow rate is 80% and it gives me a very fine print when I tried to print some fine detail that I modeled back in January. However I am unsure why but probably this is common, the bottom first layer that should stick to the support somewhat quite rough and produce holes as a result, some part however I think curled. I didn't monitor it cause printing it overnight at 0.1mm with 30mm speed. I think it has to do with retraction I try again with raft and 0.5mm retract
Also the rear y motor mount acrylic somehwat bent. I noticed the bent and I somehow gets worried about the bent though, the center part I think bent inwards by about 2-5mm, unsure about the exact bent length, is this still safe or should I loosen the y belt?
I kept forgetting what I wanted to say and ended up editing a lot. Another thing is, rarely that the x axis bearing (I think) made some kind of whistle noise. Is that due to lack of lube or what and can I use it with silicone lube or it has to be a bearing lube? (I have bearing lube probably 6 years already unsure if still usable, used to lube my rc car bearings)
Edited 5 time(s). Last edit at 06/04/2015 02:48AM by sarf2k4.
I don't really prefer to use lots of software though
I also would think that I don't wanna print in pla anymore or I think I'm going to have pla as something like printing a parts and test whether if it fits or not. I printed a direwolf with tail support, it broke when I remove the supports, the legs I mean.
I am almost done with creating a stock geeetech compatible groove mount adapter paired with mk8 extruder, it's also compatible with yours @laopa, only some minor tweaks to strengthen the mount. It is however at the center, I just flip it following from your design, also need to tweak the mounting holes left
Here is the all metal j-head I bought, also the ptfe hose is 3mm and fit right through the heat break, I think I can't really use this with 1.75mm filament but I got spare teflon tube I salvaged from the previous broken hotend though. I think also going to buy original e3d after I switched to gt 2560 board, like you said, a lot of expansion, I got spare lcd lying around which sangui can't use

I'm also going to design another groove mount that should be compatible with the stock geeetech mk8 mount. The only thing is it's not centered, I have to slowly measure it without dismantling my hot end to avoid another bed leveling process again
. This is to make it easier without printing more parts, or make another carriage based on yours that has 2 mounting points.Here is the centered e3d or j-head mount that I copied from your design [www.thingiverse.com]. As of now I'm not going to change into these until I change to gt2560 and original e3d v6. I am going to make another design as well that would be compatible with the original geeetech extruder mount without much modicifactions
Update:
I did flow calibration with self supervision especially the layer height and other thing by using cura, now my flow rate is 80% and it gives me a very fine print when I tried to print some fine detail that I modeled back in January. However I am unsure why but probably this is common, the bottom first layer that should stick to the support somewhat quite rough and produce holes as a result, some part however I think curled. I didn't monitor it cause printing it overnight at 0.1mm with 30mm speed. I think it has to do with retraction I try again with raft and 0.5mm retract
Also the rear y motor mount acrylic somehwat bent. I noticed the bent and I somehow gets worried about the bent though, the center part I think bent inwards by about 2-5mm, unsure about the exact bent length, is this still safe or should I loosen the y belt?
I kept forgetting what I wanted to say and ended up editing a lot. Another thing is, rarely that the x axis bearing (I think) made some kind of whistle noise. Is that due to lack of lube or what and can I use it with silicone lube or it has to be a bearing lube? (I have bearing lube probably 6 years already unsure if still usable, used to lube my rc car bearings)
Edited 5 time(s). Last edit at 06/04/2015 02:48AM by sarf2k4.
|
"Extruder switched off. MINTEMP triggered !" June 06, 2015 12:39AM |
Registered: 8 years ago Posts: 1 |
Hello I see you have a number of posts so I presume you are well beyond this issue but how did you fix the ""Extruder switched off. MINTEMP triggered !" concern? I have the same controller board now but my printer kit is not yet assembled so I've not yet used it. I did read that there is a setting in Marlin where I'll need to have a minimum temperature reached or the extruder will not be allowed to "turned on" to feed filament. It makes sense or the motor could not force the filament through the extruder. Was that the issue in your case or was it an actual issue with the GT2560? Any advice would be appreciated as I am reading all I can trying to avoid issues in advance.
|
Re: My first printer Geeetech i3 Pro (review so far) June 06, 2015 07:30AM |
Registered: 9 years ago Posts: 55 |
Hi
This error message can be because your thermistor is short circuit, open or read wrong value
Remove the thermistor from heater nozle, to be sure the sensor legs not touching other things.
ChecK wires, connections, pins....
And read temperature again
Also check in marlin if your thermistor is the correct one, try all of them in case.
If you have multimeter measure unplug the resistor of this last one.
|
Re: "Extruder switched off. MINTEMP triggered !" June 06, 2015 07:39AM |
Registered: 9 years ago Posts: 476 |
Quote
Cycleguy
Hello I see you have a number of posts so I presume you are well beyond this issue but how did you fix the ""Extruder switched off. MINTEMP triggered !" concern? I have the same controller board now but my printer kit is not yet assembled so I've not yet used it. I did read that there is a setting in Marlin where I'll need to have a minimum temperature reached or the extruder will not be allowed to "turned on" to feed filament. It makes sense or the motor could not force the filament through the extruder. Was that the issue in your case or was it an actual issue with the GT2560? Any advice would be appreciated as I am reading all I can trying to avoid issues in advance.
You need to have your hot end thermistor connector in order for you to fire up your hot end and make sure you connected your thermistor into the correct port. If you're just checking the board if it's alive or not, this is also a part of marlin safety feature
|
Re: My first printer Geeetech i3 Pro (review so far) June 10, 2015 01:36PM |
Registered: 10 years ago Posts: 444 |
I see that these Geetech i3 units are acrylic frame. Does anyone have experience on if they will warp or crack?
Also, is the SD card ribbon cable routed near other things which may cause interference? Some printers put the SD card directly on the controller board so that there is no ribbon cord to collect noise.
Also, is the SD card ribbon cable routed near other things which may cause interference? Some printers put the SD card directly on the controller board so that there is no ribbon cord to collect noise.
|
Re: My first printer Geeetech i3 Pro (review so far) June 10, 2015 08:57PM |
Registered: 9 years ago Posts: 476 |
So far so good on my end despite printing at around whooping 60mm/s producing ripple effect on every edgesQuote
RRuser
I see that these Geetech i3 units are acrylic frame. Does anyone have experience on if they will warp or crack?
Also, is the SD card ribbon cable routed near other things which may cause interference? Some printers put the SD card directly on the controller board so that there is no ribbon cord to collect noise.
I don't think will cause any interference though, the last time I use ramps with full graphic, routed to the left side of the printer (short cable) near the left z motor as well, no problem during print, although the ramps input terminal only lasted for a day before it burnt due to wrong cable used (solid core)


Sorry, only registered users may post in this forum.