Extruder/Mendel
Mechanical: Overview | Mendel solid model files | Procurement | Preparation of materials | Assembly notes | Extruder | X-axis | Z-axis | Y-axis | Circuit boards | Frame | Squaring the axes
Contents
Deprecated: Use the latest Wade's Geared Extruder instead (if possible).
This page describes the standard extruder for RepRap Mendel. There are alternatives Wade's Geared Extruder, Geared Nema17 Extruder Driver and Geared Nema17 Extruder that you may care to look at too.
NOTE: Geared_Nema17_Extruder is a well tested extruder by now, it have more advantages like being easy to build with common tools and it's more powerful. Follow to Geared_Nema17_Extruder to see videos of it working, pictures from users and all the information to build and use it.
Mendel uses a thermoplast extruder based on RepRap's Thermoplast Extruder Version 2.0 (please note in particular how to make the motor grip the filament as smooth motor shafts will not grip the filament sufficiently, without modification). The principle is exactly the same, but a redesign has condensed the RP parts into one component (click here for instructions on how to get hold of RepRapped parts). The rest of this page will deal with the new assembly only.
BOM
Assembly qty: 1
| Name | Qty/assembly | Total Qty | Type |
| Thermal-barrier and nozzle | 1 | 1 | Assembly |
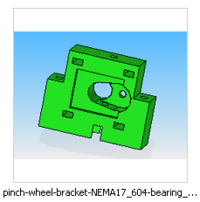
| pinch-wheel-bracket-NEMA17_604-bearing_1off.par | 1 | 1 | RP |
| m3-capx25.par | 4 | 4 | Fastener |
| m3-washer.par | 4 | 4 | Fastener |
| 624-bearing.par | 1 | 1 | Bearing |
| m4-nylock.par | 1 | 1 | Fastener |
| m4-washer.par | 5 | 5 | Fastener |
| m4x16-cap.par | 1 | 1 | Fastener |
| m4x40-cap.par | 2 | 2 | Fastener |
| stepper-motor-nema17-fl42sth47-1684A-01.par | 1 | 1 | Motor |
| stripboard | 1 | 1 | Electronics |
| ~4cm heatshrink | 1 | 1 | Electronics |
| 6-ohm length fibreglass-insulated nichrome wire | 1 | 1 | Electronics |
| 200mm 4-way ribbon cable | 1 | 1 | Electronics |
| bootlace ferrule or crimp | 2 | 2 | Electronics |
| Thermistor | 1 | 1 | Electronics |
| 4-way Pin-Header | 2 | 2 | Electronics |
Thermal-barrier and nozzle
These are the only parts of RepRap that need to be machined. The DXF files for these drawings created by the free QCad CAD system are in the folder mendel/mechanics/solid-models/extruders/pinch-wheel of your RepRap download.
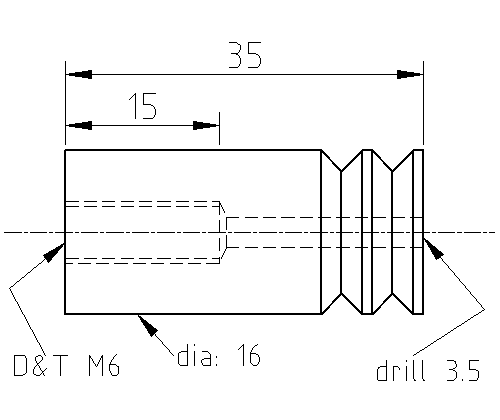
Here are the dimensions of the thermal barrier. Do not add the grooves on the top of the barrel if you use Wade's Geared Extruder! It is made from 16mm diameter unfilled PTFE (Teflon) rod Teflon physical properties. Filled Teflon, especially carbon-filled PTFE has higher heat conductivity than unfilled Teflon and may be undesirable as thermal barrier.
If you don't have access to a lathe, you can try this method
Start by facing off the ends. Then touch a centre drill on, and follow it right through with a 3.5 mm drill. Use a woodpecker cycle to clear the swarf.
Next mark 15 mm from the tip of a 5 mm drill with a fine felt-tipped pen (the tapping drill for M6), and drill to your mark.
Now mark 15 mm from the end of an M6 bottoming tap, turn off the power to your lathe, and put the tap in the tail stock. Turning the chuck by hand, cut the M6 thread to your mark.
The valleys cut in the end of the thermal barrier need to cover slightly less than the top 10mm of its length. They are just there to key into some glue, and so don't need to be very precise, nor do you need exactly two. I have made them perfectly well by putting the cylinder in the chuck of a Black and Decker drill and then just running a triangular file against it.
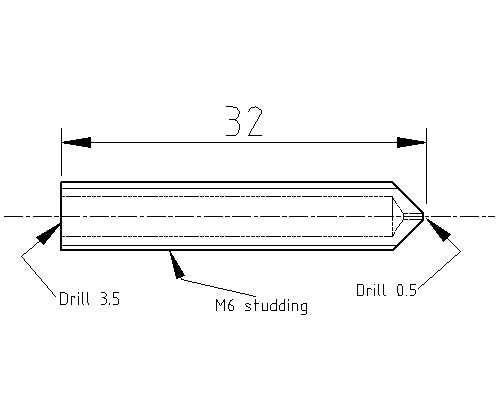
This is the barrel. It is made from M6-threaded brass rod (or an M6 brass screw with the head cut off).
This next step is a lot easier if done with a lathe. Though if you don't have access to one, you can drill the rod all the way through with a 3.5mm dia drill on a drill press and vice, then drill a 0.5mm dia hole into a dome nut, be sure you use a centre drill first to make sure everything stays concentric/true.
Start by facing off the ends. Then touch a very small centre drill on. Drill the 0.5 mm hole for the nozzle about 3 mm deep. Go slowly and carefully, and withdraw the drill frequently to clear the swarf. An 0.5 mm drill is very fragile.
Next turn and clamp the cross-slide at 45o and turn the connical end. Take it far enough to get rid of the mark left by the centre drill and to take away a bit of the 0.5 mm hole. You will probably find that the 0.5 mm hole closes up - clear it by hand with the 0.5 mm drill held in a small hand chuck.
Holding both in your hands, offer up a 3.5 mm drill beside the brass. Get its pointed end about 2 mm from the tip of the cone you turned, and move it about so that it is as near the tip as possible while still leaving a bit of brass to hold the tip on. Mark where the other end of the brass comes with the felt-tipped pen, and once more drill to your mark. The 0.5 mm hole you made should meet up with the 3.5 mm hole, but you may again need to clear it using the 0.5 mm drill by hand.
RP parts
Gluing and wiring
The PTFE thermal barrier is attached to the reprapped part with epoxy glue. Any strong epoxy will do; Araldite rapid is good.
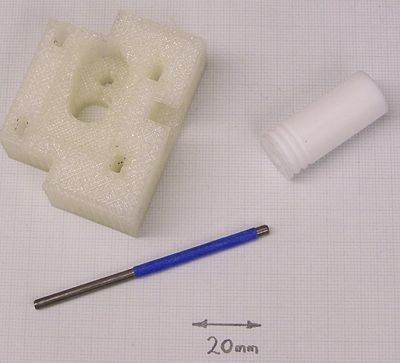
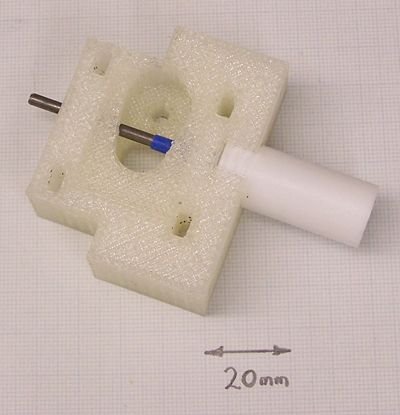
You will need a 3.5 mm diameter rod to put down the holes to exclude the glue and get everything central. I didn't have a 3.5 mm rod, so I made one from 3 mm rod and some Scotch tape (blue in the picture).
Put a very small amount of silicone grease on the rod to stop the glue sticking to it and offer up the parts together. Set up some blocks so you can stand the assembly with the thermal barrier pointing vertically upwards for the glue to set.
Mix up the glue, take out the thermal barrier, and paint the glue round the walls of the reprapped part with a small screwdriver. Take care not to get glue on the flat bottom of the hole.
Paint the glue round the valleys in the thermal barrier, and assemble the parts. If you twist the thermal barrier round on the rod that runs through it this will help the glue to spread. Add more glue if there are gaps - you will find that if you add it at the hole in the side, then twist the thermal barrier a bit, that will entrain the glue and move it between the two parts.
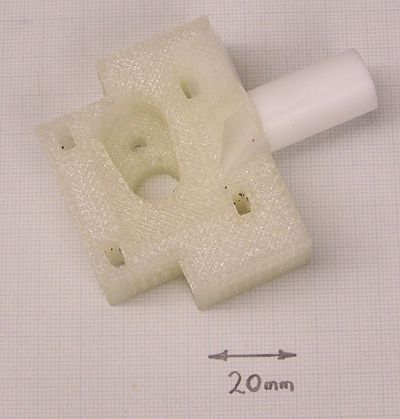
Put a piece of tape over the hole in the side.
Stand the device with the thermal barrier pointing upwards for the glue to set.
When the glue is rubbery, but not fully set, pull out the rod. Run a 3.5 mm drill down the hole by hand to clear away any glue that has got in.
Cut a 6-ohm length of fibreglass-insulated nichrome wire and bare the ends.
Cut a 200 mm length of 4-way ribbon cable and bare the four wires at one of its ends. Bare one pair by about 15 mm the other pair by about 5 mm.
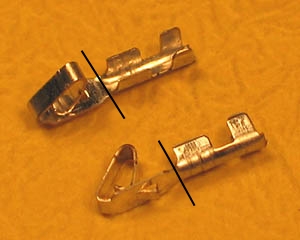
Below is another method instead of using bootlace ferrules, which may be difficult to find, and is just one example of such a crimp. Chop off the end of a header crimp marked in black.
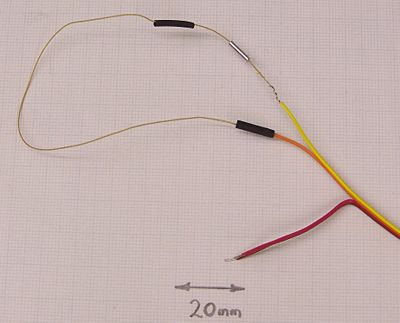
Twist one of the long bare ends onto one end of the nichrome wire, and secure it by crushing a bootlace ferrule on it, or any header connector crimp can be modified instead of a ferrule. You shouldn't solder the nichrome wire connections because:
- Solder doesn't wet nichrome wire; you can use high-temperature solder, but you will need a very hot soldering iron, and
- The nichrome wire will get too hot for a soldered connection during normal use and may eventually fail.
Put heatshrink over the bootlace ferrule or crimp.
Now do the other end identically. Think carefully about what order and orientation to put the bootlace ferrule and heatshrink on before you twist the wires...
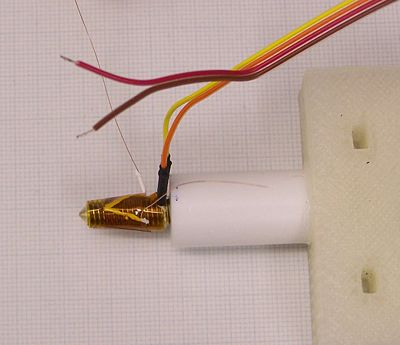
Carefully wrap a few thicknesses of PTFE plumber's tape round the brass barrel where it will screw into the PTFE cylinder to improve the fit and seal. Screw the barrel into the PTFE tightly, but don't go so tight that you damage the PTFE - remember it is soft.
Cut a 20 mm length of 10mm-wide Kapton tape and tack it to the side of the bench so you can pick it up easily.
Wind the nichrome wire onto the brass in the valleys of the threads. Start at the PTFE end, run a length straight towards the tip, then wind round and round back to the PTFE covering the straight piece you just laid.
Wrap the Kapton tape on to hold the coils you've made.
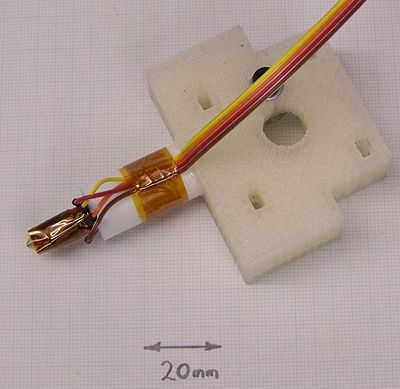
Cut a couple of 5mm lengths of Kapton tape and fold them over the leads to the temperature-sensor. Then use more Kapton tape to attach the sensor near the tip of the nozzle. Make sure the sensor itself is touching the brass of the barrel.
Cut two short lengths of heatshrink and put them on the other pair of ribbon cable wires. Solder those wires to the temperature sensor leads, and then put the heatshrink over the joints. Have the leads sticking out sideways outside the wound tape to keep these joints cool.
Wind more layers of Kapton tape on to secure everything and to give a bit of thermal insulation.
Attach the ribbon cable to the PTFE with a final length of Kapton tape.
Assembly
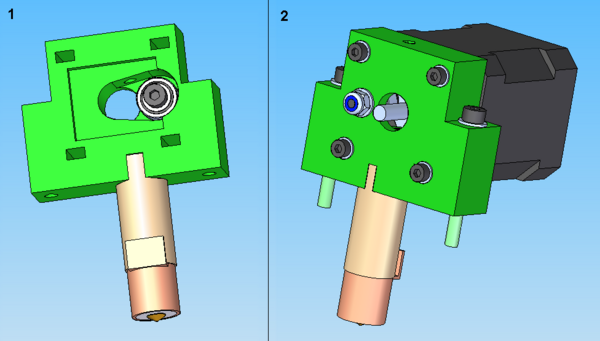
- Secure bearing using M4x16 cap, and glue nozzle assembly into pinch wheel bracket. Follow Thermoplast Extruder Version 2.0 documentation for gluing procedure. Note images below show the prior version of the heater which had a wide cover over it.
- Loosely attach motor. Motor wires should run upwards. Set distance between motor shaft and bearing to 2.5 mm – use the round shank of a 2.5 mm drill bit poked down the filament hole as a spacer. Lock motor into position. Load M4x40 caps for ready for next step.
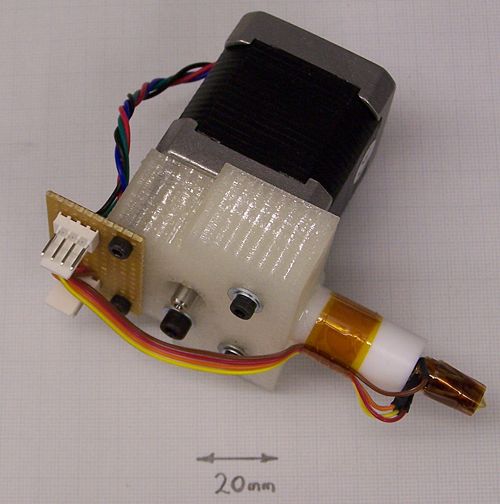
A neat way to make the electrical connections is to cut a piece of stripboard the same width as the top of the reprapped part of the extruder. Put two 4-way pin headers on it and use one for the motor connections, and one for the heater and temperature sensor.
Secure the stripboard using the top two motor-holding screws. Use no washers, otherwise the threads won't be long enough to attach the motor securely.
For the bottom two screws, you can use an M4 washer under an M3 one as shown - this will help spread the load on the reprapped part and reduce distortion.
Back to Mendel mechanical construction root.
