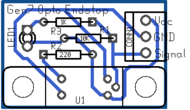
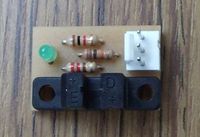
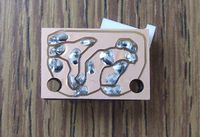
Gen7 Endstop 1.1
Gen7 Endstop History -- Gen7 Endstop is part of Generation 7 Electronics
Gen7 Endstop
Release status: working
| Description | Part of Generation 7 Electronics
|
| License | GPL v2
|
| Author | |
| Contributors | |
| Based-on | [[]]
|
| Categories | |
| CAD Models | |
| External Link | (none)
|
| |
Gen7 Endstop has moved This page shows Gen7 Endstop up to year 2015. Documentation has moved since then to RepRap DIY. |
Contents
How to get it
PCBs
Get Gen7 Endstop PCBs from Traumflug.
As Gen7 is designed to be manufactured on a RepRap, you can make PCBs yourself, of course. How to do this on a RepRap or a general milling machine is described later on this page.
Yet another way is to purchase from one of the many houses specialized in manufacturing prototype PCBs. Gen7 Endstops are single sided, so this won't cost a fortune.
Electronic components
Get Gen7 Endstop Components Kits from Traumflug.
If you want to assemble the collection yourself, see the #Parts List section.
Parts List
| Name | Count | Designations | Remarks |
|---|---|---|---|
| Resistor 220 Ohms | 1 | R1 | |
| Resistor 1 kOhms | 1 | R3 | |
| Resistor 10 kOhms | 1 | R3 | |
| LED 3 mm Red | 1 | LED1 | |
| Photointerrupter H21LOB | 1 | U1 | "end of life", no vendor known, you might have luck at ebay. |
| Molex KK100 3 Pin Header | 1 | CONN1 | Reichelt are tested to be fully compatible with Molex |
| Cable Connector for the above | 1 | ||
| Crimp Contact for the above | 3 |
Assembly Instructions
- To find out which components to put where, have the layout on your PC screen available.
- PCBs fabricated with Voronoi paths need more heat, so raise your soldering iron's temperature by about 20 deg Celsius.
- Start with the flattest parts, usually wire bridges or resistors. This way, components won't fall out when you lay the PCB on it's front for soldering. Then continue with parts of raising height, connectors are usually among the last ones.
- To ease soldering jumper headers and similar components, put a small drop of cyanacrylate glue onto the component side before inserting them. As the PCB is single-sided, this won't hurt the solder point.
Opto Endstop
- Take care to not overheat the photo sensor. Solder one pin on each side, then make a pause of a minute before continueing.
- As LEDs have to be inserted the right way, they have legs of different length. The longer leg (+) goes into the hole closer to the photo sensor, the shorter one (-) into the hole closer to the border.
Setup
TBD


