Mechanical Endstop
Vitamin
| A category of endstops commonly used in 3D printers. | |
| Wikipedia | Micro Switch |
Contents
Overview
The basic job of an endstop is to detect when an axis has reached a minimum or maximum bound.
A mechanical endstop is the simplest type of endstop: a simple mechanical switch positioned to trigger when a RepRap's axis reaches the end/start of its motion.
RepRap's Cartesian printers and many other 3D printers all move the printer head (axis) relative to a start position. The endstop provides the firmware with an indication of where an origin point is located. The homing cycle of a printer uses the endstops to locate the origin of each axis.
| A printer may have two endstops in the same axis to identify the other end. Most implementations only use one and the other is computed from the dimensions of the axis. |
Mechanical switches are less complicated to implement and cheaper than optical endstops because they do not require a circuit board and only use 2 wires for connecting the switch. Pull up and down resistors can be put close to the main board. You can use contact switches and contact-less (usually magnetically actuated) mechanical switches. Contact-less magnetic switches are called reed switches. They are proximity switches that close (or switch over) if a magnet comes close enough (usually 1mm or less) and open if the magnet moves away. Reed switches are used as sensors in home alarm systems to detect open windows and doors.
Reasons to use a mechanical switch
- Switches are the cheapest endstops in most cases.
- No need for opto pcb.
- Simple switches can be used on x and y axis.
- You could even make your own contact switch from a few pieces of metal.
- You get to solder stuff.
Limitations of mechanical switches
- Switches have a limited number of on/off cycles. However, most purpose built micro-switches are rated for well over 1,000,000 cycles and will last years.
- Needs new way to mount switch, which will depend on the switch type.
- The repeatability of the switch is very important for the z axis, and not all switches will work.
Design of an endstop using a limit/micro switch
The basic operation of these endstops is to set the logical state of a pin in the ATmega (or other controller board) to indicate when the bound was reached.
The most common design uses a micro switch (also known as lever switch), but the same design works with reed switches, other SPDT switches and is also very similar when using an opto-interrupter (ex TCST2103).
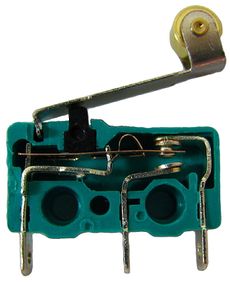
The lever switch is a single pole double throw (SPDT) switch. The switch has a single output pin called the common and labeled as C. When the lever is not pressed the C pin connects to the input pin named normally close usually labeled as NC. When the lever is pressed the C pin connects to the input pin named normally open usually labeled as NO.
The common pin on the switch is attached to an IO pin in the controller, this pin is called the signal. The firmware can select from two types of logic states for this pin. The pin is either HIGH 5V to indicate that the endstop is triggered (this is called Normally Open) or the pin is LOW 0V when the endstop triggers (this is called Normally Closed).
The Normally Closed logic is the one more commonly used and suggested as it provides an additional safety in case of failure.
In the Normally Closed logic the signal pin is kept HIGH 5V to indicate that everything is fine and lowered to LOW 0V when the lever is pressed by setting the common to the ground input in NO. The common is HIGH due to the pull-up resistor connected to the COMMON on the endstop or the internal pull-up resistors in the Arduino. The printer firmware monitors the state of this pin to check if a bound was reached. This configuration is the default for the popular firmware Marlin.
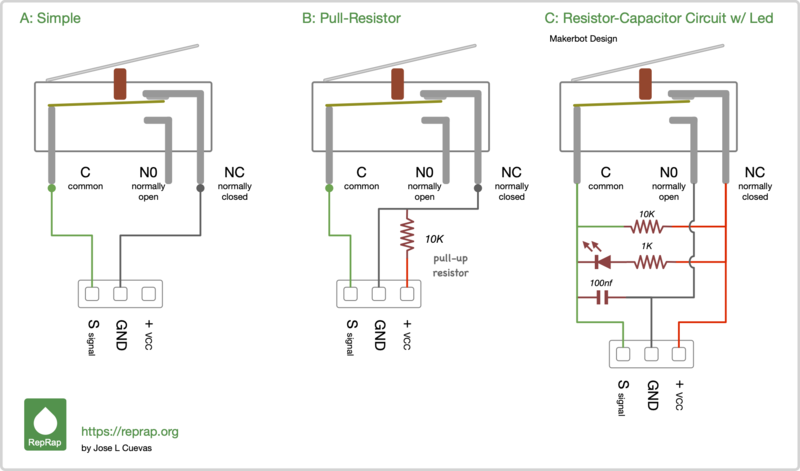
Diagram A, Simple Switch
The diagram A shows a simple design of a switch connected directly to the IO pin and the GND, this design uses the built-in pull-up resistors of the controller. Microcontrollers like the ATmega328P, ATmega2560 and other controller boards have integrated pull-up resistors on some of their inputs pins. Read more about built-in pull-up resistors in the Arduino here.
| In firmwares a setting is available to enable or disable built-in pull-ups, for example in Marlin you have the ENDSTOPPULLUPS constant in configuration.h, this option is enabled by default. |
Diagram B, Switch with Pull-up Resistor
In diagram B a pull-up resistor is added and the built-in resistors of the controller are turned off.
| Marlin: 1. Comment the constant ENDSTOPPULLUPS in configuration.h to disable the built-in pull-up resistors. 2. Change the value of the constants X_MIN_ENDSTOP_INVERTING, Y_MIN_ENDSTOP_INVERTING, Z_MIN_ENDSTOP_INVERTING to true. |
Diagram C, Switch with Led, Resistor-Capacitor and Pull-up Resistor
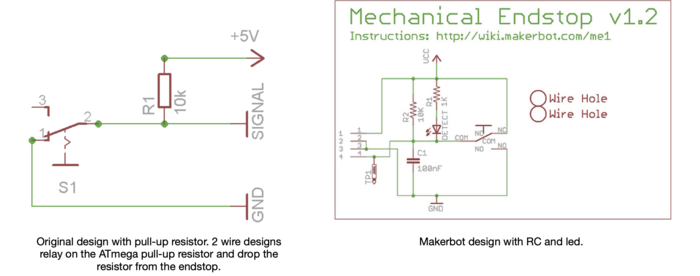
This design is commonly referred as a MakerBot V1.2 Endstop and used by most common pcb mounted endstops you find at online retailers.
This design deals with electrical noise that may cause false triggers by adding a resistor capacitor circuit that acts as a low-pass filter. The RC circuit helps to reduce high frequencies.
Is also common to find a LED that turns on when the switch is pressed.
| Marlin: 1. Comment the constant ENDSTOPPULLUPS in configuration.h to disable the built-in pull-up resistors. 2. Change the value of the constants X_MIN_ENDSTOP_INVERTING, Y_MIN_ENDSTOP_INVERTING, Z_MIN_ENDSTOP_INVERTING to true. |
| Firmwares like Marlin implement mitigation strategies in the software to reduce the effect of electrical noise. |
Wiring Considerations
(Updated 31/MARCH/2021)
The following figures shows common endstop implementations we find today driven by the popularity of certain printers and availability of affordable clones.
| Vendors use arbitrary pinout order. Always check the manufacture's documentation to determine the proper pinouts for an endstop. Using a multimeter you can trace the pin from the micro switch to the connector. If your endstop has a led trace the anode side of the led to find the VCC pin, endstops with using the Makerbot design this pin is connected to the NC. The Signal connection is always attached to the C (common) pin on the switch. |
| Disable the pull-up resistors in your firmware when using an endstop that has a pull-up resistor like the ones using the Makerbot design. |
| Motors are a common source of noise. Keep endstop wiring away from motors or use strategies like twisted cables or or used screened cables to reduce the noise. |
| Check the Ramps 1.4 guide for details on wiring endstops. |
Use GCODE M119 to test you endstops (See more info on M119...).
Marlin
The constant ENDSTOPPULLUPS tells Marlin to set the pin mode to INPUT_PULLUP.
When using a Makerbot endstop comment the constant ENDSTOPPULLUPS in configuration.h to disable the built-in pull-up resistors.
To determine if a switch is open or pressed the firmware will check the state of SIGNAL pin (Arduino pins 3, 14, 18 for RAMPS 1.4 boards) against the opposite value of the constants X_MIN_ENDSTOP_INVERTING, Y_MIN_ENDSTOP_INVERTING, Z_MIN_ENDSTOP_INVERTING. The pseudo code for this logic in Marlin is:
Switch LogicIS_PRESSED = READ(X_MIN_PIN) != X_MIN_ENDSTOP_INVERTING
For example in a Normally Closed circuit the SIGNAL is HIGH when open and LOW when pressed, thus to get the expected result the value of the constant X_MIN_ENDSTOP_INVERTING must be set to true.
When using a Makerbot endstop or an endstop with pull-up resistors change the value of the constants X_MIN_ENDSTOP_INVERTING, Y_MIN_ENDSTOP_INVERTING, Z_MIN_ENDSTOP_INVERTING to true.
Firmware Support
Following is a list of links to information on endstop configuration for some firmware alternatives.
| Firmware |
|---|
| Marlin |
| Smoothieware |
| RepRap Firmware |
| Teacup |
| Klipper |
| Repetier |
| Redeem (Replicape daemon) |
Design schematics
Eagle 5.10.0 light schematic: File:Mechanical endstop wiring schematic.sch
Switch mounting
You need a way to mount the switch on the printer. Feel free to share your solutions and designs here. Modular design encouraged to fit different switches.
Mendel
X axis
The endstop holder from Prusa Mendel works fine. Take care to solder the wires pointing up, to place the holder as far out as possible, and this maximize the build space.
Y axis
...
Z axis
Needs to sit very securely, but still be easy adjustable in small increments. The endstop holder from Prusa Mendel works fine. To simplify design, I suggest a very solid mount even if it is very hard to adjust. It is often easier to set the location of the endstop in firmware than it is to try and move the actual switch around .01 mm at a time!
How to wire a mechanical switch to replace an optical endstop?
| Old content for the replacement of optical endstop switches used in the Generation_3_Electronics/Tech_Zone_Remix designs. |
Opto Endstop v1.0, v2.1 and Tech Zone Remix
How to replace Opto Endstop v1.0, Opto Endstop v2.1 and Tech Zone Remix Endstop which share the same basic design.
Note the Tech Zone Remix Endstops are working the opposite way (normally closed) as the insctructions below, so you need to change either your firmware or the wiring of the switch to compensate.
Interface
Copied from Opto Endstop v1.0#Interface
| Pin | Function |
| +5 | This is the pin to supply +5 volts on. |
| S | This is the signal pin. It will output high (+5) if it is triggered, or low (0v) if it is clear |
| G | This is the ground pin. |
Switch requirements
You want a normally closed (NC) switch. Meaning you need a switch which connects two poles when not triggered. (A single pole double throw (SPDT) switch will work, if you wire up to the NC side of the switch -- ignore the NO pin). Read more at wikipedia.
"what happens if it's unplugged or my pet rabbit chews through the cable?" Design it such that when it's unplugged, it registers as "at the end" rather than "keep going". [1]
For the z axis, high resolution (aka short trigger distance) and high repeatability is needed.
The x and y axis resolution is not that important, unless you home the machine during a print. But you are of course encouraged to use a high quality switch if you can, as it certainly won't hurt.
Switch wiring
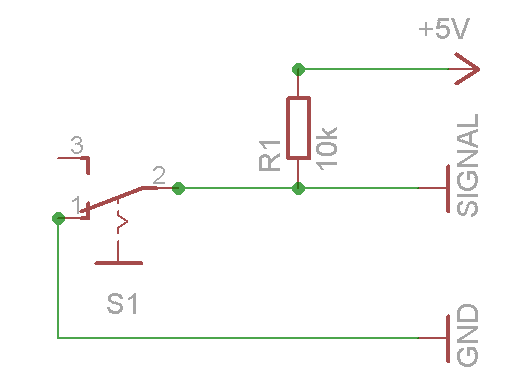
Eagle 5.10.0 light schematic: File:Mechanical endstop wiring schematic.sch
When the switch is off (like in the schematic above), it connects signal to ground. When the switch is triggered, the ground connection is cut and the signal is connected to 5v through the pull up resistor.
Make sure you keep the wires away from the motor leads and / or used screened cable as it is easy to pick up enough noise to get false triggering. [2]
Note: if you use Teacup or Sprinter firmware, then resistor R1 and the connection to 5V are obsolete. The Arduino ATmega has internal pullup resistors which can be turned on in the firmware using the USE_INTERNAL_PULLUPS flag in config.h for Teacup firmware or ENDSTOPPULLUPS in configuration.h for Sprinter and Marlin firmware. Using the internal pullup resistors eliminates the need for external resistors, which simplifies the wiring. If internal pullup resistors are used the switch can simply be connected to the signal and ground pins. Reportedly sometimes the internal pullup resistors have a large tolerance which can in rare cases cause issues. If you are having problems first double check that your wiring is correct and confirm that your firmware is configured correctly before deciding you may have bad internal pullup resistors.
Optional LED
If you want an indicator, you can hook up a LED (and a matching resistor).
