Mendel User Manual: Host Software/de
|
English • العربية • български • català • čeština • Deutsch • Ελληνικά • español • فارسی • français • hrvatski • magyar • italiano • română • 日本語 • 한국어 • lietuvių • Nederlands • norsk • polski • português • русский • Türkçe • українська • 中文(中国大陆) • 中文(台灣) • עברית • azərbaycanca • |
Contents
- 1 Mendel Gebrauchsanleitung: Hostsoftware
- 2 Einführung
- 3 Video von dem, was am Ende und zu Beginn eines Ausdrucks zu tun ist
- 4 Laden von auszudruckenden Objekten, dann Speichern dieser Objekte als G-Codes
- 5 Die Registerkarten der Steuerkonsole
- 5.1 Die Registerkarte Print (Drucken)
- 5.1.1 Load GCode (GCode laden)
- 5.1.2 Load STL (STL-Datei laden)
- 5.1.3 Load RFO (RFO laden) und Save RFO (RFO speichern)
- 5.1.4 Print on GCode RepRap (Drucken auf GCode RepRap)
- 5.1.5 Send GCodes to file (GCodes zu Datei senden)
- 5.1.6 Pause at end of layer (Pause am Ende einer Schicht)
- 5.1.7 Display paths (Pfade anzeigen)
- 5.1.8 Preferences (Einstellungen)
- 5.1.9 Print (Drucken)
- 5.1.10 Pause
- 5.1.11 Stop!
- 5.1.12 Exit (Verlassen)
- 5.1.13 Fortschrittsanzeigen
- 5.2 Die Registerkarte XYZ
- 5.3 Die Extruder-Registerkarten
- 5.1 Die Registerkarte Print (Drucken)
- 6 Alternativen
Mendel Gebrauchsanleitung: Hostsoftware
Einführung
Diese Seite beschreibt die Software des Host-Computers, mit der Du die Dateien der auszudruckenden Teile lädst und die daraus die Dateien erzeugt, die zu einer RepRap Maschine gesendet werden.
Die Host-Software arbeitet in zwei Schritten:
- Laden der auszudruckenden Teile, Erzeugen der RepRap G-Code Anweisungen aus ihnen, und Speichern dieser G-Codes in einer Datei.
- Laden einer erzeugten G-Code Datei und Senden dieser Datei zu einer RepRap Maschine, um sie auszudrucken.
Beide Schritte werden auf dieser Seite beschrieben.
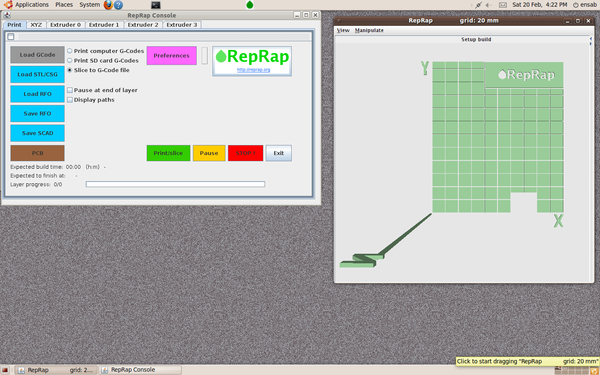
Wenn Du die RepRap Java Software startest, werden zwei Fenster geöffnet. Das eine auf der linken Seite ist eine Konsole, mit der Du die zu druckenden Objekte für den Druck einrichten kannst und mit dem Du die RepRap Maschine auch interaktiv bedienen kannst. Das andere auf der rechten Seit eist eine Planansicht des Druckbetts der Maschine, auf die Du STL-Dateien der Teile laden kannst, die Du herstellen willst, und auf dem Du sie an den gewünschten Stellen positionieren kannst, an der die Maschine sie machen soll.
English translation: This page describes the software on the host computer, you upload the files with the printed parts, and which generates the files that are sent to a RepRap machine.
The host software works in two steps:
   1st Load the printed parts, creating the RepRap G-code instructions from them, and storing these G-codes in a file.
   2nd Loading a generated G-code file and send that file to a RepRap machine to print them.
Both steps are described on this page.
If you start off the RepRap Java software, two windows are open. The one on the left side is a console with which you can set up the objects to be printed for printing and with the RepRap machine, you can also use interactive. The other on the right since eist a plan view of the printing bed of the machine on which you can STL files of parts that you want to produce, and on the can position you to where you want them, where the machine is to make them.
Video von dem, was am Ende und zu Beginn eines Ausdrucks zu tun ist
Hier ist ein Video, das zeigt, wie ein schon hergestellter Ausdruck entladen wird, und wie danach die Dinge für einen neuen Ausdruck eingerichtet werden (einschließlich einer leicht amüsanten Adrian-Konfusion, als der USB-Port noch nicht wieder freigegeben war):
English translation: Here is a video that shows how an already-made expression is unloaded, and then how to set things up for a new expression (including a slightly amusing Adrian confusion, as the USB port was not yet released):
Laden von auszudruckenden Objekten, dann Speichern dieser Objekte als G-Codes
Typischerweise beginnst Du, indem Du auf die blaue Schaltfläche "Load STL" (STL-Datei laden) klickst. Dadurch wird ein Dateiauswahl-Fenster aufgerufen, mit dem Du die STL-Datei, die das herzustellende Ding darstellt, finden und auswählen kannst.
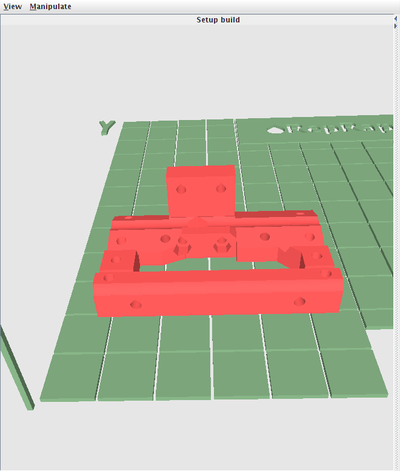
Das Ding wird dann geladen und unten links am Ursprung (des Druckbett-Koordinatensystems) abgelegt. Dann erscheint ein Popup-Fenster (gezeigt), mit dem Du auswählst, wie viele Kopien des Dings gemacht werden sollen und welcher Extruder für seine Herstellung verwendet werden soll. Wähle den Extruder aus, den Du für die Oberfläche des Objekts verwenden willst. (Relating infill and support extruders to surface extruders is described below.)
Du kannst die Ansicht des RepRap Maschinenbetts im rechten Fenster mit der linken Maustaste drehen. Die mittlere Maustaste zoomt die Ansicht, und mit der rechten Maustaste wird sie seitwärts oder nach oben/unten verschoben.
English translation: Typically you start by you (invite STL) file on the blue button "Load STL" button. This is called a file selection window with which you can find the STL file, which is the thing produced, and can choose.
The thing is then loaded and bottom left of the origin (of the bed-pressure coordinate system) is stored. Then a pop-up window (shown) with which you select how many copies of the thing should be done and what should be used for its production extruder. Choose from the extruder, which you want to use for the object's surface. (Relating to surface infill and support extruder extruders is Described below.)
You can view the RepRap machine bed in the right window with the left mouse button rotate. The middle mouse button zooms the view, and with the right mouse button will move sideways or up / down Listen Read phonetically Rate translation
Normalerweise wirst Du das Teil nicht direkt am Ursprung drucken wollen. Wenn Du das Teil mit der linken Maustaste anklickst, ändert es seine Farbe, was darauf hinweist, dass es ausgewählt wurde. Du kannst es dann mit der rechten Maustaste auf dem Druckbett an die Position verschieben, an der es gebaut werden soll. Die Rasterquadrate auf der grünen Basis haben 20 mm Kantenlänge. Du kannst das ausgewählte Objekt in 90o-Schritten um die X- und Y-Koordinatenachsen drehen, indem Du <ctrl> X bzw. <ctrl> Y drückst; mit <ctrl> Z wird es in 45o-Schritten um die Z-Achse gedreht. Die letzte Funktion dient dazu, dass man ein Objekt im 45o-Winkel ausrichten und die Füllung so einrichten kann (siehe gerade Schraffurrichtung und ungerade Schraffurrichtung), dass die Schraffur in X- und Y-Richtung erfolgt. Dadurch wird dasselbe Ergebnis erzeugt wie beim Ausrichten des Objekts anhand der Koordinatenachsen, es reduziert jedoch die von der RepRap-Maschine verbrauchte Energie (denn so wird meistens nur eine statt beider Achsen angetrieben). Außerdem läuft die Maschine ruhiger. Wenn Deine STL-Datei mit zölligen Maßangaben erstellt wurde, kannst Du das ausgewählte Objekt in Millimeter umskalieren, indem Du es mittels <ctrl> I mit 25.4 multipliziert. Zum Löschen des ausgewählten Objekts verwende die Taste <DELETE>.
Zum Abwählen des ausgewählten Objekts klicke mit der linken Maustaste auf irgendeinen anderen Teil des grünen Druckbetts. Dann kannst Du mit der Maus wieder alles auf einmal zoomen, drehen und verschieben.
English translation:
Normally you will not directly part of the original print want. If you click the part with the left mouse button, it changes color, indicating that it was selected. You can do it with the right mouse button on the print bed move to the position at which it is to be built. The grid squares on a green base have 20 mm edge length.
You can use the object selected in 90 o -steps around the X and Y coordinate axes rotate it by pressing X or <ctrl> <ctrl> Y, Z is <ctrl> with it in 45 o -steps around the Z-axis rotated. The last function is so that you can align an object in a 45 o -angle and set the filling so (see just Schraffurrichtung Schraffurrichtung and odd) that the hatching in the X-and Y-direction. This produces the same result as when you align the object on the basis of the coordinate axes, but it reduces the power consumed by the RepRap machine energy (for that is usually only one is driven instead of both axes). In addition, the machine runs more quietly. If your STL file was created with imperial measurements, you can re-scale the selected object in millimeters by multiplying it by you <ctrl> I with 25.4. To delete the selected object using the button <delete>.
To deselect the selected object, click with the left mouse button on any other part of the green pressure bed. Then you can zoom with the mouse again it all at once, rotate and move.
<HR
Gleichzeitiges Ausdrucken von mehreren Objekten
Du kannst mehrere STL Dateien auf einmal drucken, entweder verschiedene Objekte oder mehrere Kopien von einem Objekt. Drücke dazu einfach wieder auf den blauen "Load STL" Taste um das nächste Objekt zu laden. Lass einen Spalt von ca 5mm zwischen den einzelnen Objekten frei.
Falls du mehrere STL Dateien in deiner gewünschten Zusammenstellung geladen hast und du diese Zusammenstellung später erneut benutzen möchtest, kannst du alle Objekte mit Hilfe der "Save RFO" Taste abspeichern. RFO Dateien sind ein Standard RepRap Dateiformat (Hier beschrieben), um Zusammenstellungen von Objekten, die auf der Baufläche des RepRap platziert wurden, abzuspeichern.
Standardmäßig werden Objekte in der Reihenfolge gedruckt in der du sie lädst. Aber wenn du mehrere Objekte lädst ist es manchmal schwierig sich zu merken wie diese Reihenfolge war. Wenn du eins der Objekte auswählst und <ctrl> N (nächstes Teil) drückst, wird das Objekt ausgewählt das als nächstes in der Druckreihnfolge steht. Wenn du beim letzten Objekt <ctrl> N drückt landetes du wieder beim ersten. Wenn kein Objekt ausgewählt ist und <ctrl> N drückt, wird das erste Objekt in der Druckreiehnfolge ausgewählt.
Wenn du die Druckreihenfolge ändern willst, musst du <ctrl> R (reorder) drücken. Dann musst du die Objekte in der Reihenfolge anklicken, in der sie gedruckt werden sollen. Die Objekte werden dann makiert, damit du sehen kannst, welche Objekte du schon angeklickt hast. Nachdem du alle Objekte angeklickt hast wird die Makierung der Objekte wieder aufgehoben. Du kannst nun mit <ctrl> N die neue Reihenfolge überprüfen.
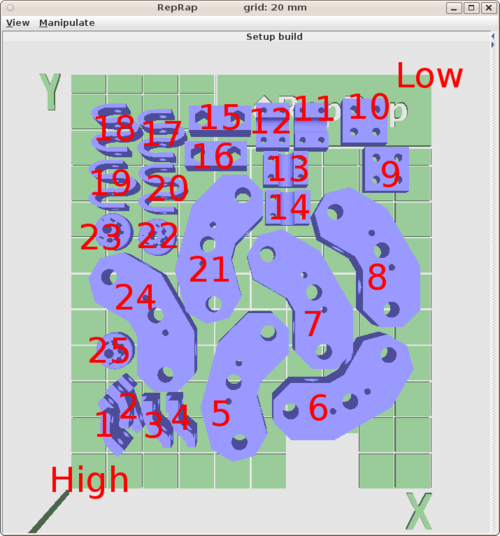
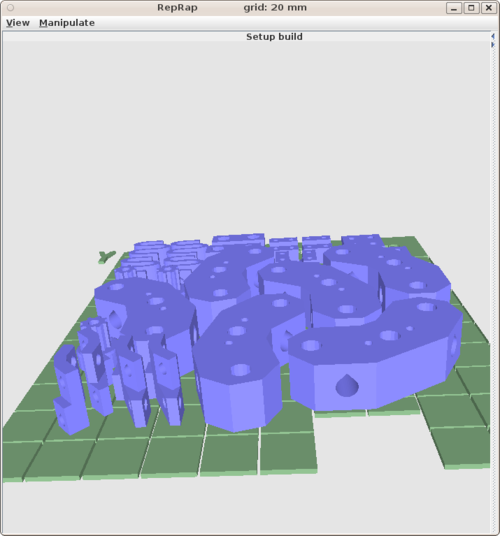
Das rechte Bild zeigt eine gute Anordnung. Ordne die höchsten Objekte nahe am Ursprung an und die niedrigen weiter weg. Erstelle eine Reihenfolge ohne lange Wege zwischen zwei Objekten. Wenn du alle niedrigen dicht beieinander stellst ( Nummer 9 bis 16), wird der Drucker einfach an denen vorbeifahren. Versuche Start- und Endpunkt möglichst nah am Ursprung zu halten um einen schnellen Druck zu gewährleisten.
English translation: You can print multiple STL files at once, either different objects or multiple copies of an object. Simply press again to load on the blue "Load STL" button to the next object. Leave a gap of about 5mm each freely between the objects.
If you've downloaded multiple STL files in your desired combination and use you again later this compilation like, you can see all objects using the "Save RFO" save button. RFO files are a standard RepRap file format (here described), to store collections of objects that were placed on the building area of the RepRap.
By default, objects in the order they are printed in which you invite. But if you invite more than one object, it is sometimes difficult to remember how this order was. If you select one of the objects and <ctrl> N (next part) press, the object is selected, the next is in the Druckreihnfolge. If you are at the last object <ctrl> N pushes you landed back at the first. If no object is selected and press <ctrl> N, the first object is selected in the Druckreiehnfolge.
If you want to change the printing order, you have to press <ctrl> R (reorder). Then you have to click on objects in the order in which they are printed. The objects are then makiert, so you can see what objects you've already clicked. Once you've clicked on all the objects Makierung the objects are deselected. You can now check <ctrl> N with the new order.
The right picture shows a good arrangement. Arrange the highest objects close to the origin of the low and further away. Create a sequence without long distances between two objects. If you are close to each other all the low interface (number 9 to 16), the printer will simply drive past them. Start and end trying to keep as close to the origin in order to ensure a quick pressure.
Du kannst auch eine oder mehrere RFO-Dateien mit der "Load RFO"-Taste laden, einzelne Objekte davon auswählen, diese bewegen oder löschen und andere STL-Dateien dazu laden und sie erneut als RFO-Datei abspeichern.
English translation: You can also load one or more files with the RFO "RFO Load" button, select individual objects of it, delete it or move and invite others to STL files and save them again as RFO file.
Objekte drucken, die aus mehr als einem Material bestehen
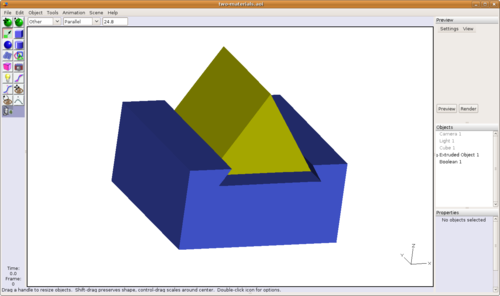
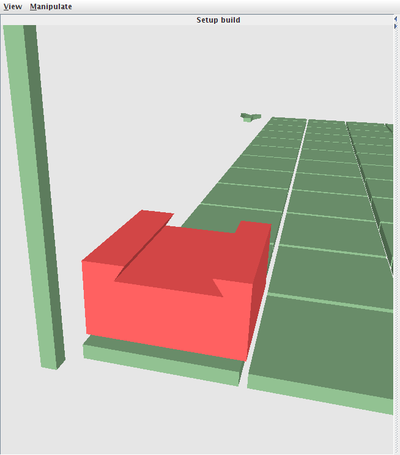
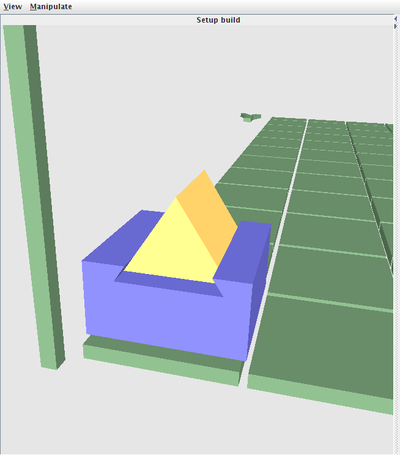
Das Bild zweigt zwei ineinander greifende aber dennoch separate Formen, die in Art of Illusion erstellt wurden. Wenn du die blaue Form am Ursprung, die Gelbe Form richtig relativ positioniert ist und beide jeweils als STL-Datei abspeicherst, kannst du sie nachher in der RepRap Hostsoftware laden ohne die Positionen der beiden Formen anpassen zu müssen. Dann kannst du sich in zwei verschiedenen Materialien (oder beide aus einem Material) drucken. In diesem Fall würde der Schwalbenschwanz dafür sorgen das sich beide Formen ineinander verkeilen.
English translation: The image presents two interrelated but separate forms, which were in Art of Illusion created. If you are the blue form at the origin, the yellow form is correctly positioned relative to each and both as an STL file move from memory you post them later in the RepRap host software without charge to adjust the positions of the two forms have to. Then you can be in two different materials (or both of a material) to print. In this case, the Swallowtail would ensure that both forms wedged into each other.
First load the STL of the shape that is the base or reference object. Choose the material to make it from, then select it (so it changes colour) but leave it at the origin where it was loaded.
Then load the second STL for the second shape and choose its material. It will be positioned in the correct (i.e. designed) position relative to the first, and they will both be locked together in this relative positioning.
If you select the base shape, you can then move the composite object about the build base as one thing to the position where you want to build it.
If you save one or more of these combined objects as an RFO file, they will be re-loaded in the correct orientation and position when you subsequently read that file in.
This facility depends on the CAD system that was used to design the objects recording the X, Y and Z coordinates of the objects that you design actually at the place in the CAD system's coordinate system where you designed them when it writes them as STL files. Beware - not all CAD systems do this.
Füllung (Infill) und Unterstützungsstrukturen
You will see that there are a number of tabs on the console labelled Extruder_n. The RepRap host software is capable of dealing with multiple physical extruders depositing multiple materials. In addition, one physical material may have several logical extruders associated with it. These logical extruders can have different parameters associated with them, so that, for example, one might be used to extrude material-A finely for the surfaces of a part to be printed, another might be used to extrude material-A coarsely for quick solid infill of the part, and a third might extrude material-A in a deliberately weak pattern to form a support for overhangs that can easily be broken away. Alternatively, you can outline in material-A, infill in material-B and support with material-C.
You can change all the many parameters of each extruder by clicking on "Preferences".
In the preferences for each extruder are fields containing the names of two other extruders: InFillMaterialType(name) and SupportMaterialType(name). These are the extruders to use to build infill pattens and support patterns respectively for the material for the extruder that names them. See the description of preferences for full details. To turn infill or support off for a particular material, change the appropriate field to say "null" (without the quotes).
Senden der G-Codes in eine Datei (Speichern)
When you are happy with the layout, select the "Send GCodes to file" option, and then select "Print". This will put up another file-selector window to allow you to specify the G-Code file that you want to save the results in.
If you wish, before selecting "Print" you can select "Display paths". This will open a graphics window that will show the paths that the machine will follow to make each Z-slice of the objects being printed.
You can also select "Pause at end of layer". This pauses the generation of output at the end of each layer to allow you to inspect the slice pattern. Continue/Cancel buttons will be displayed as each layer is about to be written to allow you to continue or to cancel the whole process.
When the GCode file has been written, exit the program with the "Exit" button.
To print your GCode file that you just generated on your RepRap machine, see the next section.
Die Registerkarten der Steuerkonsole
If you are going to control your RepRap machine interactively, or get it to print a pre-computed G-Code file, plug the RepRap machine's USB cable into the computer before starting this host software.
Die Registerkarte Print (Drucken)
Hier ist eine Liste von allen Schaltern im "Print"-tab und deren Funktion.
Load GCode (GCode laden)
To activate this, you will have to select "Print on GCode RepRap" (see below).
If you have created a GCode file (as above, or from elsewhere) this allows you to load it for actual printing on the machine. You will be shown a file selector window to choose your GCode file. When you have specified this, just hit "Print".
Load STL (STL-Datei laden)
Hiermit wählst Du die STL-Dateien aus, die zum Ausdrucken auf das RepRap Druckbett geladen werden sollen, wie oben beschrieben.
Load RFO (RFO laden) und Save RFO (RFO speichern)
These allow the loading, printing, and saving of several multiple-material objects all in one go. (See above.)
Print on GCode RepRap (Drucken auf GCode RepRap)
Select this to put the program in its mode where it sends a pre-computed G-Code file to the RepRap machine to print it. When you select this, the STL and RFO buttons will be greyed-out, as they are not active in this mode.
Send GCodes to file (GCodes zu Datei senden)
Mit dieser Funktion kannst du STL oder RFO Daten laden, und das gesammte "GCode-Programm" zum Drucken des geladenen Teils als Datei abspeichern.
Pause at end of layer (Pause am Ende einer Schicht)
Selecting this check-box will cause the software to pause at the end of each layer it makes from loaded STL or RFO files. At the start of the next layer a small window is displayed to allow you to instruct the software to continue (you can also cancel the build at such points).
This button has no effect when building an object from a GCode file. This is because in general there is no way to tell from the contents of such a file where one layer ends and the next begins. But see the "Pause" button below.
Display paths (Pfade anzeigen)
This opens a small graphics window in which the pattern of each layer is displayed as it is computed and saved to a G-Code file.
Preferences (Einstellungen)
Selecting this will open a tabbed window that will allow you to edit all the many parameters that control the operation of the RepRap machine. These parameters are described here. You can have multiple preferences files, and there is a selector at the top of the preferences window to allow you to flip between them. They are stored in a directory called .reprap in your home directory. Any file in that directory with a name ending in .preferences will be treated as a preferences file. The default is reprap.preferences.
Print (Drucken)
If you have loaded STL files this causes them to be converted to a G Code file and saved. If you have loaded a GCode file, this causes it to be printed on the RepRap machine.
Pause
When the RepRap machine is building something, this causes the machine to pause. The pause doesn't happen instantly as the control signals sent to the machine are held in a short buffer, and the pause button can have no effect until the buffer is exhausted.
The "Pause" button becomes a "Resume" button once the machine has paused.
Stop!
Im Moment tut dieser Schalter exakt das selbe wie "Pause". Wir arbeiten daran um die Maschine in Zukunft bei betätigung sofort zu stoppen.
Exit (Verlassen)
Hiermit wird das Programm verlassen.
Fortschrittsanzeigen
At the bottom of the tab are the name of the file being printed, and a set of build-progress indicators. These give an estimate of the time the build will take, when it will end, and a layer count. There is also a progress bar.
Die Registerkarte XYZ
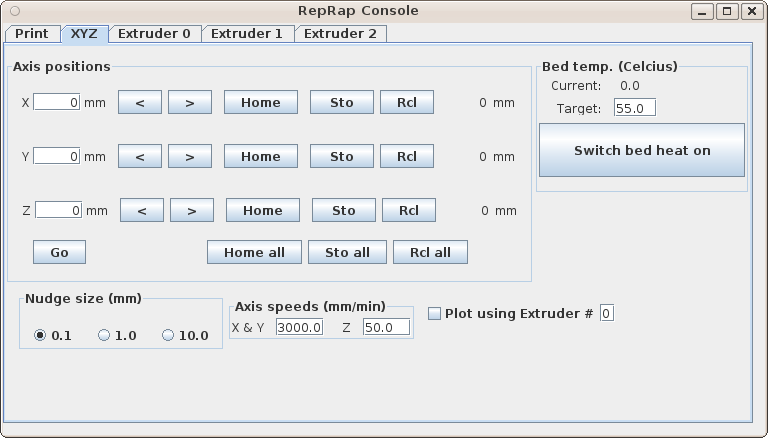
The XYZ tab allows you to move your RepRap machine around directly for testing, experimenting, and servicing.
The three numbers down the left are for you to type coordinates in as a target to go to. Selecting "Go" will then cause the RepRap machine to move to that position.
The arrow keys nudge the axes by the distance specified in the "Nudge size" box at the bottom.
The "Home" buttons cause the corresponding axis to drive to its low-value endstop position and to zero its coordinate. There is also a "Home all" button that homes all three axes at once.
The "Sto" buttons store the current coordinate in the field on the right, and the "Rcl" button recalls that coordinate to become the target for a subsequent click of the "Go" button. This is particularly useful if you are in mid-build and have paused the RepRap machine. You can store the position where the machine paused ("Sto all") then move it about to do things like cleaning the extruder. Finally put it back where it paused ("Rcl all" followed by "Go") then resume the build.
The "Axis speeds" are (I hope) self-explanatory. Note that these only control the axis speeds for the buttons in this tab. When you are saving G-Codes or using them to build an object, the software will use the speeds you set in the preferences file, and ignore the values in these boxes.
If you check the "Plot using extruder" box and subsequently click "Go", the machine will plot the line using the selected extruder rather than just moving.
The heated bed controls are on the right. If you have a heated bed on your RepRap these allow you to set its temperature, to monitor it, and to turn it on and off. The temperature monitoring function only works when you are controlling the machine interactively. When you are printing a G-Code file the temperature is not updated (because the system would have to interleave temperature requests into the stream of G-Codes that it is sending to the machine from the file, which would slow it down).
Note that the target temperature that initially appears in this box is the default one for the bed (defined in the preferences file), and that changing the value in this box does not change the default; also, that default is what will be used for builds (as with speeds above). To change the default, select "Preferences" in the "Print" tab.
Die Extruder-Registerkarten
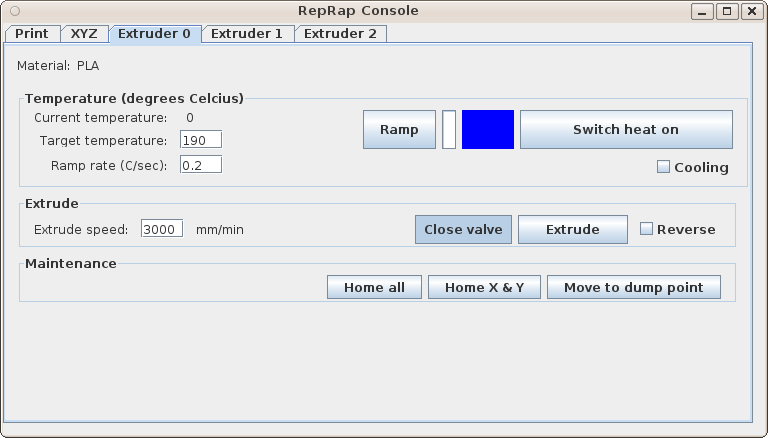
The extruder tabs allow you direct control over the RepRap machine's extruders. The tabs are divided into three sub-panels:
Temperatur
This displays the current temperature of the extruder at the top. This temperature is updated every five seconds or so at all times when the RepRap machine is not transmitting a G-Code file to the machine to build.
The target temperature allows you to set what temperature you want. Note that the temperature that initially appears in this box is the default one for the extruder (defined in the preferences file) and that changing the value in this box does not change the default; also, that default is what will be used for builds (as with speeds above). To change the default, select "Preferences" in the "Print" tab.
Selecting the "Switch heat on" button will turn the extruder's heater on and you should see the temperature start to rise. The same button toggles the heater off. There is a progress bar for the temperature as it increases, and also a coloured panel that goes from blue to red as the extruder passes from a temperature that you can touch to one that you can't...
Selecting the "Ramp" button will cause the extruder's heater to ramp up to the target temperature at a rate set by the "Ramp rate" box. This is useful for such things as curing fire-cement round a newly-constructed extruder by warming it up very slowly.
The temperature monitoring function only works when you are controlling the machine interactively. When you are printing a G-Code file the temperature is not updated (because the system would have to interleave temperature requests into the stream of G-Codes that it is sending to the machine from the file, which would slow it down).
Checking the "Cooling" box will turn the extruder's cooling fan on.
Extrude (Extrudieren)
Selecting the "Extrude" button will turn on the extruder's feed motor (if it has one) for a few seconds at a rate set by the speed box. The rate will be in millimeters of extrudate per minute. Once again, the initial speed is the one in the preferences file, and it is that preferences value that will be used for any actual build, not any number that you put in this box. The box just controls the speed on the "Extrude" button.
Checking the "Reverse" box causes the motor to turn backwards.
The "Close valve" button toggles the extruder's valve open and closed (if it has a valve).
Maintenance (Wartung)
The home buttons are, I think, self-explanatory. The dump point is the notch out of the build base in the machine designed to allow you to extrude material down it to purge the extruder.
Alternativen
There are alternative ways to run your RepRap than the one described on this page. Most notably these are the Skeinforge program, which is a tool chain that takes 3D objects and turns them into GCode files for sending to a RepRap, and ReplicatorG, which is a program for taking GCode files and printing the objects they represent on a RepRap machine.
For minimalist transmission of Gcode files to a RepRap using Linux/Unix machines from the command line, there are gcdump, and gcgen to create Gcode commands for simple RepRap control. These are available as C source or pre-compiled binaries and work well on the OLPC.
