An all metal hot-end design (Lots of Pics)
Posted by SanjayM
|
An all metal hot-end design (Lots of Pics) July 28, 2012 09:37AM |
Registered: 12 years ago Posts: 177 |
We've had a fair bit of interest in our other threads about our hot-end design so here is the promised write up.
This design takes some fairly obvious cues from the RepRapPro and Makerbot MK7 style designs.
Our goals were two-fold:
No PTFE/PEEK
The issue is how you mount this to your standard X-Carriage of a RepRap with quite large cooling fans getting in your way.
Our mounting system is slightly unconventional in that it uses the 50mm spaced screw holes normally used for mounting the extruder to the carriage to also hold the hot-end to the carriage.
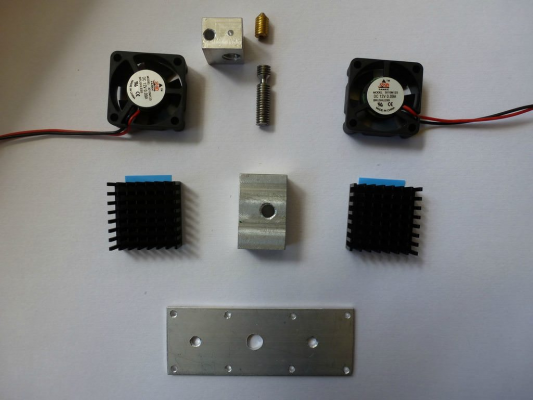
Here is an exploded layout of all the components:
At the bottom we have an aluminium heat-spreader with holes for mounting the heatsinks and 50mm spaced holes for carriage mounting.
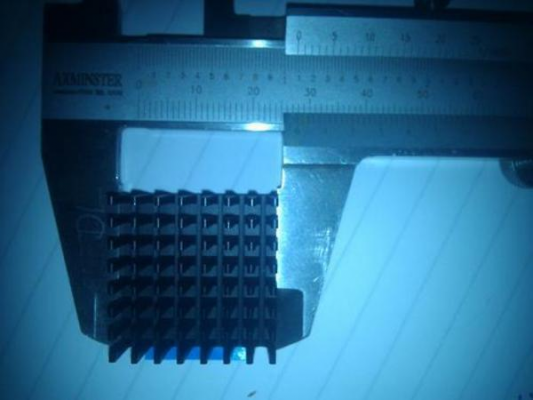
Then there are two 30mm*30mm*12mm standard commodity electronics heatsinks which are mounted to the heatspreader.
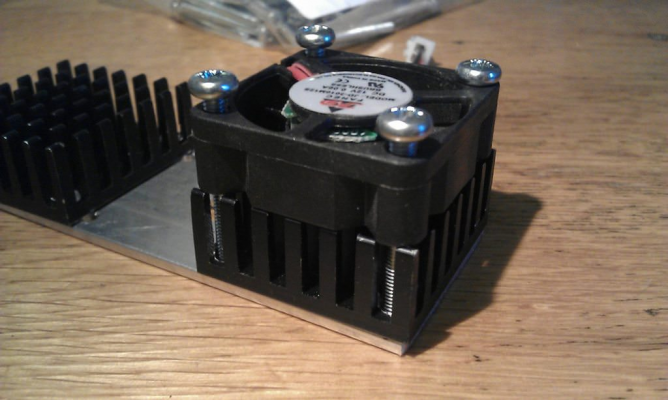
Two small 30mm fans attach above the heatsinks pulling air through them to cool.
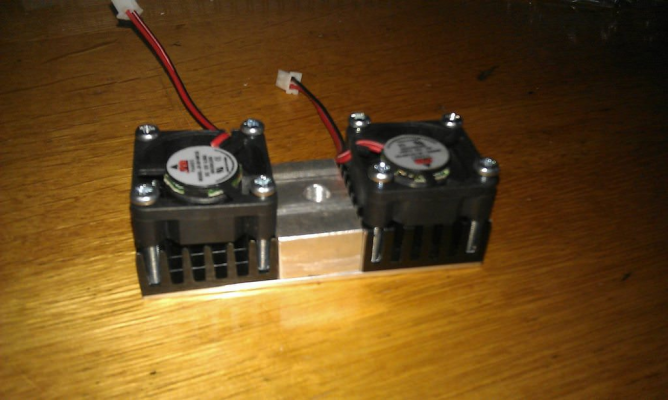
Between the two black heatsinks is an aluminium 'cooler block' (opposite of a heater block) its job is to surround the cold part of the stainless heat-break and transfer heat from it to the heat-spreader/heatsinks.
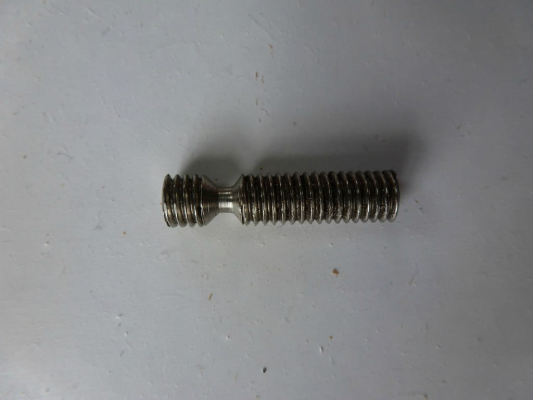
We then have a an M6 stainless heat-break which is nearly identical to a makerbot heatbreak, except ours has a flat face on the hot-end where the makerbot one has a tapered end. We also turn our heatbreaks to a more aggressive 0.3mm wall thickness for better thermal performance. The heatbreak is turned from M6 A2 stainless stud stock.
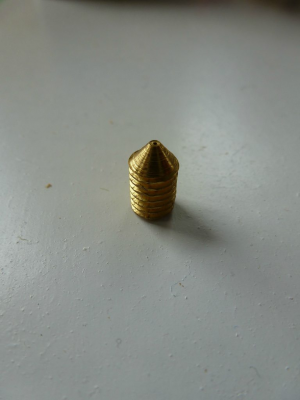
The nozzle is again turned from M6 stock, brass this time (sourced from a brass bolt in this case). After much reading we settled on a 0.4mm orifice, this orifice is 1mm in length - from our experience the diameter as well as the length of the extrusion orifice has a noticeable impact on extrusion properties. This seems to be borne out in other peoples discussions about die-swell/flow rates in J-Head nozzles which have a longer-than-usual orifice length.
The nozzle and the heatbreak are coupled by the heater-block and simply butt against each other. This method is used on the RepRapPro hot-end, it works perfectly but you must tighten the heatbreak/block/nozzle trifecta very tightly whilst the whole assembly is hot. The heatblock is fairly standard with holes to accomodate a 3W Vishay sFernice heater resistor and a D0-35 packaged thermistor. It should be noted however that the hole for the nozzle needs to be offset so that the heaterblock can sit between the fans without touching them.
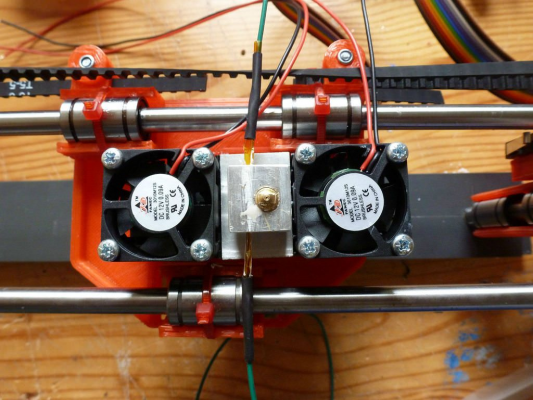
Here it is sitting on a Mendel90 X-Axis Carriage
Our experiences with this design have been very positive.
The heatsinks/spreader/cooler block never get noticeably above room tempurature, this is even when using very high extrusion tempuratures of 240C+ and with a heated bed at full blast underneath. We had some concerns that the hot air coming off the bed would impair the cooling but this does not appear to be the case.
We can extrude 1.75mm PLA (Our main feedstock) at 400mm/m, which is fast enough to lay down thick infil of 0.4mm layer thickness at 100mm/s. Our meltzone is 10mm long which with our 0.4diameter*1mm length orifice gives us basically zero stringing/blobbing with a 1.1mm retraction.
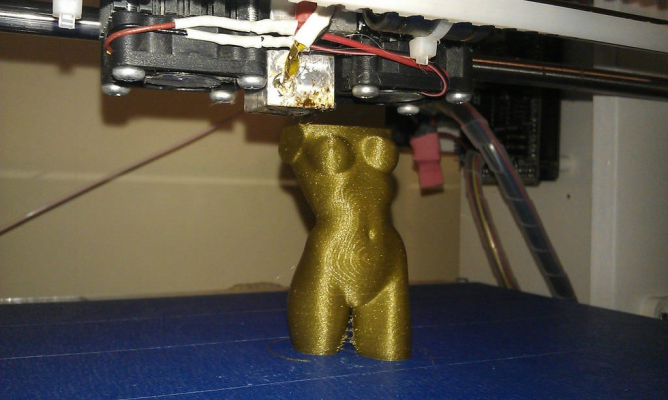
We can also do very high quality prints:
(The stringing on the legs was a result of too high temp, since eliminated. The plastic is a rather nice gold shade from faberdashery that looks quite grainy in the camera but is a lovely golden sheen in the flesh)
We are waiting on a machined 1-piece version of the heatsink/spreader/cooler-block assembly all from 1 piece of aluminium from the local engineering firm. Expect updates!
We are looking to sell these, price would be below £50, but is dependent on quotes from manufacturing firms and quantity, so if you are interested let us know below (no committment, just getting a feel for interest)
We are currently looking to try a 3mm version, which will be essentially identical, but with a 3mm conduit down the heatbreak and nozzle, but are quite busy. If there is demand for it we might be swayed into pushing through the testing of this more quickly.
This design takes some fairly obvious cues from the RepRapPro and Makerbot MK7 style designs.
Our goals were two-fold:
No PTFE/PEEK
- # Limits maximum tempurature - so struggles with higher processing temp thermoplastics like PC
# Degrades if accidentally overheated by a small margin (50C or so)
# Expensive and hard to source
- # The RepRapPro hot-end is designed for use with bowden extruders, and only mounts to the RRP carriage styles
# The makerbot hot-end is part-and-parcel with its direct feed extruder
The issue is how you mount this to your standard X-Carriage of a RepRap with quite large cooling fans getting in your way.
Our mounting system is slightly unconventional in that it uses the 50mm spaced screw holes normally used for mounting the extruder to the carriage to also hold the hot-end to the carriage.
Here is an exploded layout of all the components:
At the bottom we have an aluminium heat-spreader with holes for mounting the heatsinks and 50mm spaced holes for carriage mounting.
Then there are two 30mm*30mm*12mm standard commodity electronics heatsinks which are mounted to the heatspreader.
Two small 30mm fans attach above the heatsinks pulling air through them to cool.
Between the two black heatsinks is an aluminium 'cooler block' (opposite of a heater block) its job is to surround the cold part of the stainless heat-break and transfer heat from it to the heat-spreader/heatsinks.
We then have a an M6 stainless heat-break which is nearly identical to a makerbot heatbreak, except ours has a flat face on the hot-end where the makerbot one has a tapered end. We also turn our heatbreaks to a more aggressive 0.3mm wall thickness for better thermal performance. The heatbreak is turned from M6 A2 stainless stud stock.
The nozzle is again turned from M6 stock, brass this time (sourced from a brass bolt in this case). After much reading we settled on a 0.4mm orifice, this orifice is 1mm in length - from our experience the diameter as well as the length of the extrusion orifice has a noticeable impact on extrusion properties. This seems to be borne out in other peoples discussions about die-swell/flow rates in J-Head nozzles which have a longer-than-usual orifice length.
The nozzle and the heatbreak are coupled by the heater-block and simply butt against each other. This method is used on the RepRapPro hot-end, it works perfectly but you must tighten the heatbreak/block/nozzle trifecta very tightly whilst the whole assembly is hot. The heatblock is fairly standard with holes to accomodate a 3W Vishay sFernice heater resistor and a D0-35 packaged thermistor. It should be noted however that the hole for the nozzle needs to be offset so that the heaterblock can sit between the fans without touching them.
Here it is sitting on a Mendel90 X-Axis Carriage
Our experiences with this design have been very positive.
The heatsinks/spreader/cooler block never get noticeably above room tempurature, this is even when using very high extrusion tempuratures of 240C+ and with a heated bed at full blast underneath. We had some concerns that the hot air coming off the bed would impair the cooling but this does not appear to be the case.
We can extrude 1.75mm PLA (Our main feedstock) at 400mm/m, which is fast enough to lay down thick infil of 0.4mm layer thickness at 100mm/s. Our meltzone is 10mm long which with our 0.4diameter*1mm length orifice gives us basically zero stringing/blobbing with a 1.1mm retraction.
We can also do very high quality prints:
(The stringing on the legs was a result of too high temp, since eliminated. The plastic is a rather nice gold shade from faberdashery that looks quite grainy in the camera but is a lovely golden sheen in the flesh)
We are waiting on a machined 1-piece version of the heatsink/spreader/cooler-block assembly all from 1 piece of aluminium from the local engineering firm. Expect updates!
We are looking to sell these, price would be below £50, but is dependent on quotes from manufacturing firms and quantity, so if you are interested let us know below (no committment, just getting a feel for interest)
We are currently looking to try a 3mm version, which will be essentially identical, but with a 3mm conduit down the heatbreak and nozzle, but are quite busy. If there is demand for it we might be swayed into pushing through the testing of this more quickly.
|
Re: An all metal hot-end design (Lots of Pics) July 28, 2012 11:45AM |
Registered: 14 years ago Posts: 689 |
Interesting, thanks for the write-up. Is the printed parts in ABS or PLA? Would love to see how a 3mm PLA extruder like that would work.
--
-Nudel
Blog with RepRap Comic
--
-Nudel
Blog with RepRap Comic
|
Re: An all metal hot-end design (Lots of Pics) July 28, 2012 05:34PM |
Registered: 13 years ago Posts: 248 |
Hi guys,
Interesting design. Some questions:
Did you test it with just one fan and then decide it would need two fans or just presume it would need two fans?
What diameter hold have you in the stainless insulator? (probably 2mm) Did you find this a challenge to drill straight through that length of stainless? How did you do the drilling?
Looks like you are using a probe heater. What wattage is that heater? Did you try this design with a resistor heater? (I would expect the resistor heater might not product enough heat to keep up with the loss through the stainless.
You went to a very narrow neck on the stainless. This is good to reduce heat loss through the insulator but can weaken the shaft. Did your experimentation conclude that you needed to reduce this neck to .3mm? Had you tried this extruder with a thicker neck?
I'd like to see some video of it in action at some stage.
Tks,
NumberSix
[numbersixreprap.blogspot.com]
|
Re: An all metal hot-end design (Lots of Pics) July 28, 2012 08:50PM |
Registered: 12 years ago Posts: 177 |
Initially I did a fair bit of maths to determine the required heatsinking and decided on a single 40mm fan which we did manage to accommodate with a custom milled aluminium carriage design to which a 40mm heatsink and fan mounted directly.
This obviously wasn't practical for use as a generic reprap hotend but we are still running it successfully on a prototype printer. The calculations were borne out well in testing, so we decided to stick with that dissipation level.
2*30mm heatsinks and fan equates roughly to a single 40mm fan and heatsink in terms of surface area, but can be arranged to fit under a standard reprap x-carriage. As an additional bonus it provides much more even cooling to the print itself over a single fan which cools one half of the print more than the other, resulting in uneven quality.
So in summary, no we have not tested with one fan, but the use of 2 fans is based on calculation/experience and not assumption or blind guessing.
The drilling of the stainless heartbreak is done to 2mm internal diameter. I did mine on a manual lathe with a good quality titanium nitride coated drill bit. A good sharp bit is necessary, as the internal finish of the 2mm hole must be quite smooth to reduce friction. We found normal HSS drill bits inadequate in this respect, they become blunt before even managing to drill a single heatbreak. With a lathe and a good drill bit is is not a challenging job, we think using a cobalt bit would make things even quicker and easier.
We are not using a heater cartridge or probe heater of any sort, just a normal resistor heater. In this case a vishay sfernice 3w 5.1ohm resistor which we find the most reliable brand. We do not struggle to reach temperatures at all, heat loss via conductance up the heatbreak is much lower than you might expect, stainless steel is a surprisingly effective insulator with regards to heat.
We have tried thicker necks on the heat break, up to around 0.5mm wall thickness, they work just fine really. We simply found that if you are going to the hassle of turning a stainless heartbreak it takes only 90 seconds more work to make it a much better 0.3mm wall thickness. They are still more than strong enough to take the torque from tightening them very securely, we haven't managed to break one by accident yet.
We will get some video up asap.
|
Re: An all metal hot-end design (Lots of Pics) July 28, 2012 10:19PM |
Registered: 13 years ago Posts: 128 |
|
Re: An all metal hot-end design (Lots of Pics) July 29, 2012 03:31AM |
Admin Registered: 17 years ago Posts: 7,879 |
Which direction do the fans blow?
I think most people do the first layer with the fan off but you would need to have them on. Do you get any problems getting the first layer to stick? Have you tried it with ABS?
[www.hydraraptor.blogspot.com]
I think most people do the first layer with the fan off but you would need to have them on. Do you get any problems getting the first layer to stick? Have you tried it with ABS?
[www.hydraraptor.blogspot.com]
|
Re: An all metal hot-end design (Lots of Pics) July 29, 2012 05:03AM |
Registered: 12 years ago Posts: 177 |
The fans do indeed bow towards the bed.
We have contemplated reversing them to push air into the heatsinks, but this is obviously less efficient.
We don't have any sticking issues, we print PLA on hot blue tape (overkill, but we don't mind the prising off, and like the extra sticking).
We've printed ABS on:
Kapton, (Some lifting of corners),
Kapton+ABSJuice (Less lifting, adhesive on kapton fails and pulls away from bed. Part still stuck well to kapton)
Glass+ABSJuice (No lifting, parts very hard to remove from bed - not tested extensively)
We don't print a whole lot of ABS, and I put a lot of our warping issues down to the heated bed not being able to hit more than about 105C during printing due to PSU constraints. We can however preheat the bed to 130C with an cardboard insulator over the top so it's nice and hot for the first later.
So in summary, from our limited experience, yes we can get ABS to stick without much issue, - It does warp a bit depending on bed surface, but I think this has a lot to do with our bed as opposed to the hot end.
I'll try a more challenging ABS print and report back.
|
Re: An all metal hot-end design (Lots of Pics) July 29, 2012 05:46AM |
Registered: 13 years ago Posts: 1,918 |
Actually I can't see, why you need two fans.
If your "heatbreak" is 3 mm long and your OD is 2.6 mm and ID is 2 mm the heat transport should be 1.8 Joule/sec (lamda=15 for stainless steel). Why in the world do you need 2 fans in order to eliminate 1.8 Watts?
Btw if you still find them necessary, I would think about replacing them by a peltier. In that case you avoid the airstream towards the bed. At eb*y you will find peltiers at the same price a northbridge cooler costs. And I guess you only need one of them.
Last week I experimented with a steel barrel. Retracting the filament and letting it cool down I had jams. Don't you have such?
|
Re: An all metal hot-end design (Lots of Pics) July 29, 2012 06:26AM |
Registered: 11 years ago Posts: 1,277 |
|
Re: An all metal hot-end design (Lots of Pics) July 29, 2012 08:28AM |
Registered: 12 years ago Posts: 177 |
@Theodleif
The break is around 2mm in length, I seem to remember getting about 3w or so as the number. - But your point still stands.
Its not something I really have a satisfactory answer for, but the reality is that the heatsinks are lukewarm or so when printing, about body temperature (I really need to get an IR thermometer....). Hence the unwillingness to half the cooling.
Two theories spring to mind:
A) The heat of the sinks is merely a product of the ambient air being pulled through them - and the heatsinks are catching heat from the heatbed etc which is taking them up to this temperature. - If this is the case then the extra fan may be superfluous as we can obviously never cool below ambient.
 The heater-block and cooler block are very tight together, only 4mm or so, and that gap is not getting much airflow, there is a good chance that some radiation/convection is playing a part in taking heat from the hot side to the cold side.
-- I will try testing with the bed turned off and see what the sinks feel like then, I will also try and assemble a hot end which has only 1 fan and one heatsink.
My concern is for uneven cooling, which we experienced in a previous prototype with 1x40mm fan, half the model is cooled and the other is not, resulting in quite uneven print quality.
We don't have any trouble with retraction/cooling leading to jamming. I have just tried to make this happen by running filament into the hot-end untill it extrudes, then retracting it so the 'molten tip' of the filament is in the cold side, giving it a minute or two to cool and set, then running it back into the hot end. No troubles, no jam, not even a noticeble increase is force needed to extrude by hand.
What steps did you do that caused a jam? If you tell me what you did I will copy and see if I can reproduce a jam with those conditions.
@Dark Alchemist
From what I read the difference is negligible at best, do you have a source on that? The rationale behind it is that we like the cooling effect of the air hitting the print, it helps with overhangs/bridges etc.
Edited 1 time(s). Last edit at 07/29/2012 08:29AM by SanjayM.
The break is around 2mm in length, I seem to remember getting about 3w or so as the number. - But your point still stands.
Its not something I really have a satisfactory answer for, but the reality is that the heatsinks are lukewarm or so when printing, about body temperature (I really need to get an IR thermometer....). Hence the unwillingness to half the cooling.
Two theories spring to mind:
A) The heat of the sinks is merely a product of the ambient air being pulled through them - and the heatsinks are catching heat from the heatbed etc which is taking them up to this temperature. - If this is the case then the extra fan may be superfluous as we can obviously never cool below ambient.
 The heater-block and cooler block are very tight together, only 4mm or so, and that gap is not getting much airflow, there is a good chance that some radiation/convection is playing a part in taking heat from the hot side to the cold side.
-- I will try testing with the bed turned off and see what the sinks feel like then, I will also try and assemble a hot end which has only 1 fan and one heatsink.
My concern is for uneven cooling, which we experienced in a previous prototype with 1x40mm fan, half the model is cooled and the other is not, resulting in quite uneven print quality.
We don't have any trouble with retraction/cooling leading to jamming. I have just tried to make this happen by running filament into the hot-end untill it extrudes, then retracting it so the 'molten tip' of the filament is in the cold side, giving it a minute or two to cool and set, then running it back into the hot end. No troubles, no jam, not even a noticeble increase is force needed to extrude by hand.
What steps did you do that caused a jam? If you tell me what you did I will copy and see if I can reproduce a jam with those conditions.
@Dark Alchemist
From what I read the difference is negligible at best, do you have a source on that? The rationale behind it is that we like the cooling effect of the air hitting the print, it helps with overhangs/bridges etc.
Edited 1 time(s). Last edit at 07/29/2012 08:29AM by SanjayM.
|
Re: An all metal hot-end design (Lots of Pics) July 29, 2012 09:33AM |
Registered: 11 years ago Posts: 1,277 |
SanjayM Wrote:
-------------------------------------------------------
> @Dark Alchemist
> From what I read the difference is negligible at
> best, do you have a source on that? The rationale
> behind it is that we like the cooling effect of
> the air hitting the print, it helps with
> overhangs/bridges etc.
Ahhh, so those heatsinks are actually facing the printhead/print? If that is the case then you have a dual purpose so don't muck with it but I do know in the PC world it depends heavily on your heatsink. Most blow through the heatsink and in tests I have seen most times, but not all of the time, blowing allows for slightly greater CPU speed than does a suck method unless the heatsink was made for sucking instead of blowing. Only one I know of that did that (heatsink was specially made) was Akasa
|
Re: An all metal hot-end design (Lots of Pics) July 29, 2012 12:46PM |
Registered: 13 years ago Posts: 615 |
|
Re: An all metal hot-end design (Lots of Pics) July 29, 2012 05:49PM |
Registered: 12 years ago Posts: 313 |
Have you seen the Arcol V4 all metal hot-end? That one also has a heat break machined from stainless steel but a lot longer and with thinner walls, so it works fine with much smaller heat sink.
I have had some problems getting really good layer adhesion above 50 or 60 mm from the heat bed when printing thin walled parts with ABS and PC. The print cools too much that far up, and the filament being laid down won't fuse properly. If I had fans blowing at the print all the time, these problems would probably be much more severe.
I have had some problems getting really good layer adhesion above 50 or 60 mm from the heat bed when printing thin walled parts with ABS and PC. The print cools too much that far up, and the filament being laid down won't fuse properly. If I had fans blowing at the print all the time, these problems would probably be much more severe.
|
Re: An all metal hot-end design (Lots of Pics) July 29, 2012 07:12PM |
Registered: 13 years ago Posts: 248 |
Hi Sanjay,
Thanks for all the additional info. I took another look at your pictures and indeed it's a resistor heater, not a cartridge. I mistakenly saw the hole for the resistor as the protruding end of a cartridge. It was an illusion.
It's great that you are spelling out your thinking behind your design, and willing to take observations and feedback on board.
From my own experimentation in stainless insulators I think one of the keys to success is the quality of the finish on the inside of the stainless tube. This should not be under estimated. I've drilled some stainless tubes with limited home equipment and have found them to jam after cooling and reheating. I've attributed this jamming to poor surface finish on the inside of the tube (no PTFE lining being a specific goal in these experiments.)
I've also experimented a lot with the use and timing of air cooling of the printed piece (PLA specifically). I print on a heated bed/glass-mirror surface, recently PVA coated. I have found that having the work fan cooling from the very start of the print job is not a good idea as it a) robs the print bed surface of heat, and b) cools the first printed layer too much, both leading to poor work adhesion. This is directly in comparison to the exact same set-up and only switching the work focused cooling fan on after the first few mm have been printed. The the decision to use of work focused cooling is quite dependent on the shape and size of what you are printing also, in my view. e.g. If you had a delicate piece with lots of overhangs you may desire more cooling, and specific cooling on bridging also. But on a large, regular shaped piece, little cooling is needed.
My insulator (currently PEEK, but aluminium/stainless in the past) cooling fan is on 100% of the time. Since you are integrating the work and insulator cooling into one, always-on dual-fan set, you will not be able to control the work cooling independently of the insulator cooling. I'm not sure this is a good idea. One possible solutions might be to be able to control the fan direction. They can cool the heat-sinks when air flows in either direction (we can debate which direction cools better), so when you are first printing you suck air up, then when you want to cool the work you blow air down! Just a wacky suggestion!
Finally, I'm not sure how well your 30mm wide plate will fit in a 'standard' Greg variant X-carriages out there. There's only a 28mm gap between the linear bearing mountings. You are testing on a Mendel90 x-carriage which has wider x-rod spacing. (Edit: I've just realised you may be designing specifically for the Mendel90, in which case you design parameters may not include the narrower x-carriages, which is ok if you are aiming at that market only.)
Regards,
NumberSix
Edited 1 time(s). Last edit at 07/29/2012 07:16PM by NumberSix.
[numbersixreprap.blogspot.com]
Thanks for all the additional info. I took another look at your pictures and indeed it's a resistor heater, not a cartridge. I mistakenly saw the hole for the resistor as the protruding end of a cartridge. It was an illusion.
It's great that you are spelling out your thinking behind your design, and willing to take observations and feedback on board.
From my own experimentation in stainless insulators I think one of the keys to success is the quality of the finish on the inside of the stainless tube. This should not be under estimated. I've drilled some stainless tubes with limited home equipment and have found them to jam after cooling and reheating. I've attributed this jamming to poor surface finish on the inside of the tube (no PTFE lining being a specific goal in these experiments.)
I've also experimented a lot with the use and timing of air cooling of the printed piece (PLA specifically). I print on a heated bed/glass-mirror surface, recently PVA coated. I have found that having the work fan cooling from the very start of the print job is not a good idea as it a) robs the print bed surface of heat, and b) cools the first printed layer too much, both leading to poor work adhesion. This is directly in comparison to the exact same set-up and only switching the work focused cooling fan on after the first few mm have been printed. The the decision to use of work focused cooling is quite dependent on the shape and size of what you are printing also, in my view. e.g. If you had a delicate piece with lots of overhangs you may desire more cooling, and specific cooling on bridging also. But on a large, regular shaped piece, little cooling is needed.
My insulator (currently PEEK, but aluminium/stainless in the past) cooling fan is on 100% of the time. Since you are integrating the work and insulator cooling into one, always-on dual-fan set, you will not be able to control the work cooling independently of the insulator cooling. I'm not sure this is a good idea. One possible solutions might be to be able to control the fan direction. They can cool the heat-sinks when air flows in either direction (we can debate which direction cools better), so when you are first printing you suck air up, then when you want to cool the work you blow air down! Just a wacky suggestion!

Finally, I'm not sure how well your 30mm wide plate will fit in a 'standard' Greg variant X-carriages out there. There's only a 28mm gap between the linear bearing mountings. You are testing on a Mendel90 x-carriage which has wider x-rod spacing. (Edit: I've just realised you may be designing specifically for the Mendel90, in which case you design parameters may not include the narrower x-carriages, which is ok if you are aiming at that market only.)
Regards,
NumberSix
Edited 1 time(s). Last edit at 07/29/2012 07:16PM by NumberSix.
[numbersixreprap.blogspot.com]
|
Re: An all metal hot-end design (Lots of Pics) July 29, 2012 07:45PM |
Registered: 12 years ago Posts: 177 |
Hi NumberSix,
Totally agree on the internal finish of the heat barrier, it is vital that it is smooth for the plastic in its 'rubbery' state to slip past. Also we find that the shorter the transition the lower the extrusion force, (less amount of 'rubbbery' filament sticking to the walls). We are looking at getting the heatbreaks reamed internally to a better finish to reduce friction.
I like the idea of a reversing fan. The fans we use are brushless and as such do not reverse with reverse polarity, which is unfortunte. I will cogitate on ways to make the fans/airflow reverse/be deflected in some way.
We have contemplated a more 'upright' design with the fan pointing sideways. This sacrifices some Z height, but is better with regards to airflow hitting the print.
As for the heatsink/plate, we get away with it just, with careful heatsink selection!
|
Re: An all metal hot-end design (Lots of Pics) July 29, 2012 09:48PM |
Registered: 11 years ago Posts: 1,277 |
I like it but how would we make the fans spin backwards? Simply reversing the voltage to the fans only works with permanent magnet motors from the limited testing I did a few years back.Quote
NumberSix
One possible solutions might be to be able to control the fan direction. They can cool the heat-sinks when air flows in either direction (we can debate which direction cools better), so when you are first printing you suck air up, then when you want to cool the work you blow air down! Just a wacky suggestion!
|
Re: An all metal hot-end design (Lots of Pics) July 30, 2012 05:13AM |
Registered: 13 years ago Posts: 248 |
Ok... I'll put my hand up on that fan reversing suggestion! I don't know how you could reverse the modern fan. I didn't test that one! 
[numbersixreprap.blogspot.com]

[numbersixreprap.blogspot.com]
|
Re: An all metal hot-end design (Lots of Pics) July 30, 2012 02:51PM |
Registered: 12 years ago Posts: 177 |
NumberSix,
Here's your video, complete with commentary.
[www.youtube.com]
Theodleif, and others,
Thanks for the feedback, we've been to the engineering firm, had a chat, we've come up with a more compact, single fan cooled, fan not aimed at bed design that we are quite pleased with. It makes everything cheaper, simpler, and lighter too.
Putting one together ASAP for testing. Pictures to follow. We think you'll like this one!
|
Re: An all metal hot-end design (Lots of Pics) July 30, 2012 02:58PM |
Registered: 11 years ago Posts: 1,277 |
SanjayM Wrote:
-------------------------------------------------------
> NumberSix,
>
> Here's your video, complete with commentary.
>
> [www.youtube.com]
>
> Theodleif, and others,
>
> Thanks for the feedback, we've been to the
> engineering firm, had a chat, we've come up with a
> more compact, single fan cooled, fan not aimed at
> bed design that we are quite pleased with. It
> makes everything cheaper, simpler, and lighter
> too.
>
> Putting one together ASAP for testing. Pictures to
> follow. We think you'll like this one!
WOOHOO, congrats. Yeah, I don't know enough about the hot bed situation to comment on that so I just said to not muck with it but that cooling part I knew wasn't quite right. Either case I look forward to your next design being made public because I honestly like it and will most likely use it in my build.
|
Re: An all metal hot-end design (Lots of Pics) July 30, 2012 04:00PM |
Admin Registered: 17 years ago Posts: 7,879 |
PLA sticks to cold blue tape, so that is why the fan blowing on it works. Most people print straight on the glass though, so I expect it would stop it sticking.
[www.hydraraptor.blogspot.com]
[www.hydraraptor.blogspot.com]
|
Re: An all metal hot-end design (Lots of Pics) July 30, 2012 05:02PM |
Registered: 12 years ago Posts: 177 |
Righty!
Here are some pics, its going together now, will probably be tested by the late hours of this evening, but I thought i'd post something asap to show you guys.
Conclusions from discussion above and further thought:
So! A bit of a revamp. Been busy with a hacksaw, back at the engineering firm getting quotes. All go. A fun day.
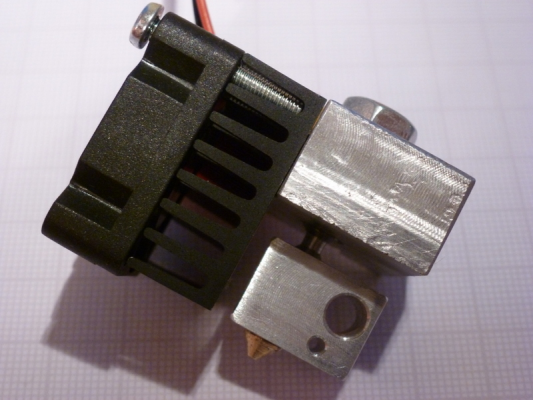
Heres what it looks like now:
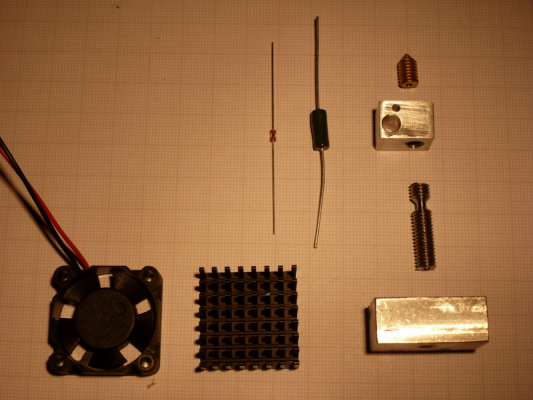
Here are all the parts laid out in a sort of 'exploded diagram' fashion:
The nozzle and heatbreak are unchanged. The heaterblock is also largely unchanged apart from being a little more compact, just because the guy at the engineering firm could - it's now exactly the width of a heater resistor.
As you can see from the photos it goes together in a fairly simple manner, with a fan+heatsink directly on the cooler-block hanging downwards. This lets us keep the total height very low.
The M6 nut will be trapped in some printed coupler part that is yet to be designed, this should allow mounting to pretty much any extruder as you can vary the size of the printed coupler to imitate the mounting end of any popular cylindrical hot-end.
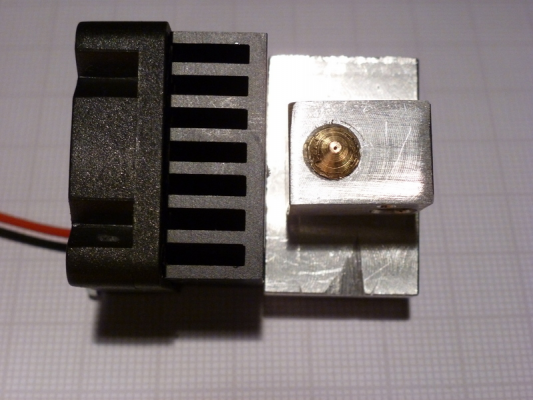
From the business end:
It's going together for off-printer testing right now, so should have something to report back to you soon.
Here are some pics, its going together now, will probably be tested by the late hours of this evening, but I thought i'd post something asap to show you guys.
Conclusions from discussion above and further thought:
- Two Fans are not needed.
- Having an always-on fan pointed at the print is not optimal.
- Getting all that gubbins under an X-Carriage is tricky.
So! A bit of a revamp. Been busy with a hacksaw, back at the engineering firm getting quotes. All go. A fun day.
Heres what it looks like now:
Here are all the parts laid out in a sort of 'exploded diagram' fashion:
The nozzle and heatbreak are unchanged. The heaterblock is also largely unchanged apart from being a little more compact, just because the guy at the engineering firm could - it's now exactly the width of a heater resistor.
As you can see from the photos it goes together in a fairly simple manner, with a fan+heatsink directly on the cooler-block hanging downwards. This lets us keep the total height very low.
The M6 nut will be trapped in some printed coupler part that is yet to be designed, this should allow mounting to pretty much any extruder as you can vary the size of the printed coupler to imitate the mounting end of any popular cylindrical hot-end.
From the business end:
It's going together for off-printer testing right now, so should have something to report back to you soon.
|
Re: An all metal hot-end design (Lots of Pics) July 30, 2012 07:05PM |
Registered: 13 years ago Posts: 248 |
Hi Sanjay,
Thanks for posting some video. It's great to see the Mendel90 in action, especially at high speed. It looks rock solid.
(I think blue tape and heated glass is usually an either/or. i.e. Blue-tape cold, glass heated. Others may comment on this.
I see you've moved away from the 'hovercraft' hotend already! It's a quickly evolving design. Keep at it!
NumberSix
SanjayM Wrote:
-------------------------------------------------------
> NumberSix,
>
> Here's your video, complete with commentary.
>
> [www.youtube.com]
[numbersixreprap.blogspot.com]
Thanks for posting some video. It's great to see the Mendel90 in action, especially at high speed. It looks rock solid.
(I think blue tape and heated glass is usually an either/or. i.e. Blue-tape cold, glass heated. Others may comment on this.
I see you've moved away from the 'hovercraft' hotend already!
 It's a quickly evolving design. Keep at it!
NumberSix
SanjayM Wrote:
-------------------------------------------------------
> NumberSix,
>
> Here's your video, complete with commentary.
>
> [www.youtube.com]
[numbersixreprap.blogspot.com]
|
Re: An all metal hot-end design (Lots of Pics) July 30, 2012 07:16PM |
Registered: 11 years ago Posts: 1,277 |
|
Re: An all metal hot-end design (Lots of Pics) July 30, 2012 07:37PM |
Registered: 13 years ago Posts: 1,918 |
Great work, Sanjay. It reminds me a little of [reprap.org] . In fact you seem to have built a reprappro hotend without a PTFE tube. That's good news.
Meanwhile I think I figured out, where my jams came from. It looks like I bought a kind of bad PLA. I will repeat my tests with better stuff.
Meanwhile I think I figured out, where my jams came from. It looks like I bought a kind of bad PLA. I will repeat my tests with better stuff.
|
Re: An all metal hot-end design (Lots of Pics) July 30, 2012 07:48PM |
Registered: 12 years ago Posts: 177 |
@NumberSix
Thanks! It is completely rock solid, we can stand on the frame happilly, and there is no way the forces of the axes moving are going to cause it to deflect in any way.
I like the name 'hovercraft'!
@Dark Alchemist
The fan pictured on the extruder cooling block will not be controlled, there is no need as far as I can see, it just serves to keep the cooler-block cool at all times. So it will be hardwired as an always-on fan.
There will be a separate fan somewhere mounted for pointing at the print and cooling that, controllable in software etc from RAMPS.
Having some niggling assembly issues right now with the prototype, easy fix in future models, but its delaying us getting this one running right now. Not beaten yet though.
The printed coupler with nut-trap is designed and printed now also.
|
Re: An all metal hot-end design (Lots of Pics) July 30, 2012 07:49PM |
Registered: 12 years ago Posts: 177 |
@theodleif
Yup! The more we iterate, the closer we come back to what is basically a mashup of a RRP hot-end style, with a makerbot type PFTE-free break, all rearranged slightly to fit on a normal reprap.
(We should mention, our first ever printer was a RRP Huxley, so this is probably no coincidence!)
Edited 1 time(s). Last edit at 07/30/2012 07:50PM by SanjayM.
|
Re: An all metal hot-end design (Lots of Pics) July 30, 2012 08:03PM |
Registered: 12 years ago Posts: 939 |
|
Re: An all metal hot-end design (Lots of Pics) July 30, 2012 09:06PM |
Registered: 12 years ago Posts: 177 |
It 'strudes!
All working and looking quite promising.
We extruded PLA and ABS, and took it to a max temp of 320C for a short while. The cooler block did become noticeably hotter during use than previous prototypes. When extruding ABS at 230 the block, (very rough touch it and guesstimate) was around 30-40C and was around the uncomfortably hot 50-60 degrees when hitting 320.
Extrusion force is similar to previous prototypes, we will get a stepper and a geared wades type extruder with hobbed bolt on it next and see how fast we can ram filament through this thing under the force of a motor.
Our only concern really is the warmth of the cooler-block being a little too high. How high is too high?
|
Re: An all metal hot-end design (Lots of Pics) July 31, 2012 01:39AM |
Admin Registered: 17 years ago Posts: 7,879 |
It needs to keep the inside of the barrel below the glass transition temperature of the plastic, about 55C for PLA.
[www.hydraraptor.blogspot.com]
[www.hydraraptor.blogspot.com]
|
Re: An all metal hot-end design (Lots of Pics) July 31, 2012 03:47AM |
Registered: 13 years ago Posts: 1,918 |
SanjayM Wrote:
-------------------------------------------------------
> Our only concern really is the warmth of the
> cooler-block being a little too high. How high is
> too high?
Maybe the heat transmission from the cooler block to the fan isn't good. I put screws though both so I can press them together tightly.
In which direction does the fan blow now? Mine blows towards the block. That works well.
Sorry, only registered users may post in this forum.
