|
Re: RepRap Samuel - A variation on the Mendel May 04, 2015 03:08PM |
Registered: 8 years ago Posts: 2 |
|
Re: RepRap Samuel - A variation on the Mendel May 04, 2015 03:17PM |
Registered: 9 years ago Posts: 32 |
|
Re: RepRap Samuel - A variation on the Mendel May 05, 2015 08:33AM |
Registered: 9 years ago Posts: 43 |
Quote
invultri
Hello
I was looking for a way to recycle my i2 into an i3 and then I found this design, which seems to be a 100% match for what I want. I will be trying to print the parts (with the wade extruder shown in this thread and [www.thingiverse.com] for y bed).
While I am researching the parts to see where they should all go I could not find a Y tensioner. Is this correct or did I miss something ? (found a couple on thingyverse that work from the idler: [www.thingiverse.com] for instance)
Edit: I also wonder why there is stress relieve on the y and z stepper axles but not on x
Very sorry I missed this question. Hopefully you've sorted out and found that the y tensioner is built into the belt clamps (see sam_t25-belt-clamp-parts.stl or the gt2 variant).
As for stress relief on the X axis, I was looking at it as an additional piece that would hold the bearing and be mounted in front of the stepper (covering the exposed hole). Problem is, depending on the pinion used as well as stepper shaft, it could vary so I didn't quite get around to it. I'll do something up and add it soon.
Thanks!
|
Re: RepRap Samuel - A variation on the Mendel May 05, 2015 08:40AM |
Registered: 9 years ago Posts: 43 |
|
Re: RepRap Samuel - A variation on the Mendel May 05, 2015 04:36PM |
Registered: 8 years ago Posts: 2 |
|
Re: RepRap Samuel - A variation on the Mendel May 05, 2015 04:40PM |
Registered: 9 years ago Posts: 32 |
Samuel made! September 25, 2015 02:40AM |
Registered: 8 years ago Posts: 4 |
Hey Guys,
Assembled a Samuel 3D printer Last week, working on Electronics now....
Dictator at - www.AgroEngineers.com
Creating - [www.LionBeast.com] - 3D Printers
Assembled a Samuel 3D printer Last week, working on Electronics now....
Dictator at - www.AgroEngineers.com
Creating - [www.LionBeast.com] - 3D Printers
Re: Samuel made! September 25, 2015 09:19AM |
Registered: 9 years ago Posts: 32 |
Re: Samuel made! September 26, 2015 12:31PM |
Registered: 9 years ago Posts: 43 |
|
300x300 build platform September 26, 2015 01:20PM |
Registered: 9 years ago Posts: 32 |
Sorry I missed your message about the bed. Yes I did get it done.
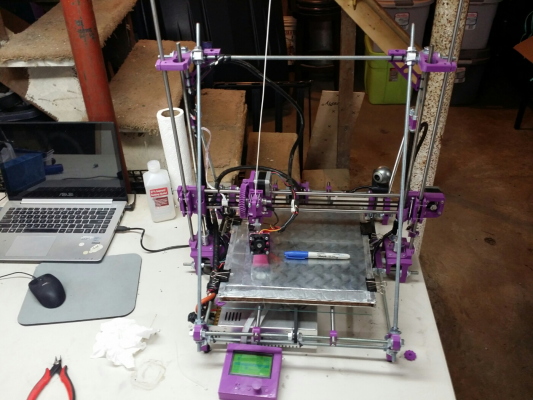
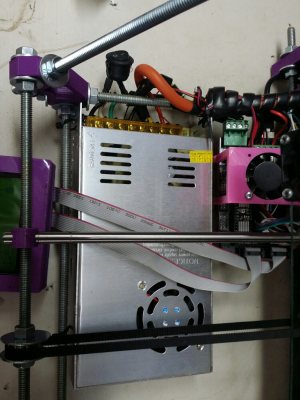
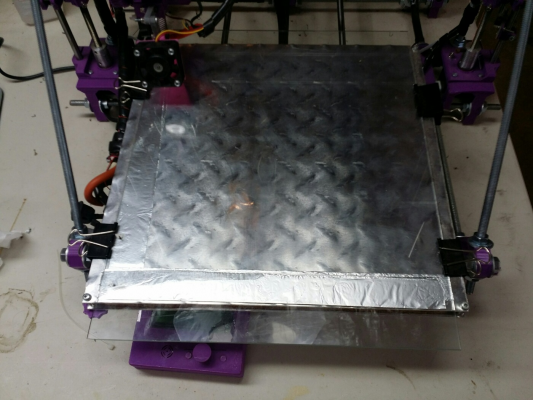
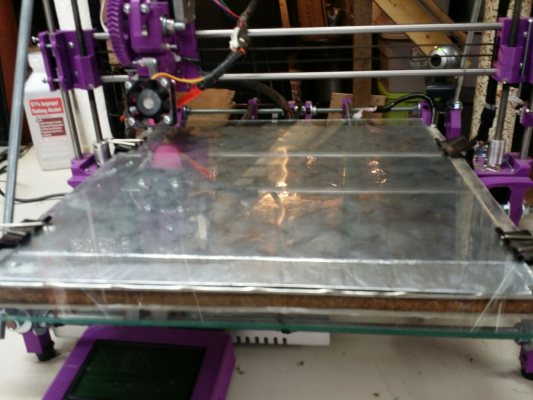
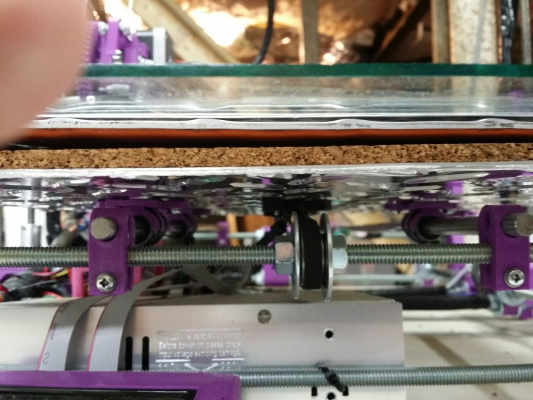
I upgraded the power supply and made sure it had a fan in it. The ramps relays can't handle the amps so they just trigger a larger automotive relay. The plates are aluminum plates from Lowes, almost to thick to bend by hand and they have a diamond pattern on one side. Not ideal but cheap and fast. I got a silicone heating pad sized about 290x290 12vdc from aliexpress. Not cheap or fast but I was prepared for that. The heater is adhesive on one side otherwise rtv silicon was on standby. Luckly the pad is flexible enough to go over the diamond parts fine. Glad I didn't need to grind them all off. Under the heater I glued a square of 1/8" thick or so cork sheet. Spring screw combo in all four corners. The glass for testing has been the simple generic 1/8" 10.5x14" single panes Lowes sells. I found that flexing occurred downwards at the corners on both the plate and glass but only slightly. Until a better option is available or my budget goes up I just made thin strips of aluminum foil and but them under the glass around the edges to compensate.
My thoughts so far:
I need to upgrade to 10mm rod maybe even 12mm. The bed wiggles as it moves and the hotend does to but mostly up and down and much less. The hotend wiggle didn't effect it when it had a 200mm bed so I'm blaming the bed smooth rod size.
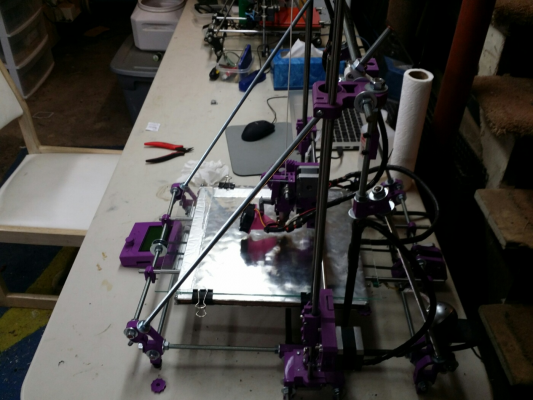
The front half forward of the towers was to flexible for the size. I added supports to the towers as pictured. I may just bolt the whole thing to a flat piece of wood to keep it solid and add mass. It will shake almost any table it is on when printing fast.
A pair of aluminum plates that are forged over cut from extrusion, predrilled for bearing and screws, and tapped 3mm metric or whatever I used.
printer with sharpey for size
added support
power supply with auto fan 40amp?
bed
Edited 1 time(s). Last edit at 09/26/2015 02:00PM by mcmasterp.
|
Re: 300x300 build platform September 26, 2015 02:02PM |
Registered: 9 years ago Posts: 32 |
|
Re: 300x300 build platform September 26, 2015 06:20PM |
Registered: 9 years ago Posts: 32 |
|
Re: RepRap Samuel - A variation on the Mendel September 29, 2015 11:10PM |
Registered: 8 years ago Posts: 1 |
|
Re: 300x300 build platform October 05, 2015 02:00AM |
Registered: 9 years ago Posts: 43 |
@mcmasterp: WOW! That looks huge. I can see why the 8mm smooth rods are buckling. Those front supports now gives it the Mendel look again... LOL.
I'm curious, why do you still use glass on the aluminium plate? The conversions I've seen show people printing on the aluminium. That would save weight.
Also, How long does that new silicon pad take to heat up and what max temp have you been able to get?
Can't wait to see the 12mm rod upgrade!
@miocid: Good Luck with the conversion!
|
Re: 300x300 build platform October 09, 2015 07:44PM |
Registered: 9 years ago Posts: 32 |
@miocid: Hey goo luck with the conversion. posts pics!
@silpstream I printed this carriage: http://www.thingiverse.com/thing:102514 and used the round bearings. I have the blocks as well but this seemed easier to line up straight. I just used zip ties to hold the 12mm rods on the printer 20" one hang over just 1/2" or so. the rod with the single bearing on it is only ziped at one end the other can move free to keep things gliding smooth. really it looks exactly like stock. you wouldn't notice unless you really knew to look.
The flex is down but what would really help is bigger x ends to hold 12mm rods. the hotend still wobbles as it moves near the center.
the heat pad works very well. heats up faster than my i2. I don't know its limit, it has a built in themosister but I was unclear if it had a self shutoff point. I think not in which case it would probably do any temp 3d printing requires. I use the glass to further distribute the heat and to give me a leveler surface. the aluminum plate is extruded plate so it bends somewhat easily when you consider the tolerances we're going for here. glass clipped to it helps but my glass is thin and cheap so not as much help as I'd like. it's hard to get a level bed.
Re: Samuel made! October 13, 2015 07:04PM |
Registered: 9 years ago Posts: 32 |
|
Re: RepRap Samuel - A variation on the Mendel January 28, 2016 08:11PM |
Registered: 9 years ago Posts: 2 |
Very cool, and thank you! I was given an old i2 for xmas from a friend after his Ultimaker upgrade. Since the i2 is a bigger platform than my Printrbot, I though I would upgrade it. Needless to say, I found this, and it's too perfect!
I have all of the major parts printed out (in purple as well, go figure), and getting ready to make the conversion. There are a few things I'm curious about, what assembly is the build platform itself based off of? It seems different from the i2, and want to add the bed leveling. In its current state, it looks like hand cut wood, and not laser cut. Overall, it seems I will have to redo the bed. It's a 200x200 platform btw (at least the heat plate is).
Second, will a bowden extruder work with the current setup or a remix part? Any suggestions for an all metal extruder that would work with this build?
Sorry if these are some stupid questions, and if any do not belong here. I'm just happy to find a great upgrade for this mess of an i2 build (sorry, mess is an understatement).
|
Re: RepRap Samuel - A variation on the Mendel January 28, 2016 08:16PM |
Registered: 9 years ago Posts: 32 |
your i2 bed should work perfectly with the provided files.
I used a different carriage then @silpstream provided because I like the way it clears the rods, so you can use anyone you can make fit really.
I've never used a bowden extruder but I don't see why this design would stop you from using one
I used a different carriage then @silpstream provided because I like the way it clears the rods, so you can use anyone you can make fit really.
I've never used a bowden extruder but I don't see why this design would stop you from using one
|
Re: RepRap Samuel - A variation on the Mendel January 29, 2016 08:48AM |
Registered: 9 years ago Posts: 43 |
Hi DBrown, @mcmasterp mentioned your i2 bed will work with no issues. I'm still using my original i2 bed, the one you saw was mcmasterp's upgraded 30cm bed. Bed levelling can be done, as well as a bowden setup. I've already done mine and I'll add the new designs to the github repository and you can find them there. Both the bed levelling and bowden components work with the carriage that I designed, so if you do choose to use another carriage (any i3 carriage fits) then you'll need to use something else.
Give me a bit of time, I just did a clean install of El Capitan on my Mac so I need reinstall a few things before I can upload the files. I'll post here once I've done the upload to github.
Give me a bit of time, I just did a clean install of El Capitan on my Mac so I need reinstall a few things before I can upload the files. I'll post here once I've done the upload to github.
|
Re: RepRap Samuel - A variation on the Mendel February 04, 2016 07:38PM |
Registered: 9 years ago Posts: 2 |
@silpstream, yes I saw that. The issues is, this is not a real i2 bed. It's something that was poorly slapped together, and was curious were to find build instructions for the one he showed in his build. 
Very cool about the bowden. I'll be sure to order one right away, thank you!
Overall, I really want to make this my better printer, and build it to be as such, hence the bed change; that and it doesn't have flush bolts holding it together, and none at all for the heat platform. I'm not sure it was really ever used to print. If it was, it had some extreme calibration issues.
|
Re: RepRap Samuel - A variation on the Mendel February 17, 2016 03:28PM |
Registered: 8 years ago Posts: 8 |
Hi everyone.
I have an i3 and have started printing the parts for a Samuel.
Just checking in to follow this thread.
And the reason i am making a Samuel instead of another i3 is because after all the improvements and supports I have seen on the i3's they look to be almost as good as a Samuel.
Thanks
Teddy_P
I have an i3 and have started printing the parts for a Samuel.
Just checking in to follow this thread.
And the reason i am making a Samuel instead of another i3 is because after all the improvements and supports I have seen on the i3's they look to be almost as good as a Samuel.
Thanks
Teddy_P
|
Re: RepRap Samuel - A variation on the Mendel March 25, 2016 06:51PM |
Registered: 8 years ago Posts: 54 |
Hi guys, maybe i'm a bit off-topic, but i REALLY find myself tore bewtween two choices and nobody answers me, so i'm asking here;
I have all the elctronic parts foor a prusa i2 or i3 and found a kit for putting together an i2 at 60€, which is super cheap.
Then i found that the miissing parts for an 13 would be 200€, triple that.
Now, what would you choose between the two ? Knowing that i can eventually convert it to a Samuel, would it be worth it to buy the i2 for cheap ?
Also, is it THAT bad that no one wants anything to do with it ?
Thank you
|
Re: RepRap Samuel - A variation on the Mendel March 26, 2016 03:55PM |
Registered: 10 years ago Posts: 651 |
|
Re: RepRap Samuel - A variation on the Mendel March 31, 2016 07:58PM |
Registered: 10 years ago Posts: 651 |
I've been printing parts for a couple of months (only have 1 day a week with enough time to even start a print). Got everything printed and was pretty assembling the X-Idler, using 623zz bearings and it appears the part (pulled from the github) wasn't designed for them. The space is too wide.
I redesigned the part to fit them perfectly, maybe a little too well, the ABS shrunk a little and I had to scrape a slight amount to get them to fit. Check it out in the pic. The new vs. the old (which I ended up snapping one of those posts off, I made those a little less wide, but a little thicker too)
I redesigned the part to fit them perfectly, maybe a little too well, the ABS shrunk a little and I had to scrape a slight amount to get them to fit. Check it out in the pic. The new vs. the old (which I ended up snapping one of those posts off, I made those a little less wide, but a little thicker too)
|
Re: RepRap Samuel - A variation on the Mendel April 18, 2016 06:14AM |
Registered: 8 years ago Posts: 1 |
I like the idea of a point of view of a potential funder. If you get your end product, you got what you need and if other people want to change it or alter it. you come up with cool idea
Did u Know Online | Buzz and Lola
Did u Know Online | Buzz and Lola
|
Re: RepRap Samuel - A variation on the Mendel April 25, 2016 11:51PM |
Registered: 8 years ago Posts: 8 |
Anyone know where to get the material for the rubber pad for the feet.
Like in this picture?
Level foot
Thanks
Teddy_P
Edited 2 time(s). Last edit at 04/25/2016 11:55PM by Teddy_P.
Like in this picture?
Level foot
Thanks
Teddy_P
Edited 2 time(s). Last edit at 04/25/2016 11:55PM by Teddy_P.
|
Re: RepRap Samuel - A variation on the Mendel April 26, 2016 12:31AM |
Registered: 9 years ago Posts: 43 |
|
Re: RepRap Samuel - A variation on the Mendel April 26, 2016 09:59AM |
Registered: 8 years ago Posts: 8 |
|
Re: RepRap Samuel - A variation on the Mendel April 27, 2016 02:42AM |
Registered: 9 years ago Posts: 43 |
|
Re: RepRap Samuel - A variation on the Mendel April 29, 2016 02:36PM |
Registered: 8 years ago Posts: 8 |
Sorry, only registered users may post in this forum.
