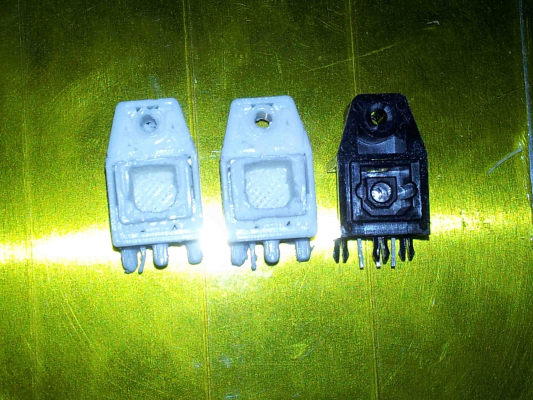
Minimal size of print?
Posted by TMD_RS436
|
Minimal size of print? January 10, 2014 09:25AM |
Registered: 10 years ago Posts: 119 |
Hello All
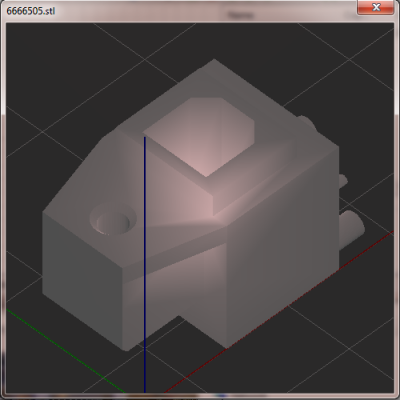
Just thought I would try and print my own item which is 3D Model of a Fibre Optic Transmitter component RS: 666-6505.
6666505.stl
6666505.g
I just wanted to see if it was converted into g code ok, so a small enough model was required.
So I tried to convert one of the components that I made this morning (in Designspark Mechanical) which my board uses as an example.
However it just won't stay on the bed, no matter what way I rotate and save it, it gets about a couple of mm into it when it then decides on lifting it up.
The strange thing is the snowman one printed fine twice, so I am not too sure if there are rules on how to place an item to print, also how does it work out parts that are raised?
Thanks
Paul
RS Ormerod No 436
|
Re: Minimal size of print? January 10, 2014 10:34AM |
Registered: 10 years ago Posts: 578 |
Hi Paul,
I've just started printing your gcode file, and all seems fine using ABS for the first few layers (I've commented out your temperature settings) - looks like you need to slice it with some support material though, the tab that starts printing on layer 16 drops to the bed
You might need to raise your bed temperature to get the PLA to stick properly and make sure the kapton is clean (I'm printing onto kapton with my ABS, but I use PVC pipe welding cement when I use PLA, you could try some of this if you have some lying around - remove the kapton and brush the cement on then print when its dry),
Ray
I've just started printing your gcode file, and all seems fine using ABS for the first few layers (I've commented out your temperature settings) - looks like you need to slice it with some support material though, the tab that starts printing on layer 16 drops to the bed

You might need to raise your bed temperature to get the PLA to stick properly and make sure the kapton is clean (I'm printing onto kapton with my ABS, but I use PVC pipe welding cement when I use PLA, you could try some of this if you have some lying around - remove the kapton and brush the cement on then print when its dry),
Ray
|
Re: Minimal size of print? January 10, 2014 10:54AM |
Registered: 10 years ago Posts: 578 |
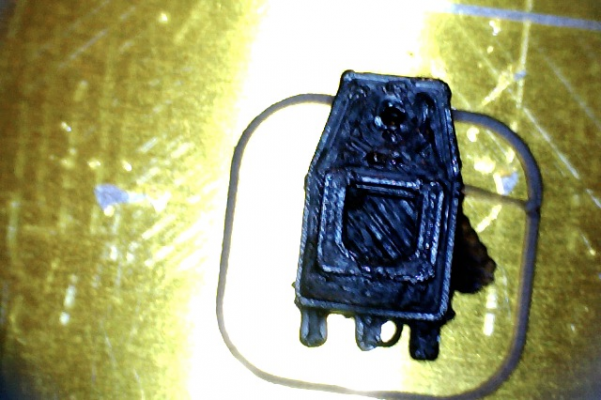
Here's the finished print on the bed - top view
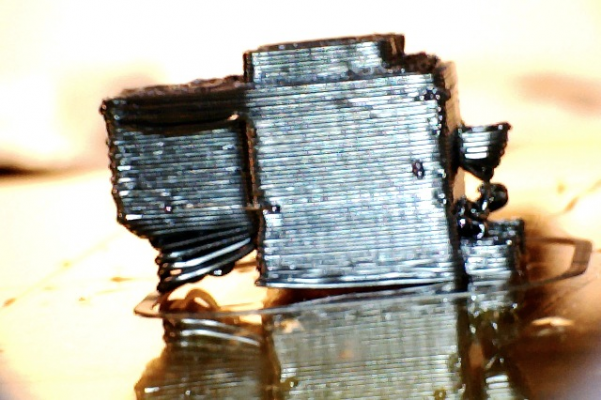
and side view showing sagging loops (needs support)
it also curled a little toward the x motor, but it did stay on!
It might be worth adding a brim in slic3r to widen the attachment surface if all else fails,
Cheers
Ray
and side view showing sagging loops (needs support)
it also curled a little toward the x motor, but it did stay on!

It might be worth adding a brim in slic3r to widen the attachment surface if all else fails,
Cheers
Ray
|
Re: Minimal size of print? January 10, 2014 11:19AM |
Registered: 10 years ago Posts: 119 |
Quote
rayhicks
Hi Paul,
I've just started printing your gcode file, and all seems fine using ABS for the first few layers (I've commented out your temperature settings) - looks like you need to slice it with some support material though, the tab that starts printing on layer 16 drops to the bed
Oh, well I used Pronterface to do the slicing, I am looking at each layer in Pronterface and looking at each layer to me looks fine, but I am new to 3d printing so I may be wrong.
As for layer 16 I cannot see what's wrong, layer 17 (in pronterface) I see the area that is floating about 3.4 mm in the air, so I gather that's what you mean by supporting material (something like a few pillars to support the floating area)
Quote
rayhicks
You might need to raise your bed temperature to get the PLA to stick properly and make sure the kapton is clean (I'm printing onto kapton with my ABS, but I use PVC pipe welding cement when I use PLA, you could try some of this if you have some lying around - remove the kapton and brush the cement on then print when its dry),
Ray
The bed and hot end temperatures can they be on constant at a set temperature or do they need to go up and down depending on the area its printing, like I said I am new to all this 3d printing.
I think I saw the bed temperature get to 65, so it needs to be higher than that?
Would this do ?
(scewfix) FloPlast SC250 Solvent Cement 250ml
I haven't got any but I can buy some if needed.
Also so this replaces the Kapton heat proof tape, so I would spread a thing layer in the area that it will be printing on, I gather I need to completely clean and wipe off all the cement after each job?
I am still using the white filament that come with the printer as well as a new black PLA filament (not started on yet).
Thanks
Paul
RS Ormerod No 436
|
Re: Minimal size of print? January 10, 2014 11:34AM |
Registered: 10 years ago Posts: 119 |
Quote
rayhicks
Here's the finished print on the bed - top view [attachment 24447 yopview.jpg]
Yeah, mine looked a bit like that, well the start of it did.
Quote
rayhicks
and side view showing sagging loops (needs support)[attachment 24448 sideview.jpg]
Yeah, the sagging on mine looked worse.
Quote
rayhicks
it also curled a little toward the x motor, but it did stay on!
Hmm, either way it didn't look that great

Quote
rayhicks
It might be worth adding a brim in slic3r to widen the attachment surface if all else fails,
Cheers
Ray[/quote]
How does this g file look now, you don't need to print it:
6666505.gcode
I enabled the brim width of 2mm and support pattern honeycomb, the rest of the setting I have no clue.
One thing I did notice was that Slic3r says that the bed temperature for the first layer and other layers are to be 0, I gather that is wrong?
Thanks
Paul
RS Ormerod No 436
|
Re: Minimal size of print? January 10, 2014 12:45PM |
Registered: 12 years ago Posts: 116 |
Some quick feedback:
There's a 'cooling' section in Slic3r, you can use this to slow down a print: [manual.slic3r.org]
You could try 'support' on this, too.
See gcode visualised in 2D/3D, upload it to: [gcode.ws]
You can also use Repetier host for this.
The problem with lifting is that there's too much heat in the print. Probably best print multiple copies (like 4), so each one has time to cool before the next layer is put on. If you increase the bed temperature too much, the plastic stays molten, and easily detaches.
If you're going to print a lot of small stuff, use a 0.3mm nozzle, which we just happen to sell...
Ian
RepRapPro tech support
|
Re: Minimal size of print? January 10, 2014 04:09PM |
Registered: 10 years ago Posts: 119 |
Hello Ian
Well I had a go at printing it via USB (so that's its very slow), very stutter LOL.
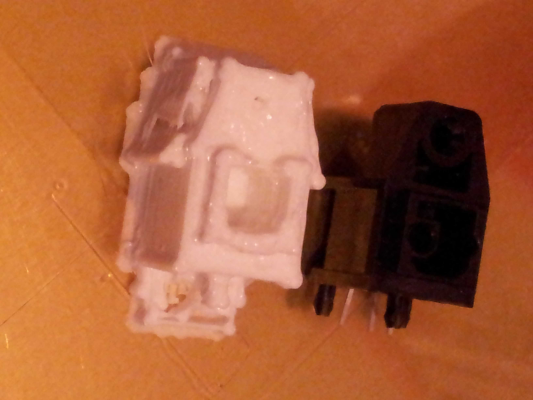
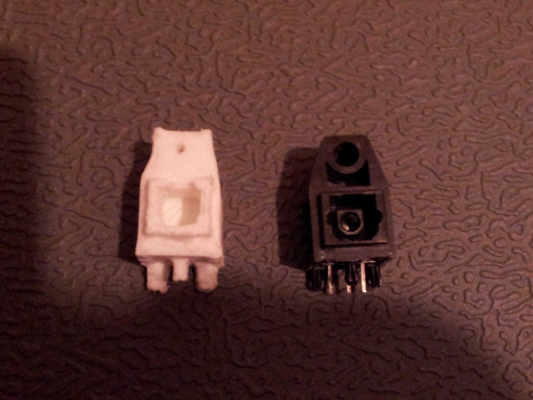
Anyhow here is what it looks like when I try and add a brim/skirt along with support:
As you can see it looks very messy so I must be setting something wrong in Slic3r.
Here is the same print with bit cut and filled away:
As you can see it looks better but still not that good.
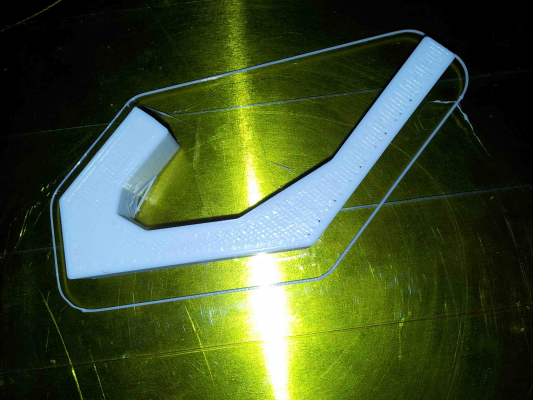
Now here is the coat hook g code which as you can see it look very nice:
So the way I see it, it must be down to me being rather n00bish with slic3r, so anyone got the setting that work fine with a skirt/brim and support enabled, because for the life of me I cannot sort it
Thank
Paul
Edited 1 time(s). Last edit at 01/10/2014 04:10PM by TMD_RS436.
RS Ormerod No 436
Well I had a go at printing it via USB (so that's its very slow), very stutter LOL.
Anyhow here is what it looks like when I try and add a brim/skirt along with support:
As you can see it looks very messy so I must be setting something wrong in Slic3r.
Here is the same print with bit cut and filled away:
As you can see it looks better but still not that good.
Now here is the coat hook g code which as you can see it look very nice:
So the way I see it, it must be down to me being rather n00bish with slic3r, so anyone got the setting that work fine with a skirt/brim and support enabled, because for the life of me I cannot sort it

Thank
Paul
Edited 1 time(s). Last edit at 01/10/2014 04:10PM by TMD_RS436.
RS Ormerod No 436
|
Re: Minimal size of print? January 11, 2014 11:00AM |
Registered: 10 years ago Posts: 119 |
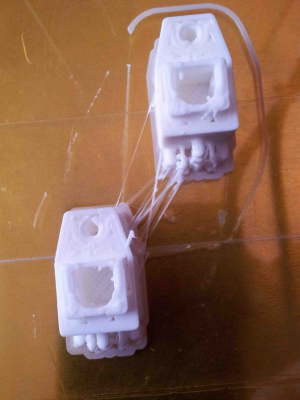
Ok, I have used a new version of Pronterface that was released on November the 5th and I have loaded up the profiles from the older version for this printer and set the Skirt/Brim and also the support material and crossed fingers and I got the following print...
And as you can see its still a bit messy but it is less cluttered than the last try.
Now this is starting to look a lot better than the last ones did at this point, I had to cut away the support material which was difficult with some areas, had to also use some files to smooth out the cut/removed areas.
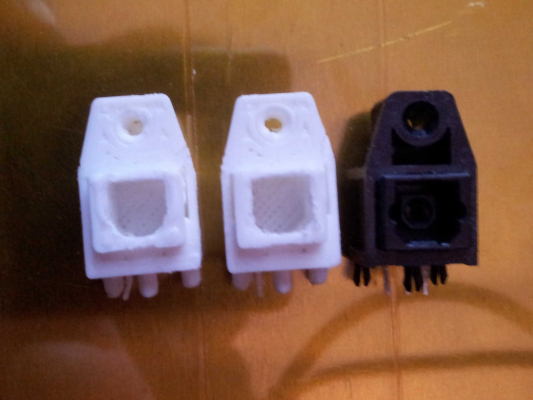
Same image as above but with the flash enabled, you can also compare the size compared to the Kapton Tape.
Its not perfect I still need to play about with Slic3r due to gaps (open areas) probably down to the fill setting maybe.
I also need to add a couple of rings due to the first half of the ring either hasn't stuck or nothing has come out at that point, so the extra ring will resolve this.
Also the new version of now displays a 3D viewer so you can see each layer like it is on site http://gcode.ws/]GCode Viewer[/url]
So at least I am slowly getting there.
So I can now create my 3d model in Designspark Mechanical save it twice, once as its own format and the other as STL and then use Slic3r to G-Code.
I save it as Designspark Mechanical own format so that its easy to edit something, where as STL is hard to change parts due to how its saved.
One thing that I have noticed is that I have to re-setup Z axis along with the Bed Plane Compensation every day and also sometimes before every print, this is becoming to be annoying, but its reducing failed print jobs.
I am also thinking of making a aluminium framework for the bed, I may do a square version with corner supports do to I am not too worried about the overall weight of the printer, its not that its going to be moved about everywhere.
May also add blocks to the four corners to level the base of the unit out and also levelling nuts for the bed.
Paul
RS Ormerod No 436
|
Re: Minimal size of print? January 11, 2014 11:34AM |
Registered: 10 years ago Posts: 14,672 |
Quote
TMD_RS436
One thing that I have noticed is that I have to re-setup Z axis along with the Bed Plane Compensation every day and also sometimes before every print, this is becoming to be annoying, but its reducing failed print jobs.
I had this too. I think it was due to the back corners of the MDF bed support sagging. I've replaced mine with aluminium, see here. There are other other solutions in the post following that one, and here.
Large delta printer [miscsolutions.wordpress.com], E3D tool changer, Robotdigg SCARA printer, Crane Quad and Ormerod
Disclosure: I design Duet electronics and work on RepRapFirmware, [duet3d.com].
|
Re: Minimal size of print? January 11, 2014 11:50AM |
Registered: 10 years ago Posts: 119 |
Hello dc
Yeah, I have read those topics which mad me think to do the same, we have a gas welder here some place so I may buy some aluminium bars and weld them together and try that.
Also my heat bed isn't sagging at the back, more sagging to the front like the following:
The annoying thing is after each print I am cleaning the beds surface and that along is altering the sagging, so I have to once again re-set all the differences
Paul
RS Ormerod No 436
Quote
dc42
Quote
TMD_RS436
One thing that I have noticed is that I have to re-setup Z axis along with the Bed Plane Compensation every day and also sometimes before every print, this is becoming to be annoying, but its reducing failed print jobs.
I had this too. I think it was due to the back corners of the MDF bed support sagging. I've replaced mine with aluminium, see here. There are other other solutions in the post following that one, and here.
Yeah, I have read those topics which mad me think to do the same, we have a gas welder here some place so I may buy some aluminium bars and weld them together and try that.
Also my heat bed isn't sagging at the back, more sagging to the front like the following:
G30 P0 X60 Y0 Z0	; back left difference.
G30 P1 X60 Y180 Z0.1	; back right difference.
G30 P2 X180 Y180 Z3.0	; front right difference.
G30 P3 X180 Y40 Z2.3 S	; front left differnce.
The annoying thing is after each print I am cleaning the beds surface and that along is altering the sagging, so I have to once again re-set all the differences

Paul
RS Ormerod No 436
|
Re: Minimal size of print? January 11, 2014 12:42PM |
Registered: 10 years ago Posts: 14,672 |
I'm now using 3-point bed setting instead of 4-point. This disables the second-order bed compensation, which as far as I can see should not be needed if the glass bed is flat and the two y-rods are truly parallel, because the X and Y axes are independent. The 3rd point is in the front centre, near the levelling screw.
There does appear to be a very slight convex curvature at the front of my glass plate, although it's very small. I may try a piece of 4mm float glass when I want to print large pieces.
Large delta printer [miscsolutions.wordpress.com], E3D tool changer, Robotdigg SCARA printer, Crane Quad and Ormerod
Disclosure: I design Duet electronics and work on RepRapFirmware, [duet3d.com].
|
Re: Minimal size of print? January 11, 2014 12:53PM |
Registered: 10 years ago Posts: 119 |
Hello dc
Yeah I was going to do the same by using a three sided bead support at first, but where I have been very unlucky as late I would probably crack or break one of the corners off, so I am thinking of the rectangle with corner angle supports just on the safe side.
As for the warping of the glass I have seen this before when the glass gets hot, but the bed doesn't get that, so it must of been like that from the start.
As for the float glass, at least you will know its really flat
Paul
RS Ormerod No 436
Quote
dc42
I'm now using 3-point bed setting instead of 4-point. This disables the second-order bed compensation, which as far as I can see should not be needed if the glass bed is flat and the two y-rods are truly parallel, because the X and Y axes are independent. The 3rd point is in the front centre, near the levelling screw.
There does appear to be a very slight convex curvature at the front of my glass plate, although it's very small. I may try a piece of 4mm float glass when I want to print large pieces.
Yeah I was going to do the same by using a three sided bead support at first, but where I have been very unlucky as late I would probably crack or break one of the corners off, so I am thinking of the rectangle with corner angle supports just on the safe side.
As for the warping of the glass I have seen this before when the glass gets hot, but the bed doesn't get that, so it must of been like that from the start.
As for the float glass, at least you will know its really flat

Paul
RS Ormerod No 436
|
Re: Minimal size of print? January 11, 2014 01:06PM |
Registered: 10 years ago Posts: 14,672 |
Quote
TMD_RS436
Hello dc
Quote
dc42
Yeah I was going to do the same by using a three sided bead support at first, but where I have been very unlucky as late I would probably crack or break one of the corners off, so I am thinking of the rectangle with corner angle supports just on the safe side.
I think the glass + alu heat spreader + heated pcb combo would be very hard to break. I'm still using the front corner screws to hold the heat spreader to the heater pcb. Here is a photo of my setup.
Large delta printer [miscsolutions.wordpress.com], E3D tool changer, Robotdigg SCARA printer, Crane Quad and Ormerod
Disclosure: I design Duet electronics and work on RepRapFirmware, [duet3d.com].
|
Re: Minimal size of print? January 11, 2014 01:16PM |
Registered: 10 years ago Posts: 119 |
Quote
dc42
Quote
TMD_RS436
Hello dc
Quote
dc42
Yeah I was going to do the same by using a three sided bead support at first, but where I have been very unlucky as late I would probably crack or break one of the corners off, so I am thinking of the rectangle with corner angle supports just on the safe side.
I think the glass + alu heat spreader + heated pcb combo would be very hard to break. I'm still using the front corner screws to hold the heat spreader to the heater pcb. Here is a photo of my setup.
I know, but like I said I have been very unlucky as late and knowing me I would break it some how, or maybe trip on something and fall on it.
But yeah yours looks nice now, how stiff was the aluminium once you cut out the un needed areas?
Also how did you get it to print across the gap on the top without and support?
Paul
Edited 1 time(s). Last edit at 01/11/2014 01:20PM by TMD_RS436.
RS Ormerod No 436
|
Re: Minimal size of print? January 11, 2014 02:14PM |
Registered: 13 years ago Posts: 1,611 |
I love those dodecahedrons. It was one of my first prints... [www.thingiverse.com]
On my first printer...
(That picture was taken the day I got it working! May 2011, I think.)
Ian
RepRapPro tech support
Edited 2 time(s). Last edit at 01/11/2014 02:32PM by droftarts.
On my first printer...
(That picture was taken the day I got it working! May 2011, I think.)
Ian
RepRapPro tech support
Edited 2 time(s). Last edit at 01/11/2014 02:32PM by droftarts.
|
Re: Minimal size of print? January 11, 2014 03:37PM |
Registered: 10 years ago Posts: 14,672 |
Quote
TMD_RS436
But yeah yours looks nice now, how stiff was the aluminium once you cut out the un needed areas?
It feels very stiff, although I expect I could bend it over my knee. I used 3mm aluminium. However, adding the square section carbon fibre as in the post following mine looks an easier mod, especially if (like me) you don't have a drill press.
Quote
TMD_RS436
Also how did you get it to print across the gap on the top without and support?
Nothing, it just does it. I occasionally get one or two dropped threads there, maybe some fine adjustment of then extrusion temp will reduce that.
Large delta printer [miscsolutions.wordpress.com], E3D tool changer, Robotdigg SCARA printer, Crane Quad and Ormerod
Disclosure: I design Duet electronics and work on RepRapFirmware, [duet3d.com].
|
Re: Minimal size of print? January 11, 2014 03:44PM |
Registered: 10 years ago Posts: 14,672 |
I use this one scaled to half size as my standard test piece. It has thin edges so it prints quite fast, and it shows up any lumpiness or stringing issues quite well. btw the one in that photo is a direct print over USB.
Quote
droftarts
On my first printer...
(That picture was taken the day I got it working! May 2011, I think.)
I love the wooden construction! I hope you've still got it, it may be valuable as an antique some day.
Large delta printer [miscsolutions.wordpress.com], E3D tool changer, Robotdigg SCARA printer, Crane Quad and Ormerod
Disclosure: I design Duet electronics and work on RepRapFirmware, [duet3d.com].
|
Re: Minimal size of print? January 11, 2014 04:14PM |
Registered: 13 years ago Posts: 1,611 |
I've still got MOST of it... but I did take it apart, as I needed the rods and linear bearings for my second printer! I will rebuild it one day, as it was one of the few examples of a 1X2 (as it was called - it was supposed to be made from 1" x 2" timber) - [reprap.org]Quote
dc42
I love the wooden construction! I hope you've still got it, it may be valuable as an antique some day.
Not my design, but I liked it. Okay, thread hijack over...
Ian
RepRapPro tech support
Sorry, only registered users may post in this forum.
