Big Blue 360 
Posted by KimBrown
|
Re: Big Blue 360 April 24, 2014 01:05PM |
Registered: 10 years ago Posts: 2,472 |
Quote
jstck
Quote
KimBrown
It should be relatively easy to control a small RC servo. Those usually run on 5V (some want 6V and there are a few large ones that take 12V), and a PWM control signal. The signal timing is a bit tricky (it's not quite "regular" PWM as it's dependent on pulse duration rather than duty cycle), but there are plenty of code examples available for Arduino.
Traditional servo operating voltage is 6 volts (4 drycell batteries), but AFAIAA they are pretty forgiving and all nowadays work down to 4V - it is common to replace drycells with 1.2V rechargable batteries that would deliver 4.8V, and many people run them from 2 cell LiPo batteries that deliver 7.4V, though it's not recommended.
If the PWM output is low frequency that might be good news for Kev - the servo may well work over a portion of the available PWM range. As you say, the servo position is determined only by the pulse width - the time between pulses is usually of little concern. Servo pulses required are from 1mS (min travel) to 2mS (max travel). While PWM is more about mark/space ratio than pulse width, changing the mark/space ratio of a constant frequency must inevitably have the effect of changing the pulse (mark) time, and so as long as the PWM frequency is below 500 Hz, then a portion of the PWM range will encompass the widths that correspond to full travel in each direction. I am not near my Ormerod right now, or I would hook up a scope and see exactly what the fan output looks like for various M208 values. So can you remember exactly what pitch of sound you can hear? We are ideally looking for something around middle C, but anything more than an octave higher won't work :-)
Dave
(#106)
|
Re: Big Blue 360 April 24, 2014 02:38PM |
Registered: 10 years ago Posts: 64 |
May I come with a naive suggestion? I'm not certain how important it is to regulate the air flow around the extruded filament, but you appear to think it is.
We mustn't forget "the fan" has two separate purposes: cooling the upper "cold end" and cooling the extruded filament.
Measurements show the cold end can be easily cooled with a small fan, and performance isn't depending on it.
A simpler way to regulate the airflow and still always cool the cold end is to indeed use a PWM, but, add a modest offset an top of it, so instead of blowing
0-100%, it spans 20-100%, always cooling the cool end a little bit. Safety concerns suggests this offset is applied outside the software.
|
Re: Big Blue 360 April 24, 2014 03:05PM |
Registered: 10 years ago Posts: 378 |
Iirc, rc servos want a 20ms pulse spacing, and 1-2ms pulse width (1.5ms=center). That equates to 50Hz, 5-10% duty cycle.
Other than that, I do agree with Michael. Rather than a servo-controlled flap (which would be a fairly complex moving part), I would prefer a cooling solution with one fan only cooling the hot end (which shouldn't need to much of a fan if it doesn't have all the ducts but just something "straight through"), and one fan to cool the printed material.
The former could be temperature controlled (just as with dc42's sensor board), the latter software controlled. Not sure if that is possible as a mod to BigBlue, or if it would need a completely new design. Guessing the latter.
I just mounted my BigBlue (which happens to be yellow), but I apparently managed to damage the thermistor wiring (the connection comes and goes), so I have to take it apart again and resolder it before I get to print something with it...
|
Re: Big Blue 360 April 24, 2014 04:05PM |
Registered: 10 years ago Posts: 859 |
Hi michaelljunggren, if you print Big Blue you will see that all the air going through it has to pass the HeatSink to keep it cooled.
The reason for using the Exhaust Pipe is to allow the user to decide how much of the air goes down to the cooling ports.
It also means that the air in the print area is warmed slightly, to reduce the effects of warping when it hits the print.
For Bridging, or small items cooling from the nozzle is critical to get a good result. Not enough cooling won't allow you Bridge as the hot
plastic falls dues to gravity. Big Blue can achieve Bridges in excess of 80mm, as is..
So you may say if that's the case then always have the most cooling near the HotEnd as you can.
But for other items like the Nautilus Gears, having to much cooling gives a poor print made up of a number of strands of plastic where the plastic
hasn't melted togeather. So slicing software regulates the fan, but with our design of HotEnd we require cooling of the HeatSink when ever the Heater is on.
This is where Big Blue comes in. By adding a servo controlled flap we can control the air flow via the Slicing software to alter how the air is used during a print, and so improve the quality of the print.
I hope to release a servo controlled flap assembly to fit on top of the exhaust in the next few days.
In the mean time I have updated Big Blues STL to remove the internal stiffener that needed removing, and updated the Fan Grill to sit on top of the Fans.
I won't be releasing a version of Big Blue with the flap already attached (Unless enough people ask for it). It will be a glue on item, together with a mounting for the servo.
Kim
Edited 2 time(s). Last edit at 04/24/2014 04:09PM by KimBrown.
Please send me a PM if you have suggestions, or problems with Big Blue 360.
I won't see comments in threads, as I move around to much.
Working Link to Big Blue 360 Complete
|
Re: Big Blue 360 April 24, 2014 04:23PM |
Registered: 10 years ago Posts: 64 |
My simple solution is to set the RPM of the fan by driving it externally, not via the duet. I always know what I'm printing so I always dial it in myself. I'm guessing the number of users that will invest in the time to install a servo is rather small.
Worth noticing is that by dialing in the RPM manually and using the 360, I notice very little difference in gravitational interference. As I said - I have a very powerful fan. At full, it doesn't perform much better than almost off.
Worth noticing is that by dialing in the RPM manually and using the 360, I notice very little difference in gravitational interference. As I said - I have a very powerful fan. At full, it doesn't perform much better than almost off.
|
Re: Big Blue 360 April 24, 2014 04:32PM |
Registered: 10 years ago Posts: 859 |
LoL a Yellow Big Blue....
It got it's name purely by chance.. Initialy when hammering out the design, I just happend to print it using Blue Filament (which was one of those painfull filaments that you had to get just right to get it to print).... Near the end of the print someone came in to the cabin where I was printing it, and said 'What's that, it's Big and it's Blue...' so the name stuck... In the mean time I've printed Orange and Candy Red, which as the wall thickness on Big Blue is much thinner than the original fan-duct, makes it semi-transparent.... and I much prefered that colour.... I may well print another Candy Red BB for my self, as you could almost see through it. BB is a complexed design, because of the Real Estate limitations.
As well as the flap idea, I am actualy forgetting that MY Big Blue already has two fans in. There is no reason why one fan can't be running all the time and the second one wired in to the PWM line.... Problem solved... I intend to add a timer to stop the main fan after the heater has been off for two minutes in any case.
So what colour is your Big Blue?
It's been good to watch the number of people downloading Big Blue, and from the numbers, it's starting to get a good following. 50 people/day are downloading BB at the moment. As more people get tired of Warped prints there will be more, as BB is a BackWash killer....
Edited 1 time(s). Last edit at 04/24/2014 04:34PM by KimBrown.
Please send me a PM if you have suggestions, or problems with Big Blue 360.
I won't see comments in threads, as I move around to much.
Working Link to Big Blue 360 Complete
|
Re: Big Blue 360 April 24, 2014 05:58PM |
Registered: 10 years ago Posts: 4 |
|
Re: Big Blue 360 April 24, 2014 06:10PM |
Registered: 10 years ago Posts: 64 |
|
Re: Big Blue 360 April 24, 2014 06:37PM |
Registered: 10 years ago Posts: 4 |
|
Re: Big Blue 360 April 24, 2014 10:19PM |
Registered: 10 years ago Posts: 859 |
WoW! Way ta go Hans.......
I think it's time for a friendly competition, 'Who can make the longest Bridge, with the Least 'Belly', 'Sag'?'
I think with the standard Bed we are going to get stuck for length of the bridge, so it would be great to see a long
bridge in both the X and Y axis, with the minimum 'Belly'/'Sag' thickness.
Now the measured length MUST be between piles... i.e. the unsupported length. (No cheating here by including the supports). So that's the rules.... Length, and belly thickness,,,,,
No external fan, or anything other than the Big Blue 1or2 fans to be used.
When you show your picture hold a ruler so we can see how long it is, and another picture of the thickest part of it's 'Belly'. It must have No loose loops hanging down, that's a fail...
Also publish the Firmware used, Extruder Temp, HotBed Temp, how closed you had the Exhaust Pipe, Bridging speed,and Bridge Flow ratio, ambient room temp would be good to so we can all get an idea of how it's going .
The minimum Bridge must be at least 2mm thick... No cheating here by running a single layer of filament across, it must be at least 2mm thick and 2mm wide.
HINT:- A diagonal will count as both X & Y..... The more closed the exhaust, the more cooling you'll have so the more solid the first layer will be, but is that the way to go.... Will the other layers MELD with the first layer if you go to far.
i.e. will the first layer be loose from the rest of the Bridge.
The Winner will get a free subscription to the Rep-Rap forum for a year........ hihihihihihi
Please send me a PM if you have suggestions, or problems with Big Blue 360.
I won't see comments in threads, as I move around to much.
Working Link to Big Blue 360 Complete
|
Re: Big Blue 360 April 25, 2014 01:44AM |
Registered: 10 years ago Posts: 378 |

|
Re: Big Blue 360 April 25, 2014 04:26AM |
Registered: 10 years ago Posts: 135 |
Hello!
I just printed the big blue last night,
I havn't got my ormerod with me so can't quite see how/where exactly it fits.. but am istching to take a scalpal to it...
also, i'm a bit unsure about the extra files (360 glue on nozzle kit)
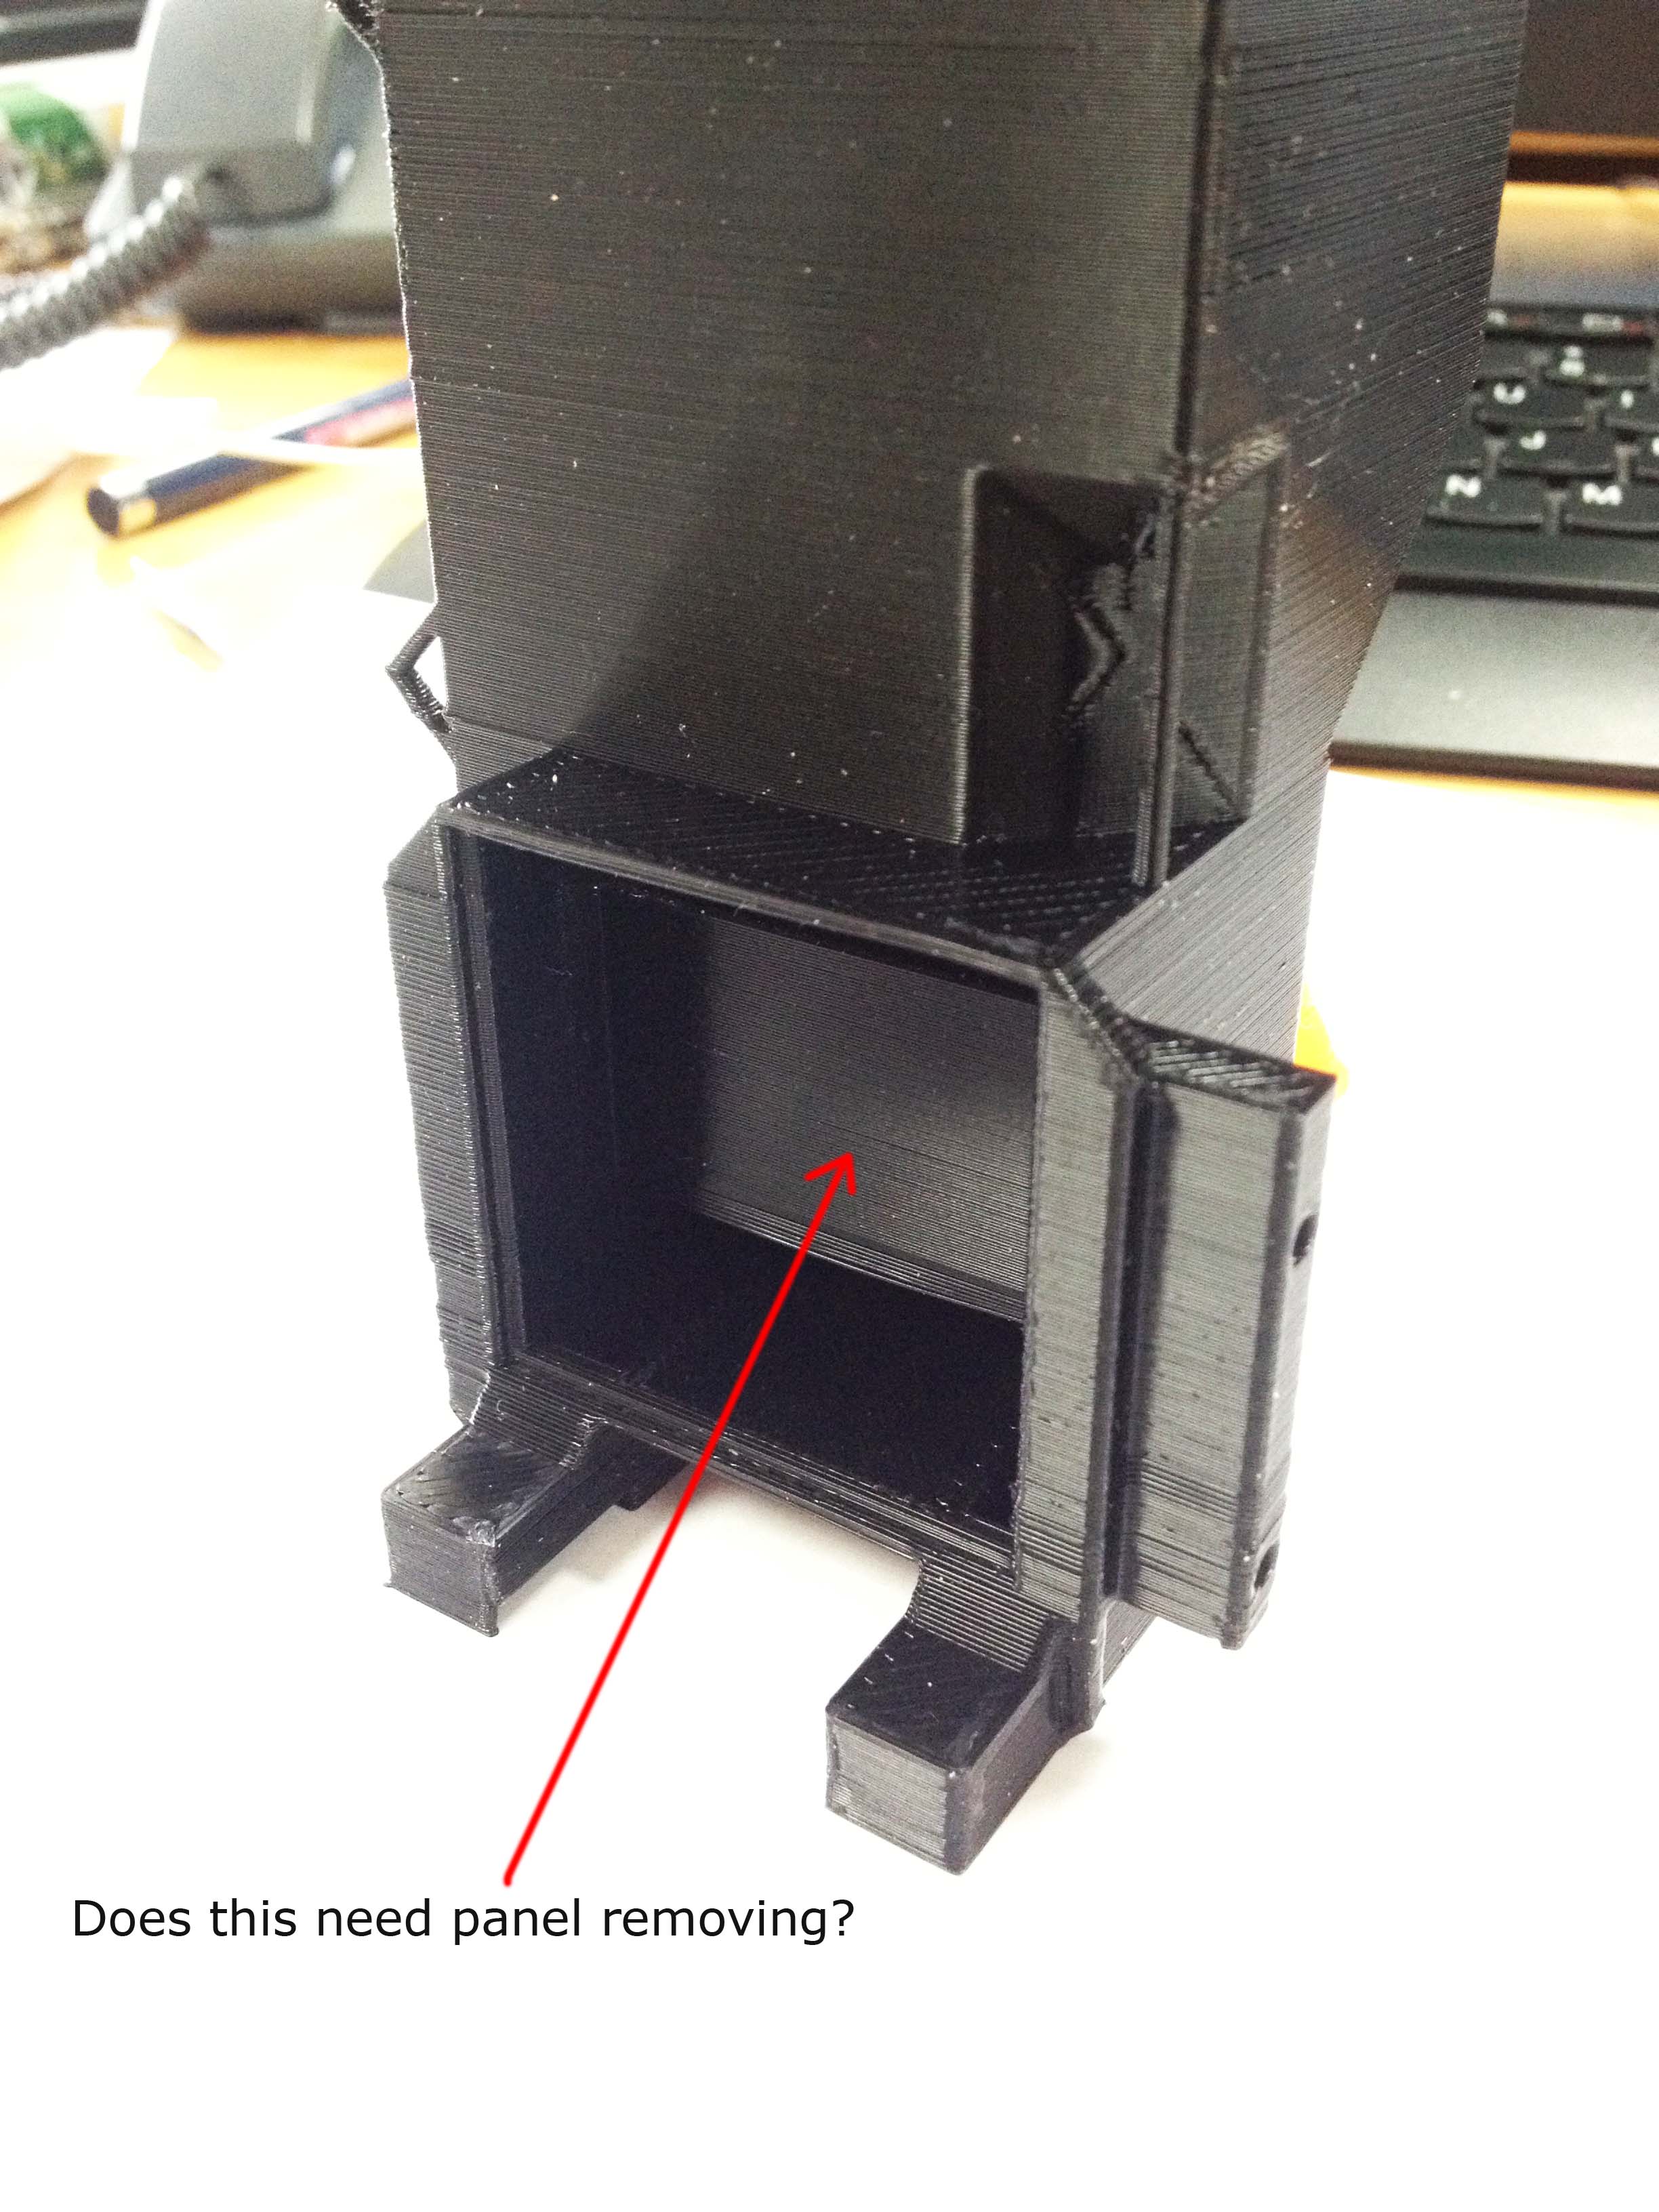
images attached of what i've done so far..
Do I still require the 360 nozzle kit? If so where does it fit on, do i cut into/cut off the existing air duct thingys??
many thanks.
Edited 1 time(s). Last edit at 04/25/2014 04:32AM by 88Zombies.
I just printed the big blue last night,
I havn't got my ormerod with me so can't quite see how/where exactly it fits.. but am istching to take a scalpal to it...
also, i'm a bit unsure about the extra files (360 glue on nozzle kit)
images attached of what i've done so far..
Do I still require the 360 nozzle kit? If so where does it fit on, do i cut into/cut off the existing air duct thingys??
many thanks.
Edited 1 time(s). Last edit at 04/25/2014 04:32AM by 88Zombies.
|
Re: Big Blue 360 April 25, 2014 05:28AM |
Registered: 10 years ago Posts: 378 |
The one you printed already have the "360" nozzles on it, so you don't need to print anything extra (other than possibly the different-sized "chimney covers" if plain tape doesn't suit your fancy).
As far as I can tell, that wall should remain in place. Air flows in through the upper hole, past the heatsink, and out through the lower hole and to the nozzles. Without the wall, the heatsink would get much less cooling.
As far as I can tell, that wall should remain in place. Air flows in through the upper hole, past the heatsink, and out through the lower hole and to the nozzles. Without the wall, the heatsink would get much less cooling.
|
Re: Big Blue 360 April 25, 2014 10:31AM |
Registered: 10 years ago Posts: 859 |
Hiya Zombies, you don't need the glue on nozzles my friend. I have left them up for people that printed the earlier versions of Big Blue.
I think any one that wanted them will have got them by now so I'll remove the item in a minute.
Ok, so here is what you need to remove..
At the bottom of BB there are thins supporting walls 0.25mm thick. I made them delibrately thin so you could snap them off with your fingers, then clean the rubbish away with a knife of file.
If you've downloaded and printed the Revision 1a file then that is basicaly it. Remove your old fan and duct, retain the heat sink and the fan, and put the rest away. The Fan sits in the top, you'll see the 4 securing holes for the screws. I put 4 in but two is fine, and there's room for two fans if you wish. The wire for the fan/s comes out the top of BB. The HeatSink sits in the square hole at the front, with the fins vertical. You may have to drill another hole on the HeatSink to allow for the two long screws to go through. If you downloaded and printed the revision 1 file, then there is a small ridge that runs across the top at the back of the HeatSink chamber that needs removing, otherwise the heatsink sits at a slight angle. It was put in initialy to stop the top of the chamber bowing during printing, but is redundant so has been removed in file 1a. The grill fits on top, and when you decide where the fan wires are going to come out you need to remove that edge of the grill to allow it to sit in the top. The exhaust pipe takes the metering plates to allow you to change the amount of air coming out of the nozzles. They press into the top, and should be a press fit, so you may need to file them down to fit. That's just about it. I suggest you glue the HeatSink in place to seal it using Bostick, UHU, or 5min Appoxy glue. This will give you the best result in the end... Oh and you can remove the column if you wish. It's purpose is to hold down the corner above during printing. You can use it to secure your probe wires if you wish.
There is a probe mount if your using the original probe, and the modified X-motor mount. The probe then sits behind the mount safely shieded by the mount from touching the M5 Z-axis lead screw...
Enjoy..
Kim..
Please send me a PM if you have suggestions, or problems with Big Blue 360.
I won't see comments in threads, as I move around to much.
Working Link to Big Blue 360 Complete
|
Re: Big Blue 360 April 26, 2014 07:32AM |
Registered: 10 years ago Posts: 48 |
I'm printing my Big Blue 360 rev 1a now and it's so far looking good... I've just nipped to the shop and bought a 2nd 40mm fan in order to get a bit more air through it. Looking at the reprappro site it says the existing fan is 12V (though as I'm printing, I can't read it or get so somewhere to measure it for sure) - maybe someone could confirm?
I assume I should just wire the 2nd 12V fan in in parallel using the same pins for now at least?
Could you mention what length M4 bolts you need to secure both fans in place (presumably bolts go through both fans and rubber rings.
Many thanks for your good work! Squags
I assume I should just wire the 2nd 12V fan in in parallel using the same pins for now at least?
Could you mention what length M4 bolts you need to secure both fans in place (presumably bolts go through both fans and rubber rings.
Many thanks for your good work! Squags
|
Re: Big Blue 360 April 26, 2014 10:20AM |
Registered: 10 years ago Posts: 378 |
The fan that came with the printer is 12V. And if you have two 12V fans, they should be wired in parallel.
What length bolts you need (which I think are M3 btw) depends on how thick the fan is, and if you have any O-rings in between. Just add up the thickness of the fans (maybe add 1-2mm for any O-rings); The bolts will be recessed a bit into the holes in the topmost fan, and that is about as much as you need sticking out the other end to thread into the holes in the fan duct.
I just have the one stock fan mounted (which I think is just under 20mm thick) and no O-rings and I have 20mm cap-head bolts.
Edit: Also, I just attached the fan with two bolts, diagonally across. Seemed more than enough to hold it firmly in place, and I can't notice any vibrations or anything. Fewer bolts = less weight.
Edited 1 time(s). Last edit at 04/26/2014 10:22AM by jstck.
|
Re: Big Blue 360 April 26, 2014 03:17PM |
Registered: 10 years ago Posts: 859 |
The fans are different sizes depending on where you get them. But normaly 20mm thick (mine are 10 or 15 I can't remember), so 45mm bolts are fine.
Yes just connect them up in parallel, I mounted mine with 'o' rings to reduce the noise. Two or four bolts is fine. The O rings squish down to nearly nothing if you use them, so tighten them up then slacken back a full turn to get the best out of using them.
Please send me a PM if you have suggestions, or problems with Big Blue 360.
I won't see comments in threads, as I move around to much.
Working Link to Big Blue 360 Complete
|
Re: Big Blue 360 April 26, 2014 04:44PM |
Registered: 10 years ago Posts: 48 |
Just a word of warning to anyone doing this modification... Don't be tempted to take the hot end bits apart to give them a clean or reposition them drastically... I made that mistake this evening... I only wanted to turn the hot end 90 deg, but stupidly still had some filament in the pipeline, so it kept flexing back and wouldn't stay where I wanted it. I heated it up, removed the filament and then tried turning the M5 threaded nozzle piece 90 degrees, so it'll but up against the brass tube holder. It was very tight indeed, so to loosen it, i turned it briefly the wrong way, after which it wouldn't shift at all. Finally, after trying to heat it free and that not working, I forced it a bit too much and the nozzle sheared off in the hot end block.
So I'll be calling RRP on Monday for a new nozzle, PTFE tube, heater block and cartridge heater (also seized in place).
Hopefully no one else will make this same mistake. I'm sure there are easier ways of adjusting this - I just should have thought first!
So I'll be calling RRP on Monday for a new nozzle, PTFE tube, heater block and cartridge heater (also seized in place).
Hopefully no one else will make this same mistake. I'm sure there are easier ways of adjusting this - I just should have thought first!
|
Re: Big Blue 360 April 28, 2014 12:12PM |
Registered: 10 years ago Posts: 135 |
@ kim -
Thanks for the info! i think i've printed the latest revision, i connected it all last night (not tested yet but looks like it should work).
This will show how much of a noob i am but i have 2 basic questions;
1.
When I pop the grill in (the metal bit that was originally placed between the fan and hot end) should the slats lay horrizontally or vertically?
I currently have them in horizontally as they were positioned before.
2.
how much lower should the hot end nozzle be against the plastic air ducts that surround it?
Its currently about 4mm which looks great as they plastic ducts dffintely wont catch any prints but after turning the PSU for a quick test, i can feel the air is blowing directly onto the nozzle. Could some one upload an image of theirs by any change??
@ Squags
this is what i was told the specs of the fan are;
MODEL 4020S12H
BEARING S
RATING VOLTAGE (VAC) 12
FREQUENCY (HZ)
RATING CURRENT (A) 0.13
POWER CONSUMPTION (W) 1.6
SPEED (RPM) 7500
AIR FLOW (CFM) 8.6
STATIC PRESSURE (MM-H2O) 5.58
NOISE (DB-A) 34 (lots)
...also, eeek, I didnt even consider the fact there would be solid filament inside the hotend nozzle when turning 90°, havn't tried a print yet but really hope mine works!!
pratically took the nozzle of trying to ammend the height 0.0 eeek.
Edited 1 time(s). Last edit at 04/28/2014 12:14PM by 88Zombies.
|
Re: Big Blue 360 April 28, 2014 01:26PM |
Registered: 10 years ago Posts: 859 |
@88Zombies................
AAAAAAAAAAAaaaaaaaaaaaaaaaaaaaa NO!!!!! The fins must be vertical... Else you won't get any cooling......
If you look there is a baffle plate to force the air to go down through the fins, so you will have to drill an extra hole in the HeatSink....
Some of the other peoples designs also had the fins vertical, so some people already have the extra hole.
The nozzle will be about 4-5mm above the nozzle, and the slots in them are angled at 45' so the air is forced to go on to the freshly printed plastic.
With your HeatSink at 90' (i.e. Horizontal) then the limited air flow (if any) will feel like it's blowing on to the nozzle....
(Note the nozzles are straight slots on the 360 and don't have the short vertical slot at the end as in this drawing).
PS
Yes it is a bit tricky turning the nozzle, but it would have meant puting a dog leg in the right hand nozzle to cater for the heater wires.
As air will go around corners, but pickup drag, I decided that it already had enough corners to go around already...
The nozzle will be fine even with the filament in while turning. It will untwist as soon as the heat goes on.
Edited 2 time(s). Last edit at 04/28/2014 01:34PM by KimBrown.
Please send me a PM if you have suggestions, or problems with Big Blue 360.
I won't see comments in threads, as I move around to much.
Working Link to Big Blue 360 Complete
AAAAAAAAAAAaaaaaaaaaaaaaaaaaaaa NO!!!!! The fins must be vertical... Else you won't get any cooling......
If you look there is a baffle plate to force the air to go down through the fins, so you will have to drill an extra hole in the HeatSink....
Some of the other peoples designs also had the fins vertical, so some people already have the extra hole.
The nozzle will be about 4-5mm above the nozzle, and the slots in them are angled at 45' so the air is forced to go on to the freshly printed plastic.
With your HeatSink at 90' (i.e. Horizontal) then the limited air flow (if any) will feel like it's blowing on to the nozzle....


(Note the nozzles are straight slots on the 360 and don't have the short vertical slot at the end as in this drawing).
PS
Yes it is a bit tricky turning the nozzle, but it would have meant puting a dog leg in the right hand nozzle to cater for the heater wires.
As air will go around corners, but pickup drag, I decided that it already had enough corners to go around already...
The nozzle will be fine even with the filament in while turning. It will untwist as soon as the heat goes on.
Edited 2 time(s). Last edit at 04/28/2014 01:34PM by KimBrown.
Please send me a PM if you have suggestions, or problems with Big Blue 360.
I won't see comments in threads, as I move around to much.
Working Link to Big Blue 360 Complete
|
Re: Big Blue 360 May 06, 2014 06:15AM |
Registered: 10 years ago Posts: 48 |
My big blue - or big black in my case is now up and running and the bridging isn't bad - though not as good as what you managed. Just a couple of questions:
1. The big blue is quite high relative to the nozzle, so on mine at least, the air is being directed mostly at the aluminium block, which may well be explaining the phenomenon above.
2. Going to X-axis home position doesn't really work. The edge of big blue designed for the original sensor mount hits the M5 threaded rod. Given both of the above I can only assume I'm using the wrong nozzle mount (I'm using the original). I see you've got another one on your list of updates - is this the one you're using and in what direction does it offset the hot end assembly? I can't see this making any difference to the first point though - would you be able to take a horizontal photo, showing the vertical difference of your nozzle/big blue assembly?
Thanks, Squags
|
Re: Big Blue 360 May 06, 2014 08:40AM |
Registered: 10 years ago Posts: 378 |
|
Re: Big Blue 360 May 07, 2014 08:56PM |
Registered: 10 years ago Posts: 859 |
Hi Squags, sorry for the delay in answering....
I work on a ship the other side of the country, so spent the day traveling yesterday, and working allot of today, and some how missed your post...
Sorry about that...
The Big Blue/Yellow.... is referanced around the HeatSink, so it should be the same height on all machines.
The nozzles should (if they are clear) blow the air down at 45' (approx) and miss blowing on to the Ally Block..
Height wise the whole assembly is governed by the length of the J Head in the HotEnd, as these are all the same, unless you have changed it for a longer one. As far as Bridging is concerned, I had One msg from someone who had poor Bridging in a few directions, which shouldn't have been the case. I told the guy to check the cooling ports were clear, as sometimes they can get rubbish in them, and he later replied, he'd fixed it, as some how he had the wires in front of one of the nozzle. I don't think he turned the Ally Block.
I'm wondering.... Did you turn the Ally Block assembly with the heater and thermister in by 90' so the wires go out under your Big Blue? If not then that's the problem there.
Please IGNOR the way the original probe was mounted in this picture.... The probe needs to be mounted on the Original Probe arm adapter.....
And the sensors point TOWARDS the M5 lead screw, and the Probe board tucks in safe behind the adapter arm.
Here, I'm in the process of going TOTALY probe less, so have already cut the arm off of my mount..... Else I'd do another picture.
If you can get a picture, that would help me tell you what's not right. Feel free to PM me. I might miss a post in a thread, but will get the PM...
I must get some sleep now, but get back to me... We'll get it sorted..
Kim
Edited 1 time(s). Last edit at 05/07/2014 08:57PM by KimBrown.
Please send me a PM if you have suggestions, or problems with Big Blue 360.
I won't see comments in threads, as I move around to much.
Working Link to Big Blue 360 Complete
I work on a ship the other side of the country, so spent the day traveling yesterday, and working allot of today, and some how missed your post...
Sorry about that...
The Big Blue/Yellow.... is referanced around the HeatSink, so it should be the same height on all machines.
The nozzles should (if they are clear) blow the air down at 45' (approx) and miss blowing on to the Ally Block..
Height wise the whole assembly is governed by the length of the J Head in the HotEnd, as these are all the same, unless you have changed it for a longer one. As far as Bridging is concerned, I had One msg from someone who had poor Bridging in a few directions, which shouldn't have been the case. I told the guy to check the cooling ports were clear, as sometimes they can get rubbish in them, and he later replied, he'd fixed it, as some how he had the wires in front of one of the nozzle. I don't think he turned the Ally Block.
I'm wondering.... Did you turn the Ally Block assembly with the heater and thermister in by 90' so the wires go out under your Big Blue? If not then that's the problem there.

Please IGNOR the way the original probe was mounted in this picture.... The probe needs to be mounted on the Original Probe arm adapter.....
And the sensors point TOWARDS the M5 lead screw, and the Probe board tucks in safe behind the adapter arm.
Here, I'm in the process of going TOTALY probe less, so have already cut the arm off of my mount..... Else I'd do another picture.
If you can get a picture, that would help me tell you what's not right. Feel free to PM me. I might miss a post in a thread, but will get the PM...
I must get some sleep now, but get back to me... We'll get it sorted..
Kim
Edited 1 time(s). Last edit at 05/07/2014 08:57PM by KimBrown.
Please send me a PM if you have suggestions, or problems with Big Blue 360.
I won't see comments in threads, as I move around to much.
Working Link to Big Blue 360 Complete
|
Re: Big Blue 360 May 12, 2014 07:32AM |
Registered: 10 years ago Posts: 48 |
Hi,
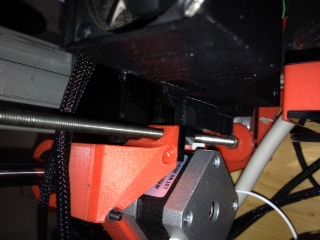
Sorry for the delayed reply. Here are some photos of my big blue (unfortunately black, so hard to take suitable photos). It seems that it's a couple of mm too close to the x arm to neatly fit beside the z axis assembly; hence why it's hitting rather than going to the home x position. If i've missed anything obvious do let me know, but don't worry if not - i quite like the look of your probeless solution, so might give that a go before too long. My local electrical shop has microswitches that look similar to what you've used there (with a wheel) - any chance of the rough dimensions, so i can compare before printing out the bracket?
Cheers,
Squags
|
Re: Big Blue 360 May 12, 2014 10:38PM |
Registered: 10 years ago Posts: 859 |
Hi Squags, the Probe arm should clear the Z-Nut trap by about 1 1/2 to 2mm approx. Not quite sure what's you've done there.(My probe mount has two screws in so I know where they are if I need them...They are doing nothing...Just storeage else I'd loose them).
I think that maybe the nozzle mount you are using is allowing the BB to sit to close to the X-axis arm. I'm using my Extended Nozzle Mount that gives an additional 1mm clearance for the Probe/table.
I'd suggest you try printing and using that first, to see if that moves the BB out a little further as the nozzle mount you might be using could be abit thin. My best guess there....
The Switch in the picture for the Z-Probing is 20x10x5mm approx. Mounted this way I found it had a clear run up and down the X-axis arm. The switch JUST accepts M2.5mm screws about 8/10mm long.
The screw holes are 10mm apart. Connections are to the COM & NC terminals as you can see in the picture. The switch came from Maplins (about £2 approx).
You can find it here:- SWITCH
I made the bracket for the switch then drilled two holes in the stiffener to screw it to.
If I get time tomorrow I will put the Bracket on ThingyVerse for you, and measure the height of the holes.
Hope that helps....
Off the Bed... Good Night..
Kim..
PS
Ian said to me the other day that the X-motor mount was designed to use a microswitch with an arm on it... So you could try this switch HERE
which looks like the one he meant. Else print and use my MicroSwitch bracket.... It lets a botton type microswitch similar to the others to be triggered by the X-carriage....
Edited 1 time(s). Last edit at 05/12/2014 10:45PM by KimBrown.
Please send me a PM if you have suggestions, or problems with Big Blue 360.
I won't see comments in threads, as I move around to much.
Working Link to Big Blue 360 Complete
|
Re: Big Blue 360 May 13, 2014 12:09PM |
Registered: 10 years ago Posts: 859 |
I will be releasing Revision 1b of Big Blue later today.
One very minor mod that will save people drilling holes for the Z-Axis MicroSwitch Bracket.
You won't need this revision if your ok with a hand drill and want to use the bracket.
Kim
Please send me a PM if you have suggestions, or problems with Big Blue 360.
I won't see comments in threads, as I move around to much.
Working Link to Big Blue 360 Complete

Sorry, only registered users may post in this forum.