My coreXY design is progressing to the build stage
Posted by the_digital_dentist
|
Re: My coreXY design is progressing to the build stage May 07, 2017 09:12AM |
Registered: 11 years ago Posts: 5,780 |
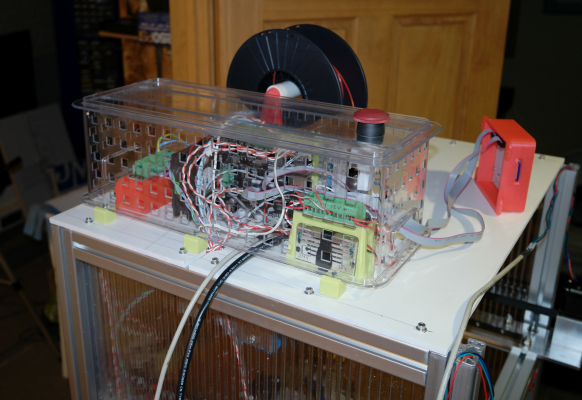
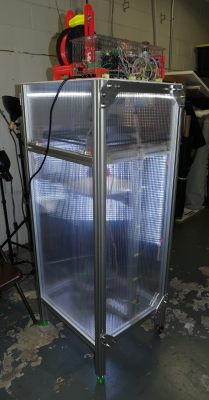
Progress! I added the left side panel (dual layer PC) and top (1/4" Sintra - foamed PVC), and got most of the electronics mounted.
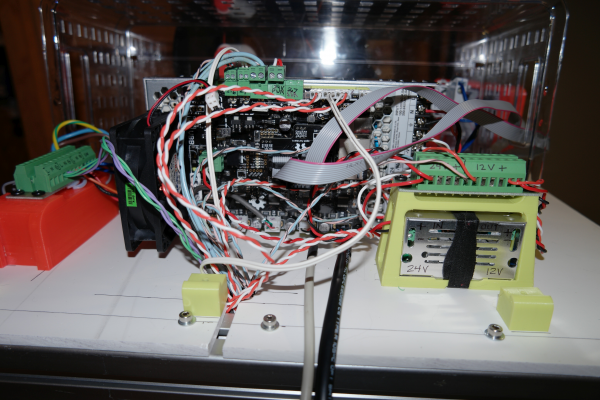
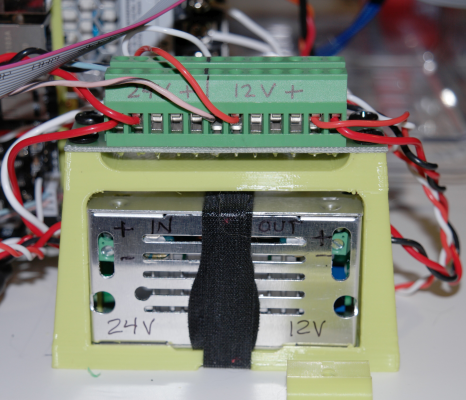
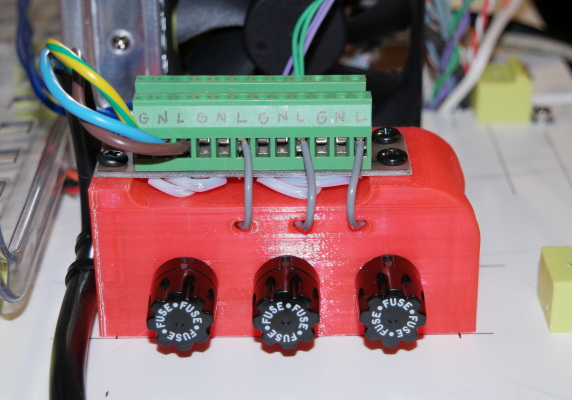
I had originally planned to mount the electronics on a panel that would tilt up so I could see the connections, but in a "doh!" moment, it occurred to me that I could just mount the electronics standing on edge and forget the hinge arrangement, so that's what I did. I used a clear plastic basket to protect it, keep fingers out, and allow plenty of ventilation. Unfortunately, it doesn't look very pretty, so I'll keep watching for something better (or maybe print something?). One of the things I struggled with was distributing DC and AC power to the different places it has to go in this machine. The AC distribution block has 3 separate, fused circuits, one for the main electronics (power supply, etc.), one for the bed heater, and a third for the soon-to-be-added enclosure heater. The main power switch is an industrial, red, emergency-stop type button that pushes down to kill power to the machine, stopping things pretty quickly. Turning power on requires twisting the button which then springs up. The DC block has screw terminals for 12V and 24V power. Things like LEDs and fans run on 12V provided by a buck-boost converter.
Lovely, isn't it?:
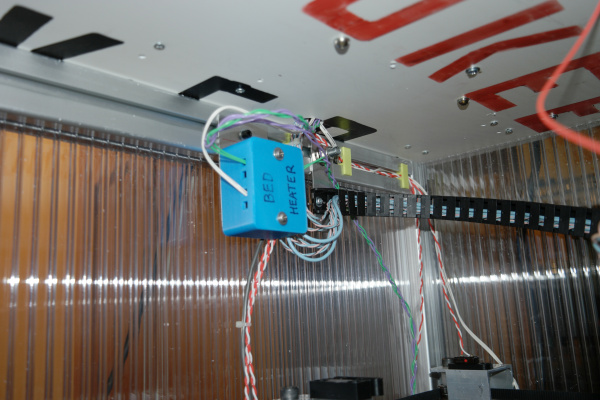
The bed heater SSR is mounted on the frame just under the controller board, inside the enclosure. I may move it out when I add the enclosure heater:
DC power distribution block- the buck/boost converter is held in using a velcro strap:
AC power distribution with fuses for power supply/controller, bed heater, and enclosure heater:
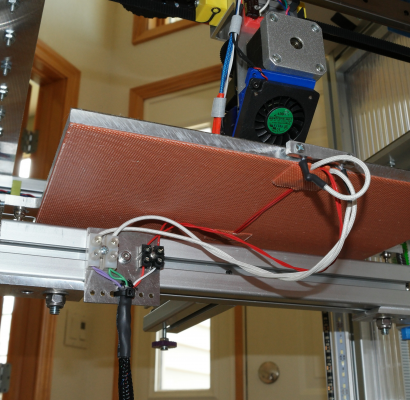
The bed heater and thermistor wires hang in a loop from the underside of the bed. I may add some braided cable jacketing, but they seem to be fine without it and it might be better to allow them a little space so the AC line doesn't induce noise in the thermistor wires. Power is delivered to the bed heater via 4 x 20 gauge teflon insulated wires (purple and green) that are braided to keep them together without twisting.
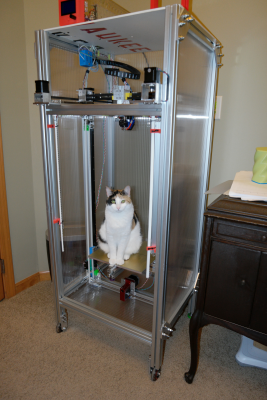
I have to say that the double walled PC enclosure panels look nice, but they develop static charges very easily and printing debris and cat hair sticks to them. They also have a lot of saw dust inside the air channels. I may have to take the thing apart, blow them out with compressed air, then apply tape to the top and bottom edges to keep them closed. Having them slide into the slots in the frame is a neat, zero hardware way to mount them, but it makes servicing the machine and routing some cables a bit of a problem. For example, the screw terminal block for the bed connections faces the back of the machine, and in order to access it I have to lay the machine down, take off a bottom frame member, then slide the PC out of the slots. Fortunately, I shouldn't have to do that more than once or twice. If I tap on the panels with my hand they rattle, but they don't make any noise at all while the machine is printing. It will be interesting to see how they behave when the machine heats up to print ABS.
ToDos: route the A and B motor cables, add a bed heater thermal cut off, LED switch (UV-off-white), enclosure heater and fan(s), LCD panel mount, filament-out sensor, bottom panel and front doors.
Edited 1 time(s). Last edit at 05/07/2017 08:31PM by the_digital_dentist.
Ultra MegaMax Dominator 3D printer: [drmrehorst.blogspot.com]
|
Re: My coreXY design is progressing to the build stage May 07, 2017 01:54PM |
Registered: 11 years ago Posts: 5,780 |
I'm printing a new enclosure for the LCD module... Here's what it looks like: [vimeo.com]
Ultra MegaMax Dominator 3D printer: [drmrehorst.blogspot.com]
Ultra MegaMax Dominator 3D printer: [drmrehorst.blogspot.com]
|
Re: My coreXY design is progressing to the build stage May 07, 2017 05:23PM |
Registered: 8 years ago Posts: 338 |
|
Re: My coreXY design is progressing to the build stage May 08, 2017 09:21AM |
Registered: 8 years ago Posts: 5,232 |
The static charge could become a problem one day. Maybe ( transparent? ) antistatic spray and some grounding wires help.
I have felt the static charge on my heated bed too, it is isolated by nylon posts and it cracks and tingles, when I remove a part.
I fear of killing my electronics or ruin a print, so I always touch the frame before touching the controller.
I have felt the static charge on my heated bed too, it is isolated by nylon posts and it cracks and tingles, when I remove a part.
I fear of killing my electronics or ruin a print, so I always touch the frame before touching the controller.
|
Re: My coreXY design is progressing to the build stage May 08, 2017 10:42AM |
Registered: 11 years ago Posts: 5,780 |
The machine's frame and power supply are grounded to the ground connection in the power line coming in to the printer. I'm not too concerned about it.
I have some "permanent" antistatic spray called Licron from my electrostatic loudspeaker days. Unfortunately, it tends to make the surface look dirty, so unless I have a problem, I won't be using it.
Ultra MegaMax Dominator 3D printer: [drmrehorst.blogspot.com]
I have some "permanent" antistatic spray called Licron from my electrostatic loudspeaker days. Unfortunately, it tends to make the surface look dirty, so unless I have a problem, I won't be using it.
Ultra MegaMax Dominator 3D printer: [drmrehorst.blogspot.com]
|
Re: My coreXY design is progressing to the build stage May 08, 2017 06:46PM |
Registered: 8 years ago Posts: 338 |
I see you have used the Rhyno to control the belts. I was wondering what size rod did you use? I think i read 8mm. I cant seem to find a datasheet for the rhyno drive. Also, it looks like it uses a pin to lock the rod in place in the picture, but it like you have some sort of coupler. How did you attach the rod to the gear? Finally, did you use the stepper motor that comes with the Ryhno drive or did you upgrade it to a nema23?
Thanks!
Edited 1 time(s). Last edit at 05/08/2017 08:05PM by Qdeathstar.
Thanks!
Edited 1 time(s). Last edit at 05/08/2017 08:05PM by Qdeathstar.
|
Re: My coreXY design is progressing to the build stage May 08, 2017 09:25PM |
Registered: 11 years ago Posts: 5,780 |
The stepper that came on the Rino is a 166 oz-in NEMA-23 motor, but with 30:1 reduction / torque multiplication, I think a NEMA-17 motor could do the job. It has an 8mm keyed shaft, and a couple rings with grub screws keep the shaft from sliding out of the gear box. I am running the motor at 1A, driven directly by the smoothieboard, and it doesn't even get warm.
Here's the Rino I bought- looks like he is still selling them: [www.ebay.com]
Here's the data sheet: [www.ondrivesus.com] These are the PF30-30ANM parts on page 3.
I don't know why he doesn't have the word "Ondrives" in the title somewhere- I was looking at these things on ebay for a couple weeks before I found his listing. "Rino" is used for a lot of different products.
This guy sells the shafts: [www.ebay.com]
I asked him to make me an extra long one (I could have done it at the makerspace, but I don't know that it would have been cheaper by the time I acquired the shaft and key stock, tools, etc.). IRIC I paid him $20 or 25 to make the longer shaft.
My measurements of belt stretch include the shaft torsion, of course. I put the motor at the middle of the shaft so the torsion would be equal at both belts.
Edited 5 time(s). Last edit at 05/08/2017 09:48PM by the_digital_dentist.
Ultra MegaMax Dominator 3D printer: [drmrehorst.blogspot.com]
|
Re: My coreXY design is progressing to the build stage May 08, 2017 10:46PM |
Registered: 8 years ago Posts: 338 |
|
Re: My coreXY design is progressing to the build stage May 09, 2017 08:32AM |
Registered: 11 years ago Posts: 5,780 |
No flats on the shaft- the pulleys I used have two grub screws each. YMMV. One, 1" or so long key slot in the middle of whatever length you're ordering. Order it a little longer than you need- you can always cut it down once your Z axis design is fully baked.
Edited 1 time(s). Last edit at 05/09/2017 08:32AM by the_digital_dentist.
Ultra MegaMax Dominator 3D printer: [drmrehorst.blogspot.com]
Edited 1 time(s). Last edit at 05/09/2017 08:32AM by the_digital_dentist.
Ultra MegaMax Dominator 3D printer: [drmrehorst.blogspot.com]
|
Re: My coreXY design is progressing to the build stage May 19, 2017 06:39PM |
Registered: 11 years ago Posts: 5,780 |
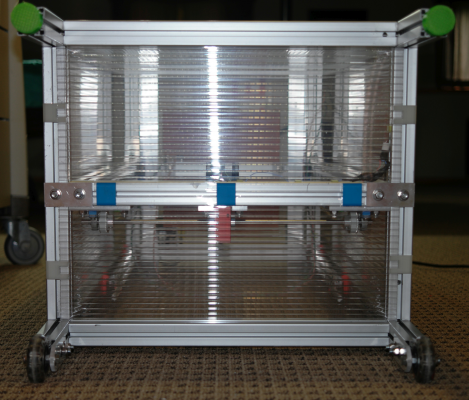
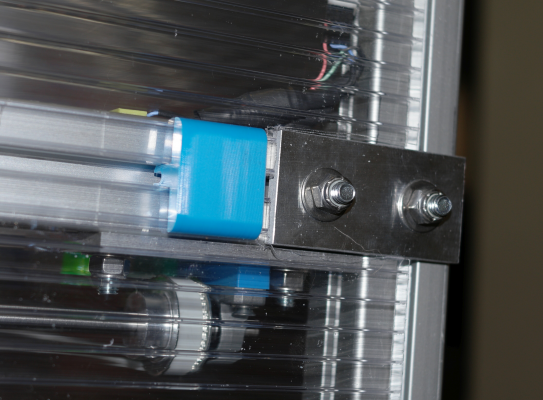
Slow progress- I decided that I liked the way the double layer PC looks so I used the last of it to finish the bottom. There are two separate pieces that fit into the frame slots at the front and rear and are held on the sides by printed snap fit (well OK, pound with a rubber mallet) pieces with fingers that insert into the air channels in the DLPC. Finally, there are a few pound in clamps (blue) that fit into the bottom of the Z axis frame piece.
I still have to make the front doors, finish some of the wiring, install the chamber heater, install a volcano heater block with a big nozzle, and add some corner braces. It never ends!
I've been using this thing to do quite a bit of printing with PLA and it has been performing extremely well. I have not had to relevel the bed since the initial setup. One of these days I'll mount a dial gauge on it and measure the flatness.
Ultra MegaMax Dominator 3D printer: [drmrehorst.blogspot.com]
|
Re: My coreXY design is progressing to the build stage May 19, 2017 08:49PM |
Registered: 7 years ago Posts: 249 |
Nice preassembled iris box. Evil print, I know [www.thingiverse.com]
Agree with the look of the 2 layer PC, can only hope it stays as cool as it looks when you add heat.
Agree with the look of the 2 layer PC, can only hope it stays as cool as it looks when you add heat.
|
Re: My coreXY design is progressing to the build stage May 19, 2017 11:31PM |
Registered: 11 years ago Posts: 5,780 |
It's only going to about 50C... It should be OK.
Ultra MegaMax Dominator 3D printer: [drmrehorst.blogspot.com]
Ultra MegaMax Dominator 3D printer: [drmrehorst.blogspot.com]
|
Re: My coreXY design is progressing to the build stage May 21, 2017 03:46PM |
Registered: 7 years ago Posts: 249 |
Yea, that's well below the Tg for PC (147 C)
The Dimension I used to run would heat the chamber to about 75 C and head to 280 C for ABS, as a result the belts would get cooked and crack over time. Well, years actually.
Replaced them with polyurethane backed belts that have a higher Tg than neoprene. Even so, Gates Polychain belts are still only rated to 85 C, must be something to do with the nylon tooth face.
Your belts are highly visible, so any wear-n-tear will be readily apparent. So my rambling is moot.
|
Re: My coreXY design is progressing to the build stage May 29, 2017 09:46PM |
Registered: 11 years ago Posts: 5,780 |
I made a gauge mount for the extruder carriage and used it to tweak the bed level to final position today. I also ran a couple flatness scans at 19C and 100C. Unfortunately, the way the machine is built, part of the frame obscures the gauge when it's near the front edge of the bed plate. I set the leveling up at 100C, so the room temp scan looks a little different. It looks like the right rear corner is a little higher than the rest of the bed, but not enough to matter.
19C flatness scan
100C flatness scan
The tests are measuring the distance from the extruder carriage to the bed surface, so the numbers include the cast aluminum bed plate flatness, the adhesive tape that holds the PEI flatness, the PEI flatness, the X axis sag, and rest of the frame sag. The accuracy spec on the gauge is +/- 20 um.
Ultra MegaMax Dominator 3D printer: [drmrehorst.blogspot.com]
|
Re: My coreXY design is progressing to the build stage May 30, 2017 06:02PM |
Registered: 11 years ago Posts: 5,780 |
Slow progress: I made a filament spool holder that will prevent filament from escaping over the spool's flanges and getting tangled. See it here: [vimeo.com]
I printed it on UMMD and the quality is great, in fact it's the best. No one, and I say this with great surety, no one has better.
Ultra MegaMax Dominator 3D printer: [drmrehorst.blogspot.com]
I printed it on UMMD and the quality is great, in fact it's the best. No one, and I say this with great surety, no one has better.
Ultra MegaMax Dominator 3D printer: [drmrehorst.blogspot.com]
|
Re: My coreXY design is progressing to the build stage June 04, 2017 06:35AM |
Registered: 10 years ago Posts: 221 |
|
Re: My coreXY design is progressing to the build stage June 04, 2017 06:52AM |
Registered: 11 years ago Posts: 5,780 |
Ultra MegaMax Dominator. I don't have a volcano, yet.
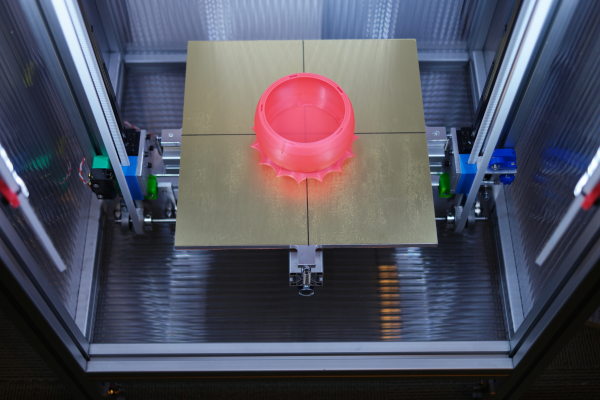
I printed this single-walled vase a couple days ago with a 0.6 mm nozzle that I made by drilling out a 0.4 mm nozzle.
Printed with 0.75mm line width, 0.36 mm layers, spiral vase mode. Slic3r seems to have trouble with the stl file because every once in a while it would stop, move the nozzle and restart, leaving gaps in the plastic.
Ultra MegaMax Dominator 3D printer: [drmrehorst.blogspot.com]
|
Re: My coreXY design is progressing to the build stage June 05, 2017 07:43PM |
Registered: 8 years ago Posts: 338 |
The Digital Dentist, I saw you were HTD 3M steel reinforced belt to lift the z axis.
My question is, is all HTD 3M belt steel reinforced or do i have too look for that?
Also, how wide is your belt? It looks like it is around 10mm..
I also saw how you got 36t pulleys to drive the z axis. Are GT2 pulleys the same as HTD pulleys? Did you use the toothed pulleys for the top and bottom of the z drive chain or did you used flanged bearing on the top?
Also, since GT2 pulleys/belt is more common, do you think HTD 3M belt is better than GT2 Steel Belt?
Thanks!
Edited 1 time(s). Last edit at 06/05/2017 07:57PM by Qdeathstar.
|
Re: My coreXY design is progressing to the build stage June 05, 2017 08:41PM |
Registered: 11 years ago Posts: 5,780 |
I used 10 mm wide HTD-3M belts. I don't know if they all have steel cores. Probably not.
The pulleys at the top of the Z axis are stacked F608zz bearings. The belt space is 11 mm so it works with 10 mm wide belts just fine. The 22 mm diameter might be smaller than optimal for steel core belts, but the belt came from China without any specs and I haven't seen any specs on other steel core belts that specify bending radius limits. Larger pulleys at the top would probably result in longer belt life. When I started this whole thing I made the top pulleys for GT2 glass core belt. I just used the same assemblies for the HTD-3M steel core belts.
HTD is a different tooth profile from GT2, and in my case, 3 mm pitch. I think I ended up with HTD-3M pulleys through a series of decisions that included having an 8mm shaft on the Rino worm drive and maybe having one of the pulleys already in my possession. Pulleys are cheap, so I don't recall the whole sequence of reasons that led me to 36 tooth HTD-3M pulleys, but I do recall there was definitely a sequence that made sense at the time, with cost being a minimal consideration.
For a given width, I suspect steel core GT2 belts and HTD belts have the same number of steel wires, so I would expect similar stretch for similar loads. I'm not sure how easy it is to find GT2 pulleys for 8 mm shafts, which is what I was dealing with.
Ultra MegaMax Dominator 3D printer: [drmrehorst.blogspot.com]
|
Re: My coreXY design is progressing to the build stage June 07, 2017 12:24PM |
Registered: 8 years ago Posts: 776 |
Quote
the_digital_dentist
Slic3r seems to have trouble with the stl file because every once in a while it would stop, move the nozzle and restart, leaving gaps in the plastic.
please, dd, i have such a high regard for your engineering expertise that i am actually quite taken aback to hear that you are using slic3r. slic3r is written in perl - a language that is so complex that it is often a joke - with an important message behind it - that perl is "WORN" - Write Once, Read Never. the mindset that goes with perl unfortunately has a side-effect: complexity combined with "clever-ness" that often fails spectacularly in unexpected scenarios... where the developers themselves are unable to recall the very same "clever-ness" that went into code that they wrote only months before and so cannot fix it.
an example was a complex part for the libre laptop that i am doing: slic3r decided that it would VARY the height, printing some layers in the required and requested 0.2mm but deciding, in its infinite f*****g stupid wisdom, to push out four times the amount of filament on some of the layers at a 0.4mm layer height. analysing the GCODE in a 3D viewer, i found these and many other f*****d-up decisions, and they left me with a deeply lasting impression that the developer(s) behind slic3r are, frankly, incompetent. efforts to report bugs remain unanswered.
when i initially bought a mendel90 three or four years ago i learned of skeinforge, and that chris palmer (nophead) supplied configurations which he himself ran *by hand* (from the command-line). whilst i am used to this in software engineering it was a bit too much for me at the time and i settled on cura 15.04. i am now *returning* to skeinforge (with pronterface as the front-end) now that i know much more about 3D printing than i did, and i can say definitely that skeinforge has the features that i need to produce quality 3D GCODE.
anyway... just fyi.
|
Re: My coreXY design is progressing to the build stage June 07, 2017 10:11PM |
Registered: 11 years ago Posts: 5,780 |
I have used Slic3r, Cura, Kisslicer, Simplify3D and found that all of them screw up from time to time, depending on the geometry. There's no perfect slicer. If one doesn't work right for a particular STL file, then you try a different one. I'm not a coder, but I think the problem is rooted in the STL file interpretation. STL files are actually just a collection of points and it is up to the slicer to figure out which points to use to make up the triangles of the surface. There are different algorithms for that and some work better under some circumstances than others. There are probably some trade-offs made for speed.
Slic3r's 1.3.0 dev version has fixed a lot of the problems it was having before- it used to crash a lot if you tried changing too many print parameters too quickly. Of course, there are still some bugs, and support material generation seems to have regressed a bit- it wants to create tiny pillars, even when you select rectilinear grid, that are nearly impossible to keep stuck to the bed plate. Cura has always been very good for support material generation so I tend to use Cura when I am trying to print something that needs a lot of support material.
Ultra MegaMax Dominator 3D printer: [drmrehorst.blogspot.com]
|
Re: My coreXY design is progressing to the build stage June 08, 2017 02:59AM |
Registered: 10 years ago Posts: 14,672 |
lkcl, I share your concerns about Perl. However, the slic3r commit comments say that the gcode generator was rewritten in C++ `11.
Large delta printer [miscsolutions.wordpress.com], E3D tool changer, Robotdigg SCARA printer, Crane Quad and Ormerod
Disclosure: I design Duet electronics and work on RepRapFirmware, [duet3d.com].
Large delta printer [miscsolutions.wordpress.com], E3D tool changer, Robotdigg SCARA printer, Crane Quad and Ormerod
Disclosure: I design Duet electronics and work on RepRapFirmware, [duet3d.com].
|
Re: My coreXY design is progressing to the build stage June 08, 2017 10:32AM |
Registered: 8 years ago Posts: 88 |
@the_digital_dentist: why don't use use "Prusa edition"? It has lots of improvements (performance & stability) vs "original" Slic3r.
[github.com]
Edited 1 time(s). Last edit at 06/08/2017 10:33AM by sigxcpu.
[github.com]
Edited 1 time(s). Last edit at 06/08/2017 10:33AM by sigxcpu.
|
Re: My coreXY design is progressing to the build stage June 12, 2017 01:27PM |
Registered: 8 years ago Posts: 601 |
I use simplify3D these days... The only issue I've found is that sometimes it misses a layer, or adds in a random solid layer. I believe that this is most likely misinterpretation of the .stl file as you say. Simplify3D have not released an update in quite sometime to fix this which I find worrying.
It is easy to solve though, often moving the item slightly, changing the layer height or exporting the file again from whatever design software you use fixes the problem.
It is easy to solve though, often moving the item slightly, changing the layer height or exporting the file again from whatever design software you use fixes the problem.
|
Re: My coreXY design is progressing to the build stage June 18, 2017 08:24PM |
Registered: 11 years ago Posts: 5,780 |
slight progress update...
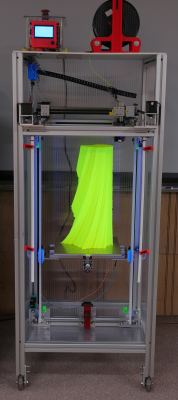
I replaced the brass nozzle with a steel nozzle, 0.4 mm, but also have some 0.8 mm nozzles handy and ready to go.
I added corner bolsters to the sides of the machine today which seem to have stiffened it considerably. I used 1/4" aluminum plate and bolted it to the frame with 5/16"-18 carriage bolts.
Ultra MegaMax Dominator 3D printer: [drmrehorst.blogspot.com]
|
Re: My coreXY design is progressing to the build stage June 18, 2017 10:29PM |
Registered: 8 years ago Posts: 338 |
|
Re: My coreXY design is progressing to the build stage June 18, 2017 10:55PM |
Registered: 11 years ago Posts: 5,780 |
I agree completely. The machine looks great from the top of the frame down. Everything above looks like crap. I'm working on it...
I put the braces on the sides of the machine only as the wobbliness of the frame appears to primarily be front-back, not side to side, probably due to the large moving mass of the Y axis.
A price? If I said $5k, it would be equivalent of getting paid $2 per hour of effort that's gone into it. Let's just call it "priceless".
I don't have the front panels for it yet and I'm deciding what to do about heating the enclosure- I have a 500W heater ready to go, but I'm thinking it may get hot enough to print ABS with just the bed heater and everything closed up. I'm going to close off the front with whatever is handy and run some tests with just a fan to circulate the air inside the box.
Oh yeah, one more slight improvement was made today- I swapped the A and B pins for the LCD encoder in the config file and so reversed the rotation direction for menu selections to a "normal", US-style in which rotating the knob clockwise increases the setting. It seems they do the opposite in europe (except for volume controls, go figure!).
Edited 1 time(s). Last edit at 06/18/2017 10:58PM by the_digital_dentist.
Ultra MegaMax Dominator 3D printer: [drmrehorst.blogspot.com]
|
Re: My coreXY design is progressing to the build stage June 18, 2017 11:27PM |
Registered: 11 years ago Posts: 5,780 |
One more reason not to let the bed drop when power is cut:
Ultra MegaMax Dominator 3D printer: [drmrehorst.blogspot.com]
Ultra MegaMax Dominator 3D printer: [drmrehorst.blogspot.com]
|
Re: My coreXY design is progressing to the build stage June 19, 2017 02:17AM |
Registered: 8 years ago Posts: 5,232 |
|
Re: My coreXY design is progressing to the build stage June 19, 2017 01:51PM |
Registered: 8 years ago Posts: 601 |
Sorry, only registered users may post in this forum.
