Folger Prusa i3 Kit from ebay
Posted by Waltermixx
|
Re: Folger Prusa i3 Kit from ebay December 09, 2014 05:10AM |
Registered: 9 years ago Posts: 1,011 |
I agree with most or your comment. You surely wonder why there's is 3 LM8UU instead on 4 ont the bed and the Z carriage. That's beacause if you install 2 on both side, the two rods must be perfectly parallel or you will have anormal wear of the rod and one bearind on one side. Because most of people can't build with the required precision, most of the reprap designs use 3 bearings only. As you say, the bearings must be also aligned properly, which is difficult with the Y bushing, and also with the Z bushings on the X ends, especialy because there's 4 bearings and because it's difficult to align rods properly. Maybe I will change the acrylic frame for a strong 15mm MDF frame.Quote
mikez104
Quote
KeyserSoze3d
Same here, I can still level mine but one of the corners the screw is compressed all the way, so if it warps anymore I'm screwed. I was considering getting one of folger techs aluminum beds. I was curious to see how thick/heavy it was. It may be worth the 14 dollars to have a bed I can level, but i would hate for it to cause my stepper to skip steps.
SO this weekend I had mine apart and put back together several times. I learned a few things.
First off, acrylic frames are stupid.
Second, watch it operate very closely and listen to it. If you hear anything wonky, try and pinpoint it.
Third, my bed seems to change level when it heats up. I don't bother even checking it until it has been up to printing temp for a little while. that's both bed and head.
KeyserSoze, My bed was so warped that I could no longer use it and that's why I made the wooden bed. I cut it out of 1/8" birch ply and used the original as a guide to drill the holes. Actually I made two and I'm glad I did. When I put it back together the wooden bed seemed to be doing the same thing. I had the screws turned all the way in on one end and the other side was all the way out.
I eventually figured it out after watching it and breaking out the digital caliper and making measurements to see where it was jacked up. I found that the Y bearing holders that are printed are NOT equal and they would hold the bearings at different heights which was torquing the bed in different directions. I took all of them and put them on the same smooth rod and put them all on a sanding block and sanded for a good 10 minutes to even them out. They were really off.
Beware also of the table holding your printer. If it's not perfectly flat, the Y chassis can twist, and if you move the printer even at a short distance, all the geometry of the machine changes. You need to do the setup again.
When making my second wooden bed, I didn't like the way there were two linear bearings on one side and only one on the other. The side with only one bearing was the side that was warping. So, when drilling the holes in the wooden bed, I flipped over my template and drilled holes for two bearings on both sides. That helped also.
The last thing I found is that when everything was all back together, one side of the frame was a little up in the air. Originally I thought, oh well, and put a spacer under it to make it solid. Then I looked at it and saw that the side that was up was the side that had the bed all compressed. I leveled it and it made a difference. I will be mounting the printer to a piece of MDF or something to make sure it does not move in the future.
All of these things together made a big difference. I made several really nice prints. I printed the case for my controller, a spool holder, light mounts for my daughters fish tank and some other little things. Once you get it dialed in, it prints like a champ.
Happy tuning.
Edited 1 time(s). Last edit at 12/09/2014 05:12AM by Zavashier.
Collective intelligence emerges when a group of people work together effectively. Prusa i3 Folger (A lot of the parts are wrong, boring !)
|
Re: Folger Prusa i3 Kit from ebay December 09, 2014 09:55AM |
Registered: 9 years ago Posts: 45 |
Quote
mikez104
The last thing I found is that when everything was all back together, one side of the frame was a little up in the air. Originally I thought, oh well, and put a spacer under it to make it solid. Then I looked at it and saw that the side that was up was the side that had the bed all compressed. I leveled it and it made a difference. I will be mounting the printer to a piece of MDF or something to make sure it does not move in the future.
All of these things together made a big difference. I made several really nice prints. I printed the case for my controller, a spool holder, light mounts for my daughters fish tank and some other little things. Once you get it dialed in, it prints like a champ.
Happy tuning.
Thanks so much for that info Mike.
Another thing I found after assembling the Y assembly was it was not square. This was made apparent when the belt would not track well. I had to lengthen my assembly a little bit to allow some lateral movement of the rods in order to get the thing squared-up.
I also glued the belt pulley halves together to keep them from separating and causing a bind in the pulley yoke.
One other thing I added was bushings in the corner blocks. Some 11/32" brass tubing fits nicely after the holes in the blocks are cleaned out with an 11/32" drill bit.
Oh, I almost forgot. I noticed the Y stepper motor deflects a little bit when in action. If someone could make a piece that would fit over the two threaded rods, behind the stepper, with an adjusting screw that could be tightened against the motor, that would keep the motor from deflecting when moving the bed. I am just stuffing a spacer in there for now.
Edited 1 time(s). Last edit at 12/09/2014 10:00AM by Easy.
|
Re: Folger Prusa i3 Kit from ebay December 09, 2014 10:59AM |
Admin Registered: 11 years ago Posts: 3,096 |
I just couldn't help but notice a comment by 'mikez104'. It is about acrylic frames and I completely agree, the frames are completely stupid. Unless you make it very thick/well develop with supporting parts.
I have had a Prusa Air 2, but in the end decided to ditch the frame. Now redesigning it in wood, not only does it bend less (if you use the correct kind of wood), but it has a very nice contrast to the metal and electronic parts. Besides that, wood can be easily fixed with simple tools and parts can be exchanged easier.
But the worst of all I have found in my acrylic frame was the flex. The frame is made of clear acrylic, 6mm, and is 'clearly' not thick enough. You could use aluminium, but you'd have to be careful with electronics near it, as the aluminium is a good conductor. Not saying aluminium is bad, but maybe it's not for everyone.
The flex ruined the precision, but only by a small percentage. The flex created sounds, vibrations and the flex kept on existing even after gluing acrylic parts together. Only after adding cross-beams was it that I had removed 99,9% of the flex.
A week ago I had the CNC machine at my academy make me a wooden box with roughly the same dimensions in triplex, this was such a lightweight, cheap and stiff material compared to acrylic. I really don't know why so many manufacturers put acrylic in their machines. Probably because it makes them sell better?
http://www.marinusdebeer.nl/
|
Re: Folger Prusa i3 Kit from ebay December 09, 2014 12:26PM |
Registered: 9 years ago Posts: 45 |
Quote
Ohmarinus
I just couldn't help but notice a comment by 'mikez104'. It is about acrylic frames and I completely agree, the frames are completely stupid. Unless you make it very thick/well develop with supporting parts.
I have had a Prusa Air 2, but in the end decided to ditch the frame. Now redesigning it in wood, not only does it bend less (if you use the correct kind of wood), but it has a very nice contrast to the metal and electronic parts. Besides that, wood can be easily fixed with simple tools and parts can be exchanged easier.
But the worst of all I have found in my acrylic frame was the flex. The frame is made of clear acrylic, 6mm, and is 'clearly' not thick enough. You could use aluminium, but you'd have to be careful with electronics near it, as the aluminium is a good conductor. Not saying aluminium is bad, but maybe it's not for everyone.
The flex ruined the precision, but only by a small percentage. The flex created sounds, vibrations and the flex kept on existing even after gluing acrylic parts together. Only after adding cross-beams was it that I had removed 99,9% of the flex.
A week ago I had the CNC machine at my academy make me a wooden box with roughly the same dimensions in triplex, this was such a lightweight, cheap and stiff material compared to acrylic. I really don't know why so many manufacturers put acrylic in their machines. Probably because it makes them sell better?
Looking at some of the Printerbot kits, nothing but plywood boxes. But I am learning a lot building the acrylic kit. Learning where the strong points need to be.
A note about the printing surface/bed. I don't think the heater panel should be attached to the printer because it appears to be very unstable dimensionally when it heats and cools.
I am going to build a double deck print bed, the lower panel connecting to the Y rails, the upper deck, the printing surface, made of cast aluminum. Then I am simply going to lay the heater panel between the two decks, unfixed, not attached rigidly so that is can flex and warp all it wants without affecting the printing surface or the Y axis plate.
Edited 4 time(s). Last edit at 12/09/2014 01:04PM by Easy.
|
Re: Folger Prusa i3 Kit from ebay December 09, 2014 12:45PM |
Registered: 9 years ago Posts: 28 |
|
Re: Folger Prusa i3 Kit from ebay December 09, 2014 06:36PM |
Registered: 9 years ago Posts: 18 |
Just received my kit last friday and barely had time to tinker with it. Mechanically it is all put together and all I need to do is put the glass bed on and wire up the electronics then troubleshoot.
One super major tip I can give anyone building this kit is heat up the jam nuts with a candle then shove them into the acrylic.
At first I was just trying to muscle the jamnuts into the acrylic and broke one of the Z-axis supports. Glued it together but that could have been prevented if I did the candle thing.
I need to take some time to go through this whole thread and dig out any other tidbits of info.
|
Re: Folger Prusa i3 Kit from ebay December 09, 2014 10:11PM |
Registered: 11 years ago Posts: 18 |
Going over Thingiverse and am definately going to print this next. My fingers still hurt from the assembly.
Allen Key Handle
Allen Key Handle
|
Re: Folger Prusa i3 Kit from ebay December 09, 2014 11:32PM |
Registered: 9 years ago Posts: 45 |
Quote
Ohmarinus
I just couldn't help but notice a comment by 'mikez104'. It is about acrylic frames and I completely agree, the frames are completely stupid. Unless you make it very thick/well develop with supporting parts.
I just finished most of the assembly and after spending hours measuring, tweaking, squaring and more tweaking, I am actually pretty happy with this kit. Yes, there are a couple of places that need bracing, and it is a lot of work getting it all square and plumb, but all and all, I think this is going to work pretty well.
Acrylic has some redeeming features. It is light, rigid, and I think the clear panels are kinda cool looking. At least you can see everything when it is working.
I won't use acrylic on my next printer, but this turned out much better than I thought it would. And it has been a lot of fun to build.
Edited 2 time(s). Last edit at 12/09/2014 11:38PM by Easy.
|
Re: Folger Prusa i3 Kit from ebay December 09, 2014 11:52PM |
Registered: 9 years ago Posts: 208 |
Evidently the holes for the nuts on the acrylic frame are designed to be larger on one side than the other to allow you to put the nut in, without it falling out.
so if you cannot get the nut in, it could be that you are going in the wrong side of the whole...
give it a shot?
Edited 1 time(s). Last edit at 12/10/2014 12:31PM by Waltermixx.
so if you cannot get the nut in, it could be that you are going in the wrong side of the whole...
give it a shot?
Edited 1 time(s). Last edit at 12/10/2014 12:31PM by Waltermixx.
|
Re: Folger Prusa i3 Kit from ebay December 10, 2014 12:12AM |
Registered: 9 years ago Posts: 25 |
I got my kit today. Really not liking UPS at all - they lost my package at warehouse for four days. Finally went picked it up tonight. Did parts check and bummed!!!!!
Was concerned I was going to recieve my kit and expected that triangle mounts or something maybe broken as see in some kits. No biggie however I never recieved 2 Stepper motor mounts, 2 top plates, 4 triangle motor mount brackets.
What a bummer, going to have leave email and have them sent out and wait bit longer now.
My project on hold little longer now.
Edited 1 time(s). Last edit at 12/10/2014 12:14AM by Booda.
|
Re: Folger Prusa i3 Kit from ebay December 10, 2014 01:03AM |
Registered: 9 years ago Posts: 57 |
Quote
Waltermixx
Evidently the wholes for the nuts on the acrylic frame are designed to be larger on one side than the other to allow you to put the nut in, without it falling out.
so if you cannot get the nut in, it could be that you are going in the wrong side of the whole...
give it a shot?
The last few people seem to be running into the same thing I did. The nuts most definitely not fit into the one side of the frame. They start to go into the opposite side of the frame but only a little. I, like the others tried to push and ended up cracking g the frame. Maybe they changed something when laser cutting the acrylic frame. Or changed source for the hardware. My nuts were not too wide but too tall. That's why I put them on the belt sander and "thinned" them out a little. Seems these folks are having the same issue.
Edited 1 time(s). Last edit at 12/10/2014 01:12AM by mikez104.
|
Re: Folger Prusa i3 Kit from ebay December 10, 2014 01:11AM |
Registered: 9 years ago Posts: 57 |
Quote
coldfront
I ordered the MK2 Aluminium Bed from Folger this week it should be here tomorrow.
I ended up ordering this one even though my wooden bed is working very well now. The one one the folger site did not list the thickness so I was not sure about it. Let us know how that one turns out.
[r.ebay.com]
|
Re: Folger Prusa i3 Kit from ebay December 10, 2014 01:51AM |
Registered: 9 years ago Posts: 9 |

Walter, first of all thank you and everyone else who's contributed to this thread, it has been tremendously helpful! I have a question on the dissassembled extruder pics above. Is that a couple of washers in it, or a bearing (maybe 623zz)? I ask because I don't have anything in mine and am not getting reliable fillament feeds - not surprising since it looks like that piece is necesary. I do have two washers that fit, but they have a lot of play on the peg, though in a quick test fit, seem like they might do the job. I don't have any extra bearings, I've used the two included bearings for the x and y idlers.
Thanks again to everyone!
Edited 2 time(s). Last edit at 12/10/2014 01:54AM by that1guy.
|
Re: Folger Prusa i3 Kit from ebay December 10, 2014 03:17AM |
Registered: 9 years ago Posts: 28 |
Hey KeyserSoze3d,
Did you design the Spool Holder yourself or grab the stl files from somewhere? If so could you post where you got it?
Did you design the Spool Holder yourself or grab the stl files from somewhere? If so could you post where you got it?
Quote
KeyserSoze3d
Quote
mikez104
This may be a silly question but can someone tell me where these bearings go?
I built a spool holder using those bearings.

|
Re: Folger Prusa i3 Kit from ebay December 10, 2014 06:55AM |
Registered: 9 years ago Posts: 1,011 |
Acrylic is fast and easy machining with a laser cutter. That makes the machining process cheaper than any other material, even Forex (expansed PVC). Through, it's lightweight so shipping costs are cheaper. On both side, kit providers can save money.Quote
Ohmarinus
I really don't know why so many manufacturers put acrylic in their machines. Probably because it makes them sell better?
Well, it's not a design fact. It's beacause of the machining process. Laser cutter cannot cut in a straight line because of diffraction and/or diffusion of the laser beam. That makes the profile a bit taped.Quote
Waltermixx
Evidently the wholes for the nuts on the acrylic frame are designed to be larger on one side than the other to allow you to put the nut in, without it falling out.
so if you cannot get the nut in, it could be that you are going in the wrong side of the whole...

Collective intelligence emerges when a group of people work together effectively. Prusa i3 Folger (A lot of the parts are wrong, boring !)
|
Re: Folger Prusa i3 Kit from ebay December 10, 2014 07:13AM |
Registered: 9 years ago Posts: 110 |
Quote
that1guy
Walter, first of all thank you and everyone else who's contributed to this thread, it has been tremendously helpful! I have a question on the dissassembled extruder pics above. Is that a couple of washers in it, or a bearing (maybe 623zz)? I ask because I don't have anything in mine and am not getting reliable fillament feeds - not surprising since it looks like that piece is necesary. I do have two washers that fit, but they have a lot of play on the peg, though in a quick test fit, seem like they might do the job. I don't have any extra bearings, I've used the two included bearings for the x and y idlers.
Thanks again to everyone!
It's a bearing. I didn't check mine for markings the last time I opened it so not sure what size.
|
Re: Folger Prusa i3 Kit from ebay December 10, 2014 07:56AM |
Registered: 9 years ago Posts: 57 |
Quote
coldfront
Hey KeyserSoze3d,
Did you design the Spool Holder yourself or grab the stl files from somewhere? If so could you post where you got it?
Quote
KeyserSoze3d
I built a spool holder using those bearings.
I built this one. It works great.
[www.thingiverse.com]
|
Re: Folger Prusa i3 Kit from ebay December 10, 2014 09:12AM |
Registered: 9 years ago Posts: 26 |
Quote
coldfront
Hey KeyserSoze3d,
Did you design the Spool Holder yourself or grab the stl files from somewhere? If so could you post where you got it?
Quote
KeyserSoze3d
Quote
mikez104
This may be a silly question but can someone tell me where these bearings go?
I built a spool holder using those bearings.
I got it here.
http://www.thingiverse.com/thing:59429
In retrospect a non-adjustable spool holder is not the best solution. Apparently there is no standard filament roll size. Although my spool holder worked great with the IC3D filament spool. It was too wide for the Micro center 3d spool. so i'm actually looking to build another spool holder.
|
Re: Folger Prusa i3 Kit from ebay December 10, 2014 09:20AM |
Registered: 9 years ago Posts: 26 |
Quote
mikez104
Quote
coldfront
I ordered the MK2 Aluminium Bed from Folger this week it should be here tomorrow.
I ended up ordering this one even though my wooden bed is working very well now. The one one the folger site did not list the thickness so I was not sure about it. Let us know how that one turns out.
[r.ebay.com]
Me too. I've got my finger hovering over the trigger. I'm interested to find out how that plate looks/feels/works.
Edited 1 time(s). Last edit at 12/10/2014 09:20AM by KeyserSoze3d.
|
Re: Folger Prusa i3 Kit from ebay December 10, 2014 09:28AM |
Registered: 9 years ago Posts: 45 |
Quote
Zavashier
Well, it's not a design fact. It's beacause of the machining process. Laser cutter cannot cut in a straight line because of diffraction and/or diffusion of the laser beam. That makes the profile a bit taped.
I discovered this when I tried to square the acrylic frame. When ever I tightened the screws that hold the triangular vertical supports, the main frame panel would bend causing the Z motors to move out of alignment. Loosen the screws and everything would move back into place. I ended up just snugging the screws down enough to hold things together but not distort the main frame panel too much.
Edited 1 time(s). Last edit at 12/10/2014 09:29AM by Easy.
|
Re: Folger Prusa i3 Kit from ebay December 10, 2014 09:41AM |
Registered: 9 years ago Posts: 26 |
Quote
Nargousias
Going over Thingiverse and am definately going to print this next. My fingers still hurt from the assembly.
Allen Key Handle
I learned from my RC helicopter days that those L keys are sent from the devil. I got some of these hardened steel hex keys a ratchet handle and never looked back.
Steel Hex Drivers
|
Re: Folger Prusa i3 Kit from ebay December 10, 2014 10:47AM |
Registered: 9 years ago Posts: 1,159 |
Quote
KeyserSoze3d
Quote
Nargousias
Going over Thingiverse and am definately going to print this next. My fingers still hurt from the assembly.
Allen Key Handle
I learned from my RC helicopter days that those L keys are sent from the devil. I got some of these hardened steel hex keys a ratchet handle and never looked back.
Steel Hex Drivers
I use something like these Hex Drivers They are also available in Torx and Imperial sizes also check out Tee handle Hex Drivers.
|
Re: Folger Prusa i3 Kit from ebay December 10, 2014 11:34AM |
Registered: 9 years ago Posts: 208 |
Quote
that1guy
Walter, first of all thank you and everyone else who's contributed to this thread, it has been tremendously helpful! I have a question on the dissassembled extruder pics above. Is that a couple of washers in it, or a bearing (maybe 623zz)? I ask because I don't have anything in mine and am not getting reliable fillament feeds - not surprising since it looks like that piece is necesary. I do have two washers that fit, but they have a lot of play on the peg, though in a quick test fit, seem like they might do the job. I don't have any extra bearings, I've used the two included bearings for the x and y idlers.
Thanks again to everyone!
Mine was a one piece grooved bearing. I dont recall if it was marked...
|
Re: Folger Prusa i3 Kit from ebay December 10, 2014 01:18PM |
Registered: 9 years ago Posts: 14 |
Hey everyone. I've been pre-occupied for a while, but am finally about ready to fiddle around again. I was hoping I could get some input. It's working better than it has, but it's still not as good as it looks like it should be based on the images I've seen of other people's results. So here goes...
First, if you check out the pics and videos here, it will show you where I'm at (visual aids are far better). You shouldn't have to be a Google Plus victim to be able to view these, I made them public.
https://plus.google.com/u/0/photos/104180436453111501116/albums/6091068459981460689
If you look at the Minecraft Creeper, and the Aztec Cube you can see it still just doesn't seem like it's as crisp and clean as it should be. Also, the one video of the hollow box, you can see that it doesn't print well over voids (also slightly noticeable in the designs on the sides of the Aztec cube). I think it needs to be slowed down when over voids to allow the plastic to cool better before it continues, but I just can't seem to find the right settings. I know I am getting small sections of "air printing", which accompanies a small pop. I'm wondering if this is bad filament, or again, something I need to change in my settings or setup. Suggestions are greatly appreciated.
Here's what I've done physically so far:
- Was using a steel sheet for print bed over the heater, but it was warping, and I couldn't find tempered glass without going broke. Eventually I found a place a little cheaper with Neo-Ceramic (fireplace glass) that seems to be working much better.
- The 4 corners of the bed were giving me real grief trying to level it. Rather than using the 2 bolt method for each corner, I purchased some longer bolts and simply threaded them right through the support nut - this appears to be a far superior method. The extra part of the bolt sticking out is what holds the bed in place (and binder clips to keep the glass from sliding around).
- I use dollar store painters tape on the glass, and spray it with dollar store hair spray (extra hold) and it seems to work. ** If you have your bed heated when you spray it with the hair spray, expect to lose 5+ degrees c right away (from the compressed air in the can, and the evaporation of the water in the hair spray).
- When I printed a nut and bolt, I couldn't put them together as they were eye shaped. Turned out one of my belts was loose - so I tightened them both. Looks so much better.
- If your motors don't look like they are doing what they are supposed to, recheck your wiring, no matter how sure you are that it is right. Was that ever frustrating.
- I still am having great difficulty getting my heat bed up past 85c. I can get it to 90c, but it takes eons, and doesn't stay at that temp well. I did find that I had my wires soldered to the bed wrong which made about a 10c difference, but it still isn't as good as I think it should be. What temperatures do you get, and how long does it take? I would love to know.
- I know that part of my problem with temperature could be the room, so I am nearly done an acrylic case to try and keep the heat in, and breezes out.
Here's what I've done with my settings, using RepetierHost 1.0.6, Arduino 1.0.6, and Marlin Ramps V1 running on Linux Mint 17 KDE:
- First I modified the Configuration.h file to match the custom settings from the FolgerTech Marlin that was on their Google Drive. The original didn't seem to be working as well as what I have now.
- I tried using both RepetierHost and Pronterface, but for some reason it appeared that for each software I needed different steps per unit. As such, I chose to stick with RepetierHost
- Then with some experimenting made some changes:
- In RepetierHost (printer settings):
+ Travel Feed Rate 250mm/min
+ Z-Axis Feed Rate 60mm/min
+ Manual Extrusion Speed 2 | 8 mm/sec
+ Manual Retraction Speed 30mm/sec
+ Default Extruder Temperature 230c
+ Default Heated Bed Temperature 110c
+ Invert Direction Controls for X-Axis
+ Max Vol. Per Second 12mm2/s
- In CuraEngine slicer settings (print):
+ Print 30 | 50
+ Travel 150 | 150
+ First Layer 30 | 30
+ Outer Perimeter 30 | 50
+ Inner Perimeter 30 | 50
+ Infill 30 | 50
+ Layer Height 0.2
+ First Layer Height 0.2
+ First Layer Extrusion Width 100
+ * no changes under structures should I?
+ Minimize crossing perimeters; should I select either of Spiralize Contour, Enable Retraction?
+ Combine Everything (Type A)
I am at a loss as to why I can't get it as accurate as what some seem to have achieved. I tried printing some 'fiddle' rings the other day, but as the accuracy isn't good enough, I couldn't get the pieces together.
Tips as to what I've done or am doing wrong would be of great value. I've tried looking through what people have said so far, and I just don't see it.
As always, thanks for any offerings.
For those of you who are curious of new print offerings, check this out: Peachy Printer. Someone from work told me about it. Looks unique. Cheap with a very strange setup.
First, if you check out the pics and videos here, it will show you where I'm at (visual aids are far better). You shouldn't have to be a Google Plus victim to be able to view these, I made them public.
https://plus.google.com/u/0/photos/104180436453111501116/albums/6091068459981460689
If you look at the Minecraft Creeper, and the Aztec Cube you can see it still just doesn't seem like it's as crisp and clean as it should be. Also, the one video of the hollow box, you can see that it doesn't print well over voids (also slightly noticeable in the designs on the sides of the Aztec cube). I think it needs to be slowed down when over voids to allow the plastic to cool better before it continues, but I just can't seem to find the right settings. I know I am getting small sections of "air printing", which accompanies a small pop. I'm wondering if this is bad filament, or again, something I need to change in my settings or setup. Suggestions are greatly appreciated.
Here's what I've done physically so far:
- Was using a steel sheet for print bed over the heater, but it was warping, and I couldn't find tempered glass without going broke. Eventually I found a place a little cheaper with Neo-Ceramic (fireplace glass) that seems to be working much better.
- The 4 corners of the bed were giving me real grief trying to level it. Rather than using the 2 bolt method for each corner, I purchased some longer bolts and simply threaded them right through the support nut - this appears to be a far superior method. The extra part of the bolt sticking out is what holds the bed in place (and binder clips to keep the glass from sliding around).
- I use dollar store painters tape on the glass, and spray it with dollar store hair spray (extra hold) and it seems to work. ** If you have your bed heated when you spray it with the hair spray, expect to lose 5+ degrees c right away (from the compressed air in the can, and the evaporation of the water in the hair spray).
- When I printed a nut and bolt, I couldn't put them together as they were eye shaped. Turned out one of my belts was loose - so I tightened them both. Looks so much better.
- If your motors don't look like they are doing what they are supposed to, recheck your wiring, no matter how sure you are that it is right. Was that ever frustrating.
- I still am having great difficulty getting my heat bed up past 85c. I can get it to 90c, but it takes eons, and doesn't stay at that temp well. I did find that I had my wires soldered to the bed wrong which made about a 10c difference, but it still isn't as good as I think it should be. What temperatures do you get, and how long does it take? I would love to know.
- I know that part of my problem with temperature could be the room, so I am nearly done an acrylic case to try and keep the heat in, and breezes out.
Here's what I've done with my settings, using RepetierHost 1.0.6, Arduino 1.0.6, and Marlin Ramps V1 running on Linux Mint 17 KDE:
- First I modified the Configuration.h file to match the custom settings from the FolgerTech Marlin that was on their Google Drive. The original didn't seem to be working as well as what I have now.
- I tried using both RepetierHost and Pronterface, but for some reason it appeared that for each software I needed different steps per unit. As such, I chose to stick with RepetierHost
- Then with some experimenting made some changes:
#define DEFAULT_AXIS_STEPS_PER_UNIT {80,80.3,4000,99}  //Close to the original, but seemed to be more effective for my unit
#define DEFAULT_MAX_FEEDRATE        {250, 250, 2, 8}   // (mm/sec) - it seemed too fast in the initial set up, and the maximum extrusion rate, the hot end couldn't keep up.
#define DEFAULT_MAX_ACCELERATION    {1000,1000,5,1000} //
- Can anyone suggest jerk settings? or should I just leave it?- In RepetierHost (printer settings):
+ Travel Feed Rate 250mm/min
+ Z-Axis Feed Rate 60mm/min
+ Manual Extrusion Speed 2 | 8 mm/sec
+ Manual Retraction Speed 30mm/sec
+ Default Extruder Temperature 230c
+ Default Heated Bed Temperature 110c
+ Invert Direction Controls for X-Axis
+ Max Vol. Per Second 12mm2/s
- In CuraEngine slicer settings (print):
+ Print 30 | 50
+ Travel 150 | 150
+ First Layer 30 | 30
+ Outer Perimeter 30 | 50
+ Inner Perimeter 30 | 50
+ Infill 30 | 50
+ Layer Height 0.2
+ First Layer Height 0.2
+ First Layer Extrusion Width 100
+ * no changes under structures should I?
+ Minimize crossing perimeters; should I select either of Spiralize Contour, Enable Retraction?
+ Combine Everything (Type A)
I am at a loss as to why I can't get it as accurate as what some seem to have achieved. I tried printing some 'fiddle' rings the other day, but as the accuracy isn't good enough, I couldn't get the pieces together.
Tips as to what I've done or am doing wrong would be of great value. I've tried looking through what people have said so far, and I just don't see it.
As always, thanks for any offerings.
For those of you who are curious of new print offerings, check this out: Peachy Printer. Someone from work told me about it. Looks unique. Cheap with a very strange setup.
|
Re: Folger Prusa i3 Kit from ebay December 10, 2014 03:53PM |
Registered: 9 years ago Posts: 28 |
|
Re: Folger Prusa i3 Kit from ebay December 10, 2014 03:56PM |
Registered: 9 years ago Posts: 57 |
|
Re: Folger Prusa i3 Kit from ebay December 10, 2014 04:20PM |
Registered: 9 years ago Posts: 12 |
Quote
NukedWorker
Hey everyone. I've been pre-occupied for a while, but am finally about ready to fiddle around again. I was hoping I could get some input. It's working better than it has, but it's still not as good as it looks like it should be based on the images I've seen of other people's results. So here goes...
First, if you check out the pics and videos here, it will show you where I'm at (visual aids are far better). You shouldn't have to be a Google Plus victim to be able to view these, I made them public.
https://plus.google.com/u/0/photos/104180436453111501116/albums/6091068459981460689
If you look at the Minecraft Creeper, and the Aztec Cube you can see it still just doesn't seem like it's as crisp and clean as it should be. Also, the one video of the hollow box, you can see that it doesn't print well over voids (also slightly noticeable in the designs on the sides of the Aztec cube). I think it needs to be slowed down when over voids to allow the plastic to cool better before it continues, but I just can't seem to find the right settings. I know I am getting small sections of "air printing", which accompanies a small pop. I'm wondering if this is bad filament, or again, something I need to change in my settings or setup. Suggestions are greatly appreciated.
Here's what I've done physically so far:
- Was using a steel sheet for print bed over the heater, but it was warping, and I couldn't find tempered glass without going broke. Eventually I found a place a little cheaper with Neo-Ceramic (fireplace glass) that seems to be working much better.
- The 4 corners of the bed were giving me real grief trying to level it. Rather than using the 2 bolt method for each corner, I purchased some longer bolts and simply threaded them right through the support nut - this appears to be a far superior method. The extra part of the bolt sticking out is what holds the bed in place (and binder clips to keep the glass from sliding around).
- I use dollar store painters tape on the glass, and spray it with dollar store hair spray (extra hold) and it seems to work. ** If you have your bed heated when you spray it with the hair spray, expect to lose 5+ degrees c right away (from the compressed air in the can, and the evaporation of the water in the hair spray).
- When I printed a nut and bolt, I couldn't put them together as they were eye shaped. Turned out one of my belts was loose - so I tightened them both. Looks so much better.
- If your motors don't look like they are doing what they are supposed to, recheck your wiring, no matter how sure you are that it is right. Was that ever frustrating.
- I still am having great difficulty getting my heat bed up past 85c. I can get it to 90c, but it takes eons, and doesn't stay at that temp well. I did find that I had my wires soldered to the bed wrong which made about a 10c difference, but it still isn't as good as I think it should be. What temperatures do you get, and how long does it take? I would love to know.
- I know that part of my problem with temperature could be the room, so I am nearly done an acrylic case to try and keep the heat in, and breezes out.
Here's what I've done with my settings, using RepetierHost 1.0.6, Arduino 1.0.6, and Marlin Ramps V1 running on Linux Mint 17 KDE:
- First I modified the Configuration.h file to match the custom settings from the FolgerTech Marlin that was on their Google Drive. The original didn't seem to be working as well as what I have now.
- I tried using both RepetierHost and Pronterface, but for some reason it appeared that for each software I needed different steps per unit. As such, I chose to stick with RepetierHost
- Then with some experimenting made some changes:
#define DEFAULT_AXIS_STEPS_PER_UNIT {80,80.3,4000,99}  //Close to the original, but seemed to be more effective for my unit
#define DEFAULT_MAX_FEEDRATE        {250, 250, 2, 8}   // (mm/sec) - it seemed too fast in the initial set up, and the maximum extrusion rate, the hot end couldn't keep up.
#define DEFAULT_MAX_ACCELERATION    {1000,1000,5,1000} //
- Can anyone suggest jerk settings? or should I just leave it?
- In RepetierHost (printer settings):
+ Travel Feed Rate 250mm/min
+ Z-Axis Feed Rate 60mm/min
+ Manual Extrusion Speed 2 | 8 mm/sec
+ Manual Retraction Speed 30mm/sec
+ Default Extruder Temperature 230c
+ Default Heated Bed Temperature 110c
+ Invert Direction Controls for X-Axis
+ Max Vol. Per Second 12mm2/s
- In CuraEngine slicer settings (print):
+ Print 30 | 50
+ Travel 150 | 150
+ First Layer 30 | 30
+ Outer Perimeter 30 | 50
+ Inner Perimeter 30 | 50
+ Infill 30 | 50
+ Layer Height 0.2
+ First Layer Height 0.2
+ First Layer Extrusion Width 100
+ * no changes under structures should I?
+ Minimize crossing perimeters; should I select either of Spiralize Contour, Enable Retraction?
+ Combine Everything (Type A)
I am at a loss as to why I can't get it as accurate as what some seem to have achieved. I tried printing some 'fiddle' rings the other day, but as the accuracy isn't good enough, I couldn't get the pieces together.
Tips as to what I've done or am doing wrong would be of great value. I've tried looking through what people have said so far, and I just don't see it.
As always, thanks for any offerings.
For those of you who are curious of new print offerings, check this out: Peachy Printer. Someone from work told me about it. Looks unique. Cheap with a very strange setup.
Some suggestions:
Did you check the vrefs?
Maybe you should decrease the head temperatutre?
You can place a piece of cardboard over the bed as you heat it and when it reaches temperature you remove it! It will speed up the process by much! I can reach 100 degrees in 15 minutes from cold!
|
Re: Folger Prusa i3 Kit from ebay December 10, 2014 04:46PM |
Registered: 9 years ago Posts: 28 |
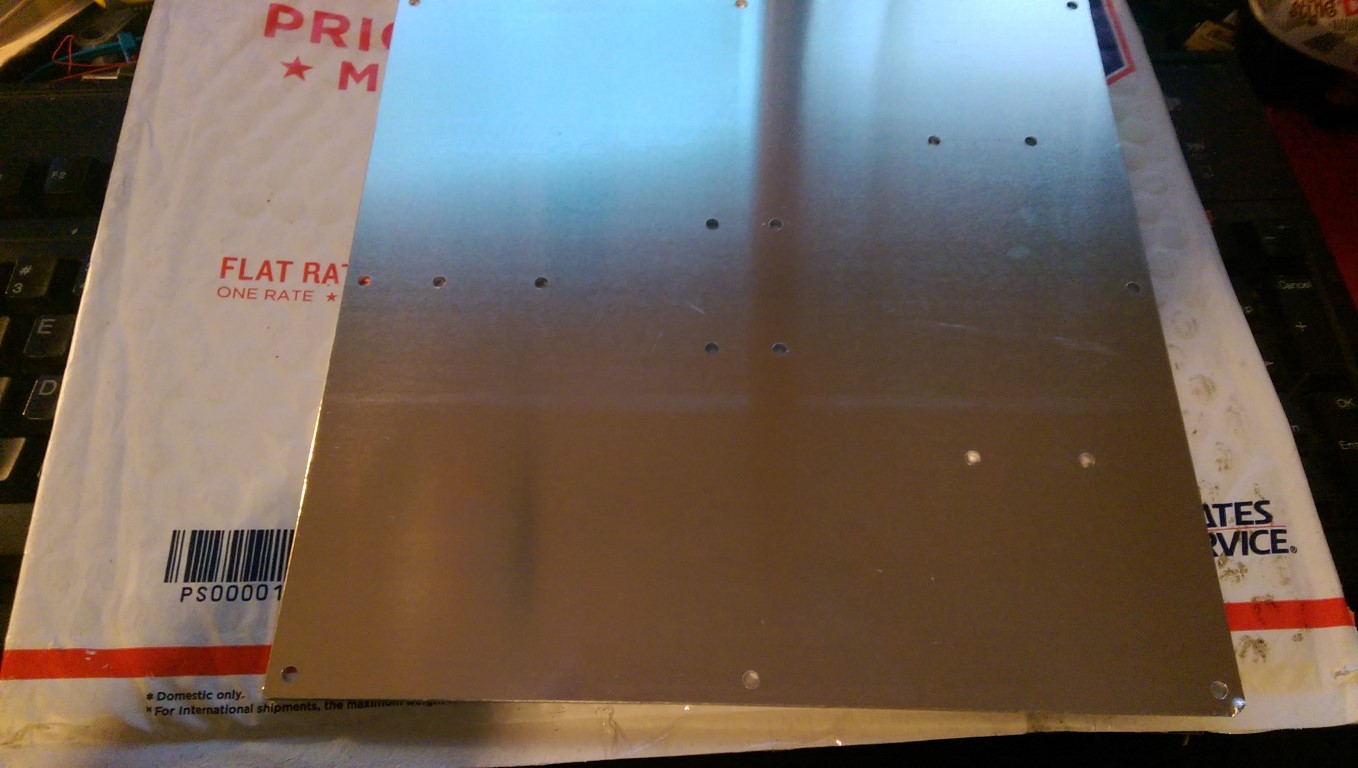
The thickness seems to be 1.5875 or 1/16th, few problems so far the holes don't line up.. hahah
The length of the bearing holders are a bit longer so the screws don't fit through perfect, looks like i will be marking new holes and drilling them here soon. here is a attached photo with the old bed overlay on top of the new one.
The length of the bearing holders are a bit longer so the screws don't fit through perfect, looks like i will be marking new holes and drilling them here soon. here is a attached photo with the old bed overlay on top of the new one.
|
Re: Folger Prusa i3 Kit from ebay December 10, 2014 05:27PM |
Registered: 9 years ago Posts: 57 |
Quote
konto89
Quote
NukedWorker
Tips as to what I've done or am doing wrong would be of great value. I've tried looking through what people have said so far, and I just don't see it.
.[/i]
Some suggestions:
Did you check the vrefs?
Maybe you should decrease the head temperatutre?
You can place a piece of cardboard over the bed as you heat it and when it reaches temperature you remove it! It will speed up the process by much! I can reach 100 degrees in 15 minutes from cold!
I agree with the vrefs. All mine can set to +600mV and I was getting very jerkymotor movements. I backed them off until they started missing steps then advanced them a bit. Konto, I got the exact same time heating mine from 18 to 100. And 100 seems to work fine for my filament. (Hatchbox ABS).
|
Re: Folger Prusa i3 Kit from ebay December 10, 2014 07:10PM |
Registered: 9 years ago Posts: 28 |
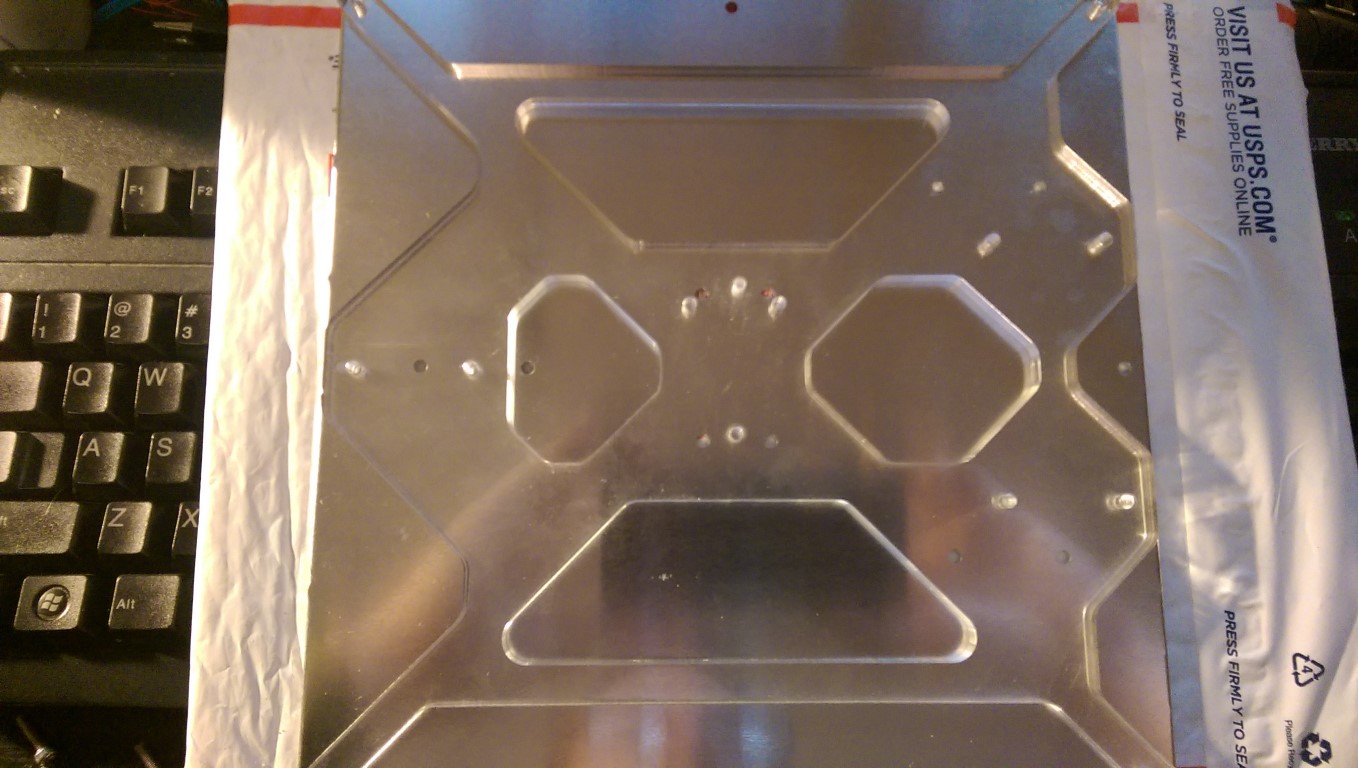
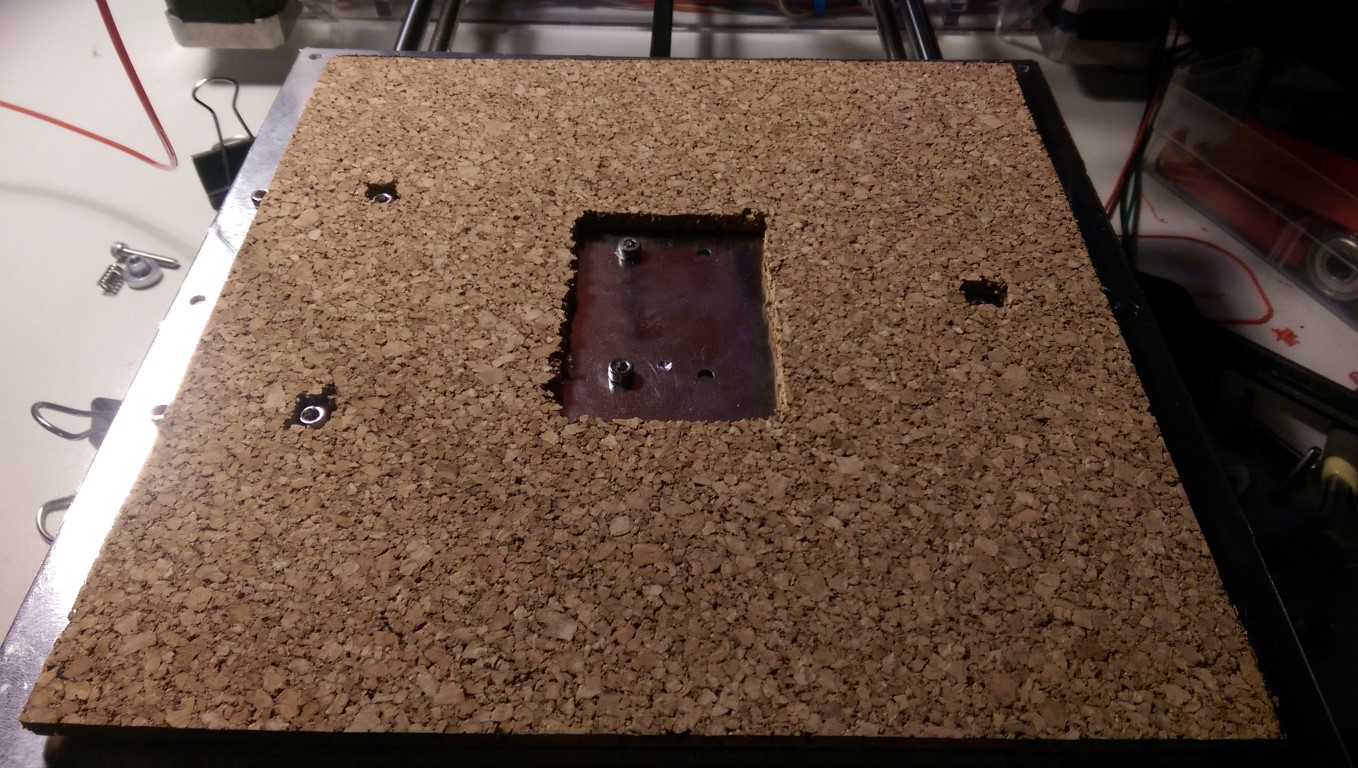
I have finished drilling the new holes and assembling the new bed onto my prusa i3. A few things I noticed when attaching the bed was the clearance from the screws that are screwed into the beard holders and the frame. I had to cut down the screws for them to pass over the frame. As for drilling the new holes i took the old acrylic bed screwed it down to the aluminium bed and used a drill press it came out pretty nice everything fit well and was perfect. Leveling the bed is 100% better and really easy now. I also added cork board between the heat bed and the aluminium bed giving more insulation, and helping with heating up the bed really well. Heating the bed at 100c took only 12 mins total aside from around 25 mins before.
Pros:
Easy Manual Leveling
Not Acrylic
Better Stability
The (4) screws for leveling the bed have a lot more room and the nut doesn't fall off.
Cons:
The Pre-Drilled holes are not in the right place, I pretty much purchased this board feeling it would be an easy swap in and out.
There is a small gap overhang due to the bed being a little bigger than the Heat bed this has messed up the height of my Y-EndStop, I will need to print a lower endstop mount.
Aside from everything I had to do I like this bed better then the acrylic bed, here are some photos.


Sorry, only registered users may post in this forum.