Cherry Pi III Is Available
Posted by AndyCart
|
Re: Cherry Pi III Is Available November 26, 2014 01:50AM |
Registered: 10 years ago Posts: 515 |
|
Re: Cherry Pi III Is Available November 26, 2014 09:38PM |
Registered: 9 years ago Posts: 164 |
Yeah, I think you've said that before Andy. I've adjusted it but I think it'd be the only thing I haven't checked again within the last couple of days.
I might actually double check that all of the end stops are quite firmly glued in place still. My assumption is that if one of them isn't firm, it could be moving just enough to mess with calibration?
If memory serves I had an autocal accuracy tolerance of 0.03mm. Does that seem right?
EDIT: Also, how long should an autocal take? In theory. Assuming everything is pretty sweet.
Edited 1 time(s). Last edit at 11/26/2014 09:38PM by pugzor.
|
Re: Cherry Pi III Is Available November 26, 2014 09:45PM |
Registered: 9 years ago Posts: 164 |
I think I've passed the point where I've now spent more time messing with firm/software than it took to acquire all the parts and build the actual machine, haha. Pretty sure I've spent enough that I could have organised personal delivery of a unit from you too, Andy!
Really want to get it up and running so I can make custom Christmas tree ornaments. Yeah, I know how to party.
Really want to get it up and running so I can make custom Christmas tree ornaments. Yeah, I know how to party.
|
Re: Cherry Pi III Is Available November 28, 2014 05:55AM |
Registered: 9 years ago Posts: 164 |
Okay, so, I got an autocalibration to happen again. Took around 20 minutes.
Next issue! Lol.
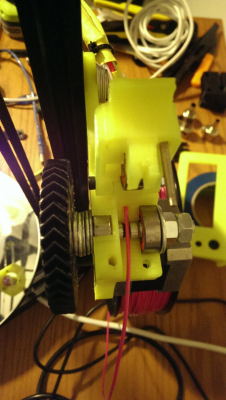
So, my printy doesn't seem to want to put out filament consistently. I can see pretty easily that my hobbed bolt has basically no traction on the filament whatsoever. Given the attached picture, what can I do to fix this?
Next issue! Lol.
So, my printy doesn't seem to want to put out filament consistently. I can see pretty easily that my hobbed bolt has basically no traction on the filament whatsoever. Given the attached picture, what can I do to fix this?
|
Re: Cherry Pi III Is Available November 28, 2014 07:15PM |
Registered: 10 years ago Posts: 515 |
|
Re: Cherry Pi III Is Available November 28, 2014 08:09PM |
Registered: 9 years ago Posts: 164 |
|
Re: Cherry Pi III Is Available November 29, 2014 05:08AM |
Registered: 10 years ago Posts: 515 |
Your picture shows the extruder hinge open. It may be a stupid question but you do have it closed and tightened down when you print don't you? With the washers you are using you may as well not use a bearing as it's not being used. This will cause unnecessary load on your extruder stepper motor. Get some standard M8 washers!
|
Re: Cherry Pi III Is Available November 29, 2014 07:50AM |
Registered: 9 years ago Posts: 164 |
Given the level of questions I've been asking, I think that's a legitimate question haha, but yes I do have that tightened down (just opened it up for the pic).
I understand your point of view around the hobbed bolt, but I might have things worked a bit differently. You see, I haven't tightened the nut that holds the hobbed bolt on. There's about 0.5-1.0 mm of play and I've used a second nut to kind of lock the position of the first nut. There's not much friction at all when the extruder gear is disconnected. The large wheel keeps everything in place and the slot for the hex head actually keeps the bolt in place for the most part, the nuts are really just there as a bit of a safety if the bolt decides to go for a wander. Besides, those are considered 'standard' M8 washers here... maybe it's a retarded Australian convict thing? I did notice that for all the bearings to work 'correctly' they need to have a washer with a relatively similar OD and ID, but I felt in this situation it was largely inconsequential. Tell me if my theory is flawed though, please!
I might try adding a bit of heat. Printer is set for 200°C and the PLA I'm using is Colorfabb with recommended temps of 195-220°C. Might crank it up to 220°C and see if that makes a difference? Probably won't but I figure if it's not heating fast enough then it's obviously going to slip on the feeder. There's a bit of plastic (which I've since removed) in the valleys of the hobbed bolt, so it's definitely getting traction. I guess the other option is that the feed rate is too fast but my first run was lacking plastic, which seemed to kind of "ball" up too in areas. Don't know really...
Edit: Hey Andy, the Jheads you supply come with a 0.4mm nozzle, right? Prety sure it is but just wanted to confirm.
Edited 1 time(s). Last edit at 11/29/2014 08:12AM by pugzor.
|
Re: Cherry Pi III Is Available November 29, 2014 11:17AM |
Registered: 10 years ago Posts: 903 |
With the extruder open and hotend at temperature, you should be able to push the filament through the nozzle with just your fingers and moderate force. Simplest test that you can do to figure out if the filament pusher is at fault or if the problem is further upstream at the hotend (or excessive friction in the Bowden tube). Are you sure that the filament is going all the way into the hotend and not getting hung up at the top near the bowden tube connector?????
|
Re: Cherry Pi III Is Available November 29, 2014 12:12PM |
Registered: 10 years ago Posts: 515 |
|
Re: Cherry Pi III Is Available November 29, 2014 12:30PM |
Registered: 10 years ago Posts: 6 |
|
Re: Cherry Pi III Is Available November 29, 2014 05:51PM |
Registered: 10 years ago Posts: 515 |
|
Re: Cherry Pi III Is Available November 29, 2014 09:16PM |
Registered: 9 years ago Posts: 164 |
Something I'll do when I get a chance, but it shouldn't be affecting the machine's ability at this point in time.Quote
AndyCart
Yes the hot ends I supply are 0.4mm. The bearings were designed into the extruder for a reason! If I were you I would swap the washers. It's simple and cheap and is another thing you don't need to worry about
Yeah, I think it's all fine with that. It was difficult to push filament through by finger so it might just need more heat. Mind you, in Slic3r (within Repetier) my settings were 3mm filament and 0.5mm nozzle diameter, so that might have had something to do with why things weren't working out so great.Quote
vreihen
With the extruder open and hotend at temperature, you should be able to push the filament through the nozzle with just your fingers and moderate force. Simplest test that you can do to figure out if the filament pusher is at fault or if the problem is further upstream at the hotend (or excessive friction in the Bowden tube). Are you sure that the filament is going all the way into the hotend and not getting hung up at the top near the bowden tube connector?????
|
Re: Cherry Pi III Is Available November 30, 2014 02:19AM |
Registered: 10 years ago Posts: 515 |
I normally print PLA at 210, and you are correct, it does make a difference. I have always had good results with Cura. It's much easier to setup, especially in the early stages of your 3D printing journey. If you had Slic3r set for 3.0mm filament and 0.5 nozzle that is probably the answer you would only be getting a fraction of the plastic extruded.
|
Re: Cherry Pi III Is Available December 01, 2014 02:17PM |
Registered: 9 years ago Posts: 1 |
Hello Cherry Pi owners,
I am now one of you as I just built my own Cherry Pi... and I enconter a funny bug in the process with the auto-calibration, so I fixed it: [github.com]
This should have affected everybody but apprently either the Arduino compiler are outputing different code (I am on a Mac) or my board is was really sensitive. To check, in a safe way, if you are affected (you should know as the autocalibration crashed the head in the bed really bad) send a G30 X0 Y0, after probing the bed at 0, 0 (center) if the head move closer of the Z Tower you have the effect then I have, regardless you still experience a buffer overflow but you are lucky as nothing bad happen : )
In the process of cornering this bug I rebuilt the printer a few times, as the result the plastic part start to acting up (my plastic part were not great to begin with). I currently using a small piece to keep the lips of the Rods Carrier to open up, if someone is interrested I can post the stl for this part, and I lose the top bracket cover so I had to use a long screw to attach to the aluminum part (as described here: [forums.reprap.org]) and that seems to work for now.
|
Re: Cherry Pi III Is Available December 02, 2014 03:11AM |
Registered: 10 years ago Posts: 6 |
|
Re: Cherry Pi III Is Available December 02, 2014 08:02AM |
Registered: 10 years ago Posts: 6 |
Andy,
been studying your machines on thingiverse ...
excellent work ... and thanks for sharing ..
one doubt i wanted to confirm before i get cracking...
Cherry Pie IIIs - driven by Spectra fishing lines
Cherry Pie III - driven by GT2 belts & pulleys ...
are they any other differences like the build volume, etc etc ??
thanks a lot in advance
chX
|
Re: Cherry Pi III Is Available December 02, 2014 08:28AM |
Registered: 10 years ago Posts: 515 |
Quote
crazyhorseX
thanks ...
I am gonna build one
the Git or the thingiverse page for the latest files of this machine ?
chX
The latest .stl files are here [www.thingiverse.com]
|
Re: Cherry Pi III Is Available December 02, 2014 08:33AM |
Registered: 10 years ago Posts: 515 |
Quote
crazyhorseX
Andy,
been studying your machines on thingiverse ...
excellent work ... and thanks for sharing ..
one doubt i wanted to confirm before i get cracking...
Cherry Pie IIIs - driven by Spectra fishing lines
Cherry Pie III - driven by GT2 belts & pulleys ...
are they any other differences like the build volume, etc etc ??
thanks a lot in advance
chX
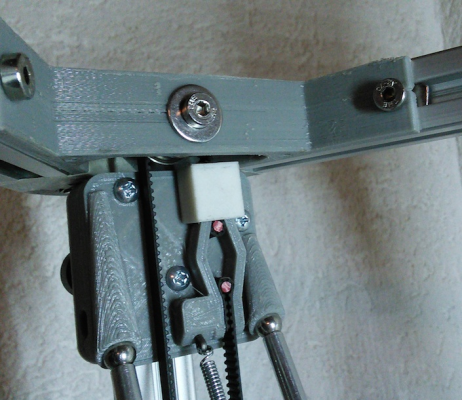
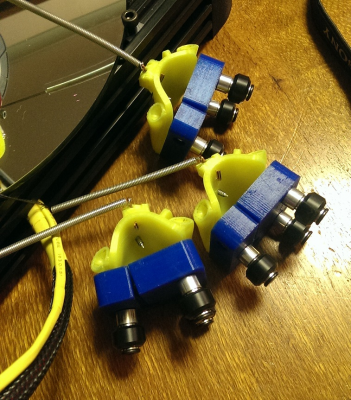
No that's not quite correct. All Cherry Pi models are driven with GT2 belts. The Spectra line used in Cherry Pi IIIS is used to secure the delta rods to the effector and the tower carriages alongs with a spring. The Spectra and spring provide the tension that holds the 8mm drilled ball bearings on the rod ends into the printed sockets on the effector and the tower carriage rod carrier. Build volume is the same on all models (apart from the 4XL) it's around 190mm diameter by 250mm height. You can easily extend the build height by using larger extrusions for the towers. The stock size is 600mm. I suppose you could also increase the diameter by increasing the 9 stretchers, the stock are 250mm. I've found that the standard size suits most people and if you go too big you will get problems with twist and wobble whilst printing. Stock is rock steady.
Andy
|
Re: Cherry Pi III Is Available December 06, 2014 05:16PM |
Registered: 9 years ago Posts: 164 |
I've noticed that my carriages have a bit of play in them, but I'm not sure what's the cause. I'm having troubles autocalibrating again and I think this might be one of the reasons but I'm not sure. The adjuster screws are done up to a nice tension so there's no play, but I noticed that when you move one of the opposite tower carriages it's noticable. For example, there's a bit of a wobble in tower X when you move either Y or Z up and down. Is this normal? Is it possible my springs/spectra are too tight?
I'm not sure if this is helpful to anyone either but I've tried to use some elastic (it's sold as "hat elastic", round with a diameter of around 1.2mm) to try and support the Bowden tube and wires. I think I may have made my Bowden tube and wires a bit longer than is best, so I given my Bowden tube and wires enter between X and Z, I looped it around the top between Y and Z, secured on the Bowden tube and wires around half way with a zip tie. It's tied up so when all towers are at their endstops there's no real expansion of the elastic, but it's got enough give so that it's no super tight when they're on the print bed. It's mostly an attempt to remove some of that "weight" from impacting on the effector.
I'm not sure if this is helpful to anyone either but I've tried to use some elastic (it's sold as "hat elastic", round with a diameter of around 1.2mm) to try and support the Bowden tube and wires. I think I may have made my Bowden tube and wires a bit longer than is best, so I given my Bowden tube and wires enter between X and Z, I looped it around the top between Y and Z, secured on the Bowden tube and wires around half way with a zip tie. It's tied up so when all towers are at their endstops there's no real expansion of the elastic, but it's got enough give so that it's no super tight when they're on the print bed. It's mostly an attempt to remove some of that "weight" from impacting on the effector.
|
Re: Cherry Pi III Is Available December 06, 2014 05:24PM |
Registered: 10 years ago Posts: 515 |
I wouldn't have thought tension on the Spectra could affect the tower carriage, unless it's so tight the ball bearings are being stopped from rotating in their sockets. I always put a bit of silicone grease in my sockets before I clip the delta rods in. I seem to recall you are using Openbuilds V slot. I use Bosch Rexroth extrusion that has a much shallower V there shouldn't be any play in the carriages.
|
Re: Cherry Pi III Is Available December 07, 2014 02:26PM |
Registered: 10 years ago Posts: 9 |
I use OpenBuilds v-slot as well Andy and with a little tension added your carriage trucks fit nice and snug for me. The slot may be deeper but the profile is the same or very close. It's possible his parts were a little oversized though. I had issues with tolerance (not bored deep enough) on a lot of the mini v-wheels and have since switched to solid v-wheels. It may just have been my supplier using a cheaper source. I could have just added an extra spacer in the middle but I just ended up exchanging them. The mini's do look a bit cleaner, so next build I may give them another go from a different source this time.
Edited 1 time(s). Last edit at 12/07/2014 02:28PM by DeltaDroid.
Edited 1 time(s). Last edit at 12/07/2014 02:28PM by DeltaDroid.
|
Re: Cherry Pi III Is Available December 09, 2014 06:36AM |
Registered: 9 years ago Posts: 164 |
Well gents, it appears I'm actually out of the game for a while due to my own stupidity.
I was going to go to a hackerspace meeting tonight as there was a regular with a lot of experience building deltas. I live a fair way away from work so catch the train in, leaving my car at the train station during the day. Out in the sun. Yeah... ends up hot cars and thermoplastics don't mix too well. Who would have thought?
I was going to go to a hackerspace meeting tonight as there was a regular with a lot of experience building deltas. I live a fair way away from work so catch the train in, leaving my car at the train station during the day. Out in the sun. Yeah... ends up hot cars and thermoplastics don't mix too well. Who would have thought?
|
Re: Cherry Pi III Is Available December 09, 2014 09:29AM |
Registered: 10 years ago Posts: 903 |
Quote
pugzor
Out in the sun. Yeah... ends up hot cars and thermoplastics don't mix too well. Who would have thought?
Hot cars and *PLA* do not mix. (For that matter, PLA should never be used for items exposed to the outdoors/sun.) I've had a mis-printed CP top bracket printed in ABS sitting on the dashboard of my car through the entire summer, just testing to see if it would warp or deform. No problems at all.
 (Sad smiley because the printing error was that it came out slightly warped, and I was hoping to un-warp it with solar exposure.)
Regarding the hot car part, I forgot that you were south of the equator. Up here in NY/USA, we are having another large winter storm. Freezing rain outside right now, and my employer decided to open two hours late so that everyone could get their cars chiseled out. I'd offer to trade a set of ABS CP parts for your sunshine, but the shipping (for the sunshine) would be cost-prohibitive.....

|
Re: Cherry Pi III Is Available January 01, 2015 11:02PM |
Registered: 9 years ago Posts: 164 |
Well, I don't have a working CP3 yet, but earlier last year I backed The Micro on Kickstarter. I was part of the December tier and filled out my survey a few days ago. I know it's probably still a couple of months away but when I get it I will more than likely be able to print replacement parts for my CP3. It's only got a small build area but I think it should be enough to do pretty much everything... even if I have to modify a part or two. Maybe the only thing that won't print un-modified would be the top hats? Print area of The Micro is 109x113mm for up to 76mm.
|
Re: Cherry Pi III Is Available January 02, 2015 03:58AM |
Registered: 10 years ago Posts: 515 |
|
Re: Cherry Pi III Is Available January 02, 2015 08:27AM |
Registered: 10 years ago Posts: 327 |
Don't give up Pugzor, you'll get there.
Having decided to build one of these beauties, I can't wait to get started. I have pretty much all parts on order now, so it's just a waiting game. The only changes I have decided to make are a Smoothieboard instead of the Mega/Ramps 1.4 and an E3D V6 hotend.
I'll post updates as and when I get started.
Regards,
Les
Pointy's Things
Pointy's Blog
|
Re: Cherry Pi III Is Available January 03, 2015 07:17AM |
Registered: 10 years ago Posts: 327 |
So parts have started arriving already, today I got the 608 bearings and a nice package from westfield fasterners with all the bolts/nuts and washers required for the build. Yesterday I picked up a cheap (£2.59) 25cm mirror plate from the Range, it's only 4mm thick and has a stupid candle sticker on it (easily removed) but might do the job.
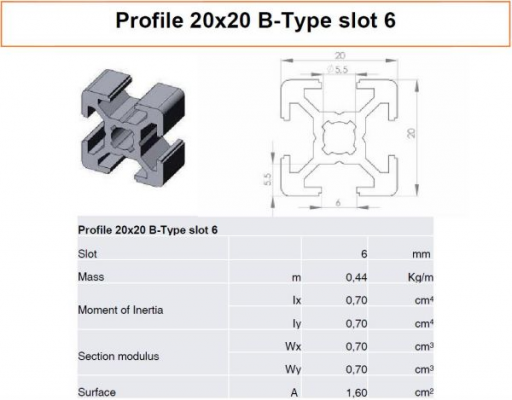
Having read this thread and had email discussions with Andy I am still a little unsure about the Aluminium profile. I normally get my profile from Motedis here's a drawing of it...
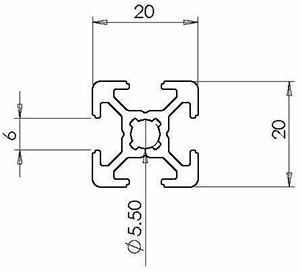
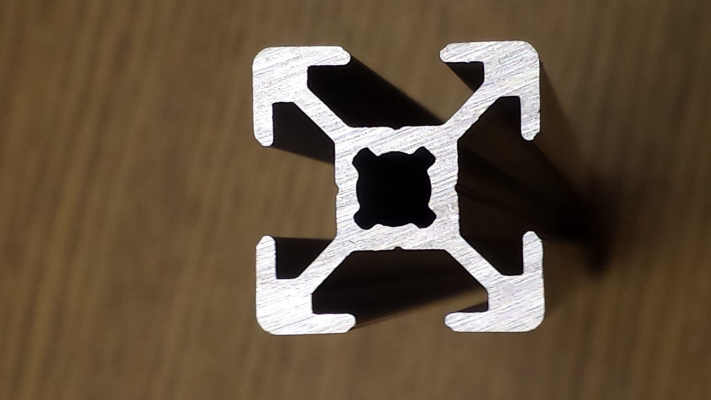
And here's the drawing of the KJN profile...
Andy's concern is that the Motedis profile is not a true V, but looking at the KJN drawing neither is that.
So I compared the Motedis profile with the profile that came with my Ormerod, it looks exactly the same. So where do Reprap get their profile from? I also found this picture on RichRap's blog which again doesn't look like a true V and he even mentions that the profile comes from KJN.
Anyway I have gone with the Motedis profile and we will see how it works. (I also ordered a couple of their own rollers, which run in the slot to see how they work)
While I was on the Motedis site I saw this Profile Slider, it's expensive but looks pretty neat. Anyone seen them used them on a 3d printer?
Regards,
Les
Pointy's Things
Pointy's Blog
|
Re: Cherry Pi III Is Available January 03, 2015 07:59AM |
Registered: 10 years ago Posts: 515 |
Hi Les
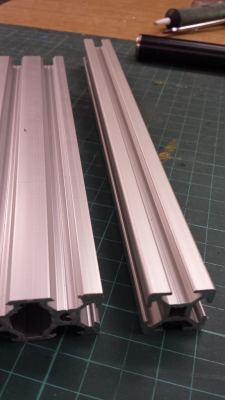
The KJN profile that ships isn't the same as the diagram on the website! The image below shows the KJN profile on the right and the Open Builds V slot on the left :-
If you use a different V wheel than the OpenBuilds Mini them the spacing on the tower carriages may be incorrect!
Regards
Andy
Edit: Added a better image of the KJN profile. The step is actually there but the reality is that it is much less pronounced than the CAD drawing would lead you to believe.
Edited 1 time(s). Last edit at 01/03/2015 08:06AM by AndyCart.
|
Re: Cherry Pi III Is Available January 03, 2015 08:14AM |
Registered: 10 years ago Posts: 515 |
Hi Guys
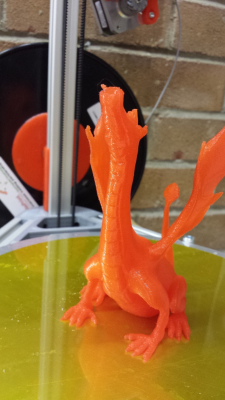
I just printed this as a test print for my new effector and Chinese E3D V5 hot end clone. It came out great. It's Adalina the singing dragon from Thingiverse at 50% scale
Printed at 0.3mm layer height with a 0.4mm nozzle, 2 perimeters, 10% in fill. 80mm/s print speed.
Andy
I just printed this as a test print for my new effector and Chinese E3D V5 hot end clone. It came out great. It's Adalina the singing dragon from Thingiverse at 50% scale
Printed at 0.3mm layer height with a 0.4mm nozzle, 2 perimeters, 10% in fill. 80mm/s print speed.
Andy
Sorry, only registered users may post in this forum.
