Rebuilt the bottom Half
Posted by johneato
|
Rebuilt the bottom Half January 27, 2014 12:14PM |
Registered: 10 years ago Posts: 132 |
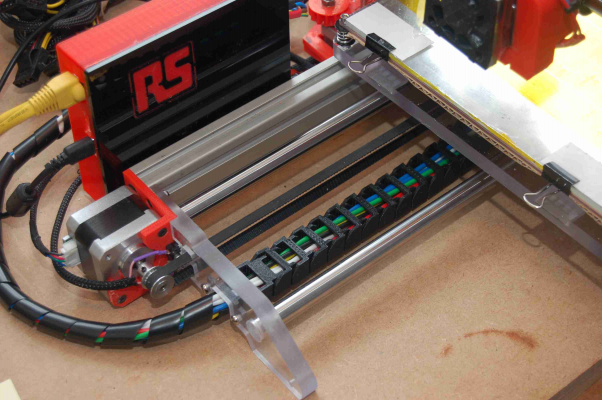
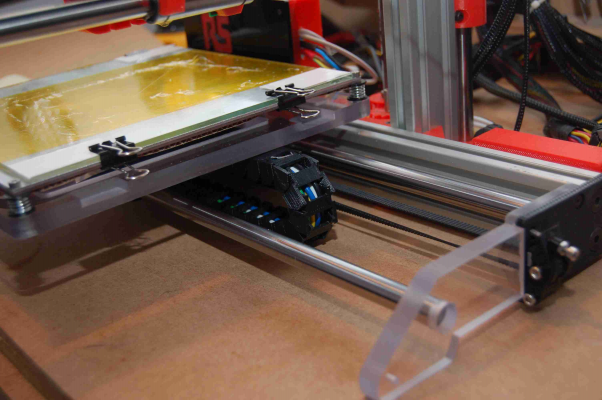
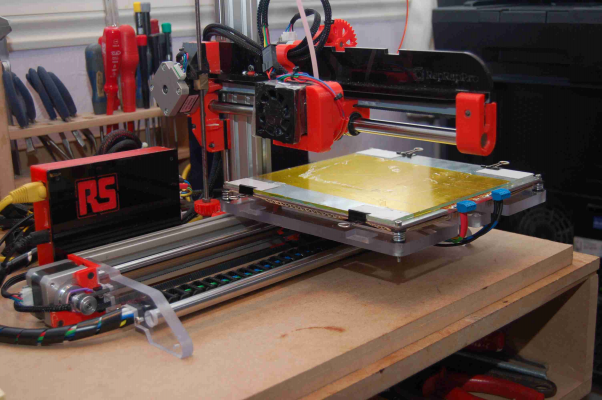
]I have been reading all the ideas and solutions on various threads and have brought together into my interpretation and rebuilt the bottom half. Gone is the mdf, ply, acrylic and ribbon cable.
The table and side plates have been replaced with 10mm polycarbonate. I reduced the weight of the table as much as possible by removing large areas, but still very very sturdy. Added belt fasteners and tensioner.
Printed a cable chain courtesy of thingiverse and replaced the ribbon with 6 55/0.1 wires. Halved the volt drop in the cabling.
Plus a few other tweaks picked up on the forum.
Many thanks to all who have contributed, it prints beautifully.
John
|
Re: Rebuilt the bottom Half January 27, 2014 12:58PM |
Registered: 10 years ago Posts: 32 |
|
Re: Rebuilt the bottom Half January 27, 2014 01:00PM |
Registered: 10 years ago Posts: 859 |
I Like the cable chain and the table. Is that the built proof plastic that you can cut and tap easily?
I have some at home, but don't know how it would stand up to the heat of the table. I did know it's name, but that was years ago.
Nice job..
Kim
Edited 1 time(s). Last edit at 01/27/2014 01:17PM by KimBrown.
I have some at home, but don't know how it would stand up to the heat of the table. I did know it's name, but that was years ago.
Nice job..
Kim
Edited 1 time(s). Last edit at 01/27/2014 01:17PM by KimBrown.
|
Re: Rebuilt the bottom Half January 27, 2014 01:01PM |
Registered: 13 years ago Posts: 1,611 |
|
Re: Rebuilt the bottom Half January 27, 2014 01:45PM |
Registered: 10 years ago Posts: 132 |
Kim :-
The material is Poycarbonate, a couple of years ago I bought a large amount from an old hardware shop that was closing down. It is in 500 x 300mm sheets and labelled as aircraft screens. It machines and taps very well and is incredible strong. A significant amount of my CNC is constructed with it.
Ian:-
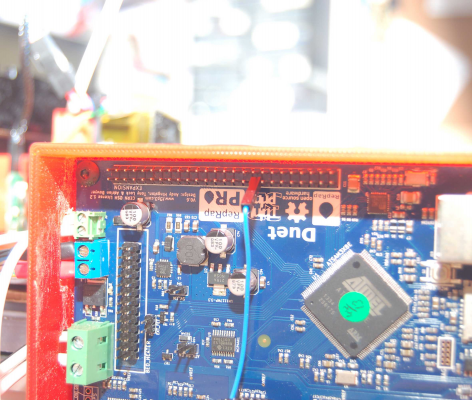
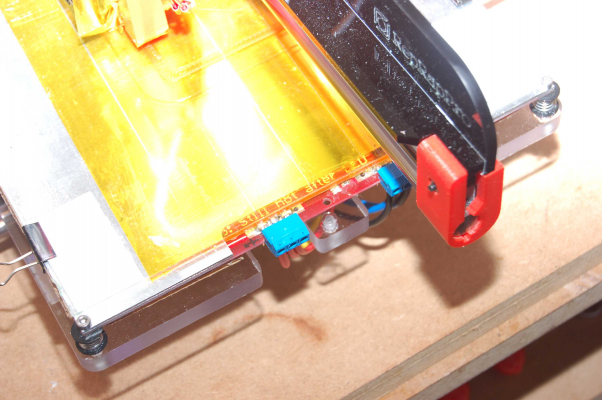
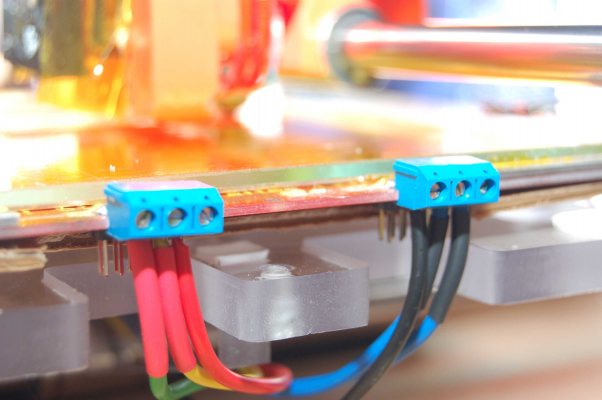
I did fit the two extra screw terminals and reprinted the Duet enclosure with an extra opening. I attached two further 3 way screw connectors to the front of the heater PCB.
John
|
Re: Rebuilt the bottom Half January 27, 2014 02:19PM |
Registered: 10 years ago Posts: 1,230 |
|
Re: Rebuilt the bottom Half January 27, 2014 02:52PM |
Registered: 10 years ago Posts: 132 |
Erik
The weight is about 320 grms against the original that came in at about 110grms. So its about 3 times the weight, but when you factor in the weight of the aluminum and glass the total weight increase as a percent is far less. I had concerns about the extra weight and the increase in inertia. Also I was concerned how much the cable chain would add. Printing at default speeds it's fine, not tried going faster, but I'm sure if I increase speeds then the extra mass will tell. Anyway I'm retired, I don't need extra speed. Maybe an highspeed table next.
However I have to say it is nice to find the setup of the table the same as when I last used it.
One thing I have noticed since having a stable platform is that the Z axis overtime tends to lean forward, the screws are as tight as I can make them but there is still movement. Trying to think how to brace it.
John
The weight is about 320 grms against the original that came in at about 110grms. So its about 3 times the weight, but when you factor in the weight of the aluminum and glass the total weight increase as a percent is far less. I had concerns about the extra weight and the increase in inertia. Also I was concerned how much the cable chain would add. Printing at default speeds it's fine, not tried going faster, but I'm sure if I increase speeds then the extra mass will tell. Anyway I'm retired, I don't need extra speed.
 Maybe an highspeed table next.
 However I have to say it is nice to find the setup of the table the same as when I last used it.
One thing I have noticed since having a stable platform is that the Z axis overtime tends to lean forward, the screws are as tight as I can make them but there is still movement. Trying to think how to brace it.
John
|
Re: Rebuilt the bottom Half January 27, 2014 04:35PM |
Registered: 10 years ago Posts: 103 |
|
Re: Rebuilt the bottom Half January 27, 2014 09:36PM |
Registered: 10 years ago Posts: 176 |
|
Re: Rebuilt the bottom Half January 28, 2014 02:45AM |
Registered: 10 years ago Posts: 1,230 |
Quote
johneato
Erik
The weight is about 320 grms against the original that came in at about 110grms. So its about 3 times the weight, but when you factor in the weight of the aluminum and glass the total weight increase as a percent is far less....
John
..and you got a more solid y-axis-rib for the belt to mount on, should be no problem to raise the current for the motors a bit
I was wondering about the aluminum, is it really needed...is it meant to distribute the heat or what? - has anyone taken a heat picture with and without?
My alu is bent and twist the glass so my beds measurement is like this:
X60 Y20 Z0.0
X60 Y180 Z0.0
X180 Y180 Z0.2
X180 Y20 Z-0.2
..all because of a bent alu plate, the glass is flat if allowed to float freely, I know it doesn't matter, the software will compensate for that but it bugs me anyway
If the alu plate is of no practical use I would rather save the weight or swap the weight for a thicker plate of glass
Another nice touch is your spring adjustment of the bed in all four corners with the nuts embedded, makes for a very fast and easy adjustment
Erik
|
Re: Rebuilt the bottom Half January 28, 2014 03:20AM |
Registered: 10 years ago Posts: 66 |
|
Re: Rebuilt the bottom Half January 28, 2014 04:01AM |
Registered: 10 years ago Posts: 132 |
Erik
I totally agree about the aluminium, mine is domed. I replaced the extruder with a dial gauge and used this to level the table, initial using the aluminium surface, I noticed the aluminium was higher it the middle. Probably caused by over tightening the corners initially when trying to level the table. I replaced the glass it rocked slightly. When I clipped the glass down it followed the curve of the aluminium. I put a thin shim underneath a corner, refixed the glass and adjusted again with the dial gauge. The glass is bed is now very good. The software is fine but in this case is not going to compensate for a dome in the middle
However I do like the idea of doing away with the aluminium. I don’t know if that is a good idea, I would be interested to hear other peoples opinion.
John
|
Re: Rebuilt the bottom Half January 28, 2014 04:13AM |
Registered: 10 years ago Posts: 14,672 |
I doubt that the aluminium by itself is stiff enough to bend the glass much. I suspect it is the alu and pcb sandwich together that is providing the stiffness, aided by the corner screws. Some people have used springs to support the weight of the bed in order to make levelling easier, and this might have the beneficial effect of clamping the alu less tightly to the pcb.
Large delta printer [miscsolutions.wordpress.com], E3D tool changer, Robotdigg SCARA printer, Crane Quad and Ormerod
Disclosure: I design Duet electronics and work on RepRapFirmware, [duet3d.com].
Large delta printer [miscsolutions.wordpress.com], E3D tool changer, Robotdigg SCARA printer, Crane Quad and Ormerod
Disclosure: I design Duet electronics and work on RepRapFirmware, [duet3d.com].
|
Re: Rebuilt the bottom Half January 28, 2014 04:30AM |
Registered: 10 years ago Posts: 132 |
The glass does deform and can be measured. The bed is mounted on springs but doesnt help because the glass is clamped to the aluminium/ PCB by the edge clamps which do exert quite a force.Quote
dc42
I doubt that the aluminium by itself is stiff enough to bend the glass much. I suspect it is the alu and pcb sandwich together that is providing the stiffness, aided by the corner screws. Some people have used springs to support the weight of the bed in order to make levelling easier, and this might have the beneficial effect of clamping the alu less tightly to the pcb.
John
|
Re: Rebuilt the bottom Half January 28, 2014 04:49AM |
Registered: 10 years ago Posts: 14,672 |
Quote
johneato
The glass does deform and can be measured. The bed is mounted on springs but doesn't help because the glass is clamped to the aluminium/ PCB by the edge clamps which do exert quite a force.
Maybe it's time to try 4mm glass then? I've had some cut and I may get a chance to try it today. I also have a selection of different Swiss clips, so I'll see which ones clamp with the least force.
Where did you get the springs from? I've tried my local fastenings supplier and searched eBay UK, so far without success.
Large delta printer [miscsolutions.wordpress.com], E3D tool changer, Robotdigg SCARA printer, Crane Quad and Ormerod
Disclosure: I design Duet electronics and work on RepRapFirmware, [duet3d.com].
|
Re: Rebuilt the bottom Half January 28, 2014 05:44AM |
Registered: 10 years ago Posts: 145 |
|
Re: Rebuilt the bottom Half January 28, 2014 06:20AM |
Registered: 10 years ago Posts: 14,672 |
Quote
GregL
Try cannibalising a retractable ballpont pen
I think it needs stronger springs that those.
Large delta printer [miscsolutions.wordpress.com], E3D tool changer, Robotdigg SCARA printer, Crane Quad and Ormerod
Disclosure: I design Duet electronics and work on RepRapFirmware, [duet3d.com].
|
Re: Rebuilt the bottom Half January 28, 2014 06:23AM |
Registered: 10 years ago Posts: 132 |
|
Re: Rebuilt the bottom Half January 28, 2014 07:40AM |
Registered: 10 years ago Posts: 119 |
|
Re: Rebuilt the bottom Half January 28, 2014 07:52AM |
Registered: 10 years ago Posts: 578 |
@dc42, Maplins sell a spring kit, that includes some springs that look like those [www.maplin.co.uk] £3.59. RS sell kits too (or did when I bought them a few years ago, but these are very stiff).
Ray
Ray
|
Re: Rebuilt the bottom Half January 28, 2014 08:04AM |
Registered: 10 years ago Posts: 132 |
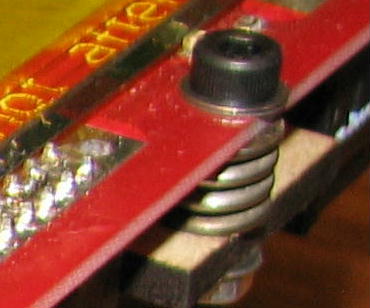
Here is a link to ebay for the springs I used. I printed stepped washers to keep them centralised
[www.ebay.co.uk]
[www.ebay.co.uk]
|
Re: Rebuilt the bottom Half January 28, 2014 08:13AM |
Registered: 10 years ago Posts: 578 |
|
Re: Rebuilt the bottom Half January 28, 2014 11:15AM |
Registered: 10 years ago Posts: 1,230 |
The problem with springs is that there are so many variables, you can exclude the length by using disc springs (don't know if that is the right engrish word), just ad as many as needed
..and don't think you can buy a long spring and just cut it into shorter parts, that will not work without special spacers, the spring have to be made to length from anew
Mine was made of Ø1.2 spring wire, outer D=8mm, length (relaxed) 8mm
..and yes there should be a washer between the spring and the bed, this is only temporary until I get the time to redesign the bed, I'm not retired yet, just tired ;-)
Erik
|
Re: Rebuilt the bottom Half January 28, 2014 11:23AM |
Registered: 10 years ago Posts: 14,672 |
Thanks Ray, I just got the spring kit from Maplins.
Large delta printer [miscsolutions.wordpress.com], E3D tool changer, Robotdigg SCARA printer, Crane Quad and Ormerod
Disclosure: I design Duet electronics and work on RepRapFirmware, [duet3d.com].
Large delta printer [miscsolutions.wordpress.com], E3D tool changer, Robotdigg SCARA printer, Crane Quad and Ormerod
Disclosure: I design Duet electronics and work on RepRapFirmware, [duet3d.com].
|
Re: Rebuilt the bottom Half January 28, 2014 01:47PM |
Registered: 10 years ago Posts: 147 |
Quote
johneato
Kim :-
The material is Poycarbonate, a couple of years ago I bought a large amount from an old hardware shop that was closing down. It is in 500 x 300mm sheets and labelled as aircraft screens. It machines and taps very well and is incredible strong. A significant amount of my CNC is constructed with it.
Ian:-
I did fit the two extra screw terminals and reprinted the Duet enclosure with an extra opening. I attached two further 3 way screw connectors to the front of the heater PCB.
John
Hi John,
Would you be able to explain the connections to the heated bed and duet please? A picture paints a thousand words (close up).
Thanks
Paul
|
Re: Rebuilt the bottom Half January 28, 2014 03:25PM |
Registered: 10 years ago Posts: 132 |
Paul
Duet was removed and two additional screw connectors fitted in the marked positions. Top is the thermistor and bottom is the heated bed. I also reprinted the Duet enclosure with a suitable hole for the addtional wires.
Notched the Heater PCB so I could fit 2 additional 3 way screw connectors, the notch enabled the connector pins to reach the tracks on the PCB
Ran 6 55/0.1 wires through the cable chain. At the back of the Duet I spliced the 6 wires into two larger diameter wires, this fitted better into the Duet connectors, better than trying to get three wires into each connector.
John
|
Re: Rebuilt the bottom Half January 28, 2014 04:07PM |
Registered: 10 years ago Posts: 119 |
|
Re: Rebuilt the bottom Half January 28, 2014 04:12PM |
Registered: 10 years ago Posts: 314 |
|
Re: Rebuilt the bottom Half January 28, 2014 04:14PM |
Registered: 10 years ago Posts: 132 |
|
Re: Rebuilt the bottom Half January 28, 2014 04:18PM |
Registered: 10 years ago Posts: 132 |
Sorry, only registered users may post in this forum.
