Foldable, portable CoreXY (Fusebox derivative)
Posted by lkcl
|
Re: Foldable, portable CoreXY (Fusebox derivative) April 28, 2016 09:15PM |
Registered: 10 years ago Posts: 651 |
|
Re: Foldable, portable CoreXY (Fusebox derivative) April 29, 2016 06:44PM |
Registered: 8 years ago Posts: 776 |
ok it turns out that the company i'm using for 12mm x 300 precision rods buys them in 3m lots, and the ends are typically *just* out of spec. so he throws the ends away. but, unfortunately, just after the ends, about 0.2 metres to 0.5 metres, sometimes that can be close to the edge of the tolerances for LM12UU bearings, as well: 12.004 mm instead of 12.001. sooo..... he's very kindly sending me a set of pre-tested 12mm x 300mm rods and 4 replacement pre-tested LM12UU bearings, which is awesome. it's in the same box as the QTY 3 TR8 lead-screws and closed loop, so he saves on courier costs. i'm happy, he's happy 
anyway, yes, it turns out that the ends of the printbed support rails just happen to reach far enough to consider putting in two front lead screw nuts, one on each. i've found a GPLv2+ openscad file for generating pulleys, and i've made up a GT2-6mm-40tooth pulley from it that has 3 M3x6 nut-bolt traps. i've also looked up how to support lead screws with bearings, and i'm going to go with just 2... skating bearings. yes i am an avid skater of about 20 years, now, and i am retiring my K2 90mm training skates that are 10 years old and the foam has worn down to the point where it's seriously painful to use them. i'm used to blisters, but this was serious ankle-bone-bending territory level of pain, which is Generally Bad. so, i am taking out the 16 (!!) 608 ABEC-5 bearings in them, and repurposing them for use with these lead screws. so i have plenty, basically
the app note i saw, what you do is, you put 2 bearings at one end, and 2 at the other, and you put grub screws which push 1 of the pair in one direction and the other one in the opposite direction. the lead screw is trapped in between, and can't move. if you have a long rod (over 300mm) apparently it's adviseable to go with *four* bearings at each end, because the pressure from 2 bearings can cause a twist in the rod. 4 will equalise the pressure (you do push left, push right, push left, push right, all in the space of about... 30mm).
but at the top, if the bottom of the rod is trapped (so it cannot drop against the floor of the printer, which would mean a change in the z height), i am not so concerned about the top, so will go with just one, for a total of three 608 bearings per lead screw, and see how that goes.
as the front two lead screws need to be removable, i will mount the top bearing (one left, one right) onto the corexy part (where it can stay attached), but the bottom, which will contain two bearings, i have to arrange that to stay on the rod and to actually be able to remove the whole TR8 rod *plus* bearings, with the pulley still attached to each, for stowing purposes. i might just make a snug housing or something, which the bearing-holder is dropped into. the main thing to stop is z-travel on those front two rods.
photos to follow of various parts, along with CAD renders, as i print them out. took 3 goes to get a GT2-6mm-40tooth pulley.... oops

anyway, yes, it turns out that the ends of the printbed support rails just happen to reach far enough to consider putting in two front lead screw nuts, one on each. i've found a GPLv2+ openscad file for generating pulleys, and i've made up a GT2-6mm-40tooth pulley from it that has 3 M3x6 nut-bolt traps. i've also looked up how to support lead screws with bearings, and i'm going to go with just 2... skating bearings. yes i am an avid skater of about 20 years, now, and i am retiring my K2 90mm training skates that are 10 years old and the foam has worn down to the point where it's seriously painful to use them. i'm used to blisters, but this was serious ankle-bone-bending territory level of pain, which is Generally Bad. so, i am taking out the 16 (!!) 608 ABEC-5 bearings in them, and repurposing them for use with these lead screws. so i have plenty, basically

the app note i saw, what you do is, you put 2 bearings at one end, and 2 at the other, and you put grub screws which push 1 of the pair in one direction and the other one in the opposite direction. the lead screw is trapped in between, and can't move. if you have a long rod (over 300mm) apparently it's adviseable to go with *four* bearings at each end, because the pressure from 2 bearings can cause a twist in the rod. 4 will equalise the pressure (you do push left, push right, push left, push right, all in the space of about... 30mm).
but at the top, if the bottom of the rod is trapped (so it cannot drop against the floor of the printer, which would mean a change in the z height), i am not so concerned about the top, so will go with just one, for a total of three 608 bearings per lead screw, and see how that goes.
as the front two lead screws need to be removable, i will mount the top bearing (one left, one right) onto the corexy part (where it can stay attached), but the bottom, which will contain two bearings, i have to arrange that to stay on the rod and to actually be able to remove the whole TR8 rod *plus* bearings, with the pulley still attached to each, for stowing purposes. i might just make a snug housing or something, which the bearing-holder is dropped into. the main thing to stop is z-travel on those front two rods.
photos to follow of various parts, along with CAD renders, as i print them out. took 3 goes to get a GT2-6mm-40tooth pulley.... oops

|
Re: Foldable, portable CoreXY (Fusebox derivative) April 29, 2016 06:48PM |
Registered: 8 years ago Posts: 776 |
Quote
FA-MAS
For your bearings binding up, check to see if the rubber seals at the end are dragging. I found that to be a problem when I got cheap bearings. I ended up trimming the lip off of them.
oh! appreciated, sorry, bit of cross-over. thanks for the tip - the bearings aren't cheap ones, they're good specs from a reputable company: it was the rods. he's looking to get some quotes from european precision rod manufacturers but they're well over twice the price of his current supplier. given that he's throwing out what.. 5-10% of the rod due to it being out of spec, it's still a tolerable but silly situation: i just happened to get 2 "close-to-the-ends" rods. they *should* have worked - they were, strictly speaking, still within spec of the bearings.... but... mehh. good clean tested replacements on the way.
|
Re: Foldable, portable CoreXY (Fusebox derivative) May 03, 2016 01:12PM |
Registered: 8 years ago Posts: 776 |
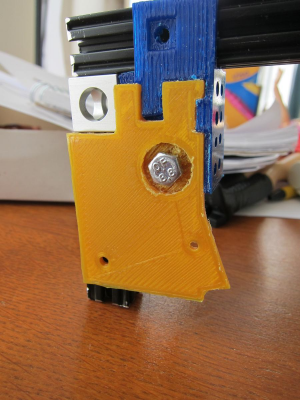
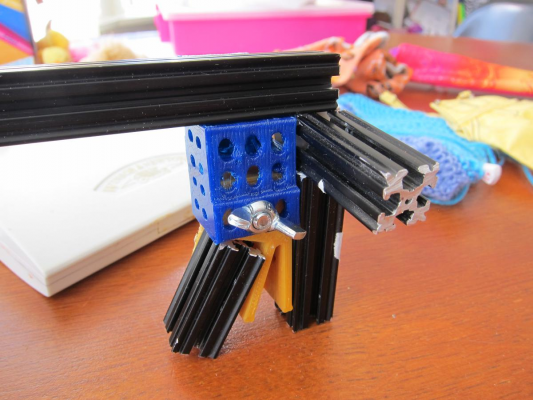
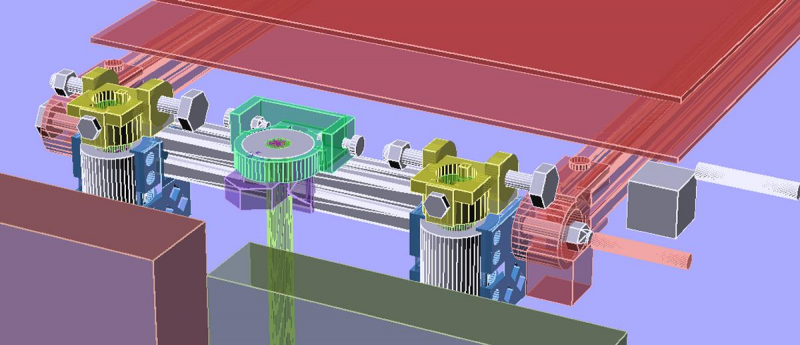
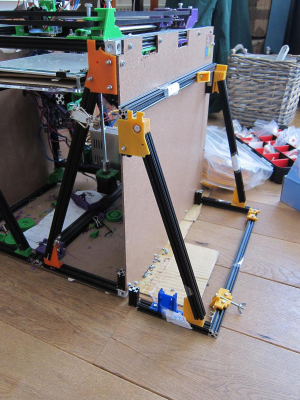
these are images of the new interlock mechanism between the box corner and the top corexy part. the idlers (currently attached to the top corexy) are excluded from the mockup. the idea here is that the blue part slots into a J shape on the box corner (gold), then a wing nut on the other side keeps it firmly in place. the J-shape ensures that there is no up-down or sideways-motion permitted, and the M5 bolt and wing nut ensure no forwards-backwards movement. thus, the two pieces (box and corexy) are locked firmly together, which is a critical requirement for this design to have complete rigidity.
i know drilling of the extrusion has been discussed, but i prefer the fact that no metal drillbit or bench drill is required (no special tools) with the corner-cubes. also, the corner cubes make it easy to maintain the box. if the frame parts were interlocked together, the whole box becomes something of a chinese puzzle. with corner cubes, removing one piece of extrusion is just a matter of removing one corner cube (any corner cube) then unslotting a single piece of extrusion from the hardboard. the alternative - with drilled extrusion: dismantle pretty much the *entire* box due to the very very specific assembly order. been there. had to do it. got fed up
i know drilling of the extrusion has been discussed, but i prefer the fact that no metal drillbit or bench drill is required (no special tools) with the corner-cubes. also, the corner cubes make it easy to maintain the box. if the frame parts were interlocked together, the whole box becomes something of a chinese puzzle. with corner cubes, removing one piece of extrusion is just a matter of removing one corner cube (any corner cube) then unslotting a single piece of extrusion from the hardboard. the alternative - with drilled extrusion: dismantle pretty much the *entire* box due to the very very specific assembly order. been there. had to do it. got fed up

|
Re: Foldable, portable CoreXY (Fusebox derivative) May 03, 2016 06:51PM |
Registered: 8 years ago Posts: 776 |
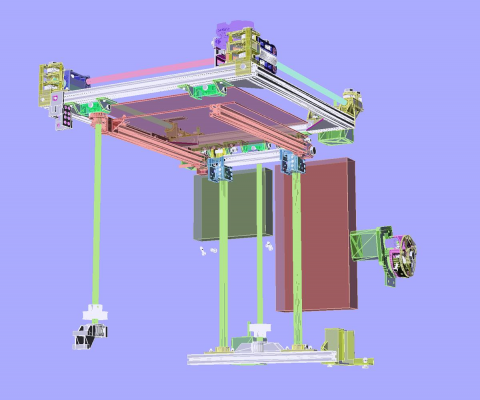
the CAD is starting to approach finalisation for the sandwich200v2, and i've a stack of printed parts accumulating. the lead screw set and replacement 12mmx300mm rods and LM12UU bearings (kindly supplied f/o/c by alfa-tech3d) arrived today, so photos of the assembled three lead screws tomorrow. here's an underside CAD picture with the frame removed:
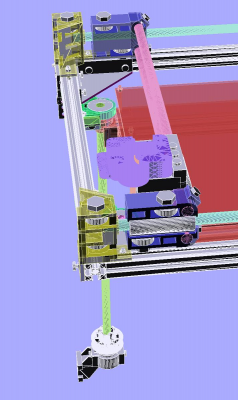
bottom left you can see a slot-in housing for the left front lead screw, that goes back then down to lock into the base of the frame. travelling up that lead screw until you hit "green", that's a *hinged* bearing-holder mounted on the front of the *CoreXY* assembly. the CoreXY assembly itself is hinged (to drop down, in the v2), so if that bearing-holder was not hinged, it would be flat-out impossible to remove the lead screw: you couldn't lift that bearing-holder off: as you swung the CoreXY assembly up, either the bearing-holder would bend and crack, or the lead screw would bend, or both.
a TR8 nut is on a push-fit piece that slots onto the front end of each of the printbed rails. it's push-fit because it's not necessary to be screwed on, push-fit stops left-right and up-down movement, and forwards-backwards movement is constrained by the printbed not being able to move backwards and forwards because it's on a fixed hinge at its other (rear) end. those hinges are in blue / cyan towards the back of the printbed.
here's where you can see the 12mm x 300mm rods and their holders (yellow) - the top holders are hinged so that the top CoreXY assembly can drop down (the CoreXY assembly is left out of this picture). the back centre lead screw's bearing holder (eye-burning green) is *also* hinged at the top, because, like the top of the 12mm diameter rods, it's also attached to the top CoreXY assembly, so again, *has* to be hinged. it would not be sensible to leave this lead screw free-floating, even though technically it would be feasible. in a static printer that might be fine, however in a portable one it is not.
note as described earlier, there is no other extrusion part(s) other than that one single piece at the bottom of the z-assembly. the 12mm rods are so ridiculously thick that it was deemed structurally unnecessary to have additional extrusions. the three pieces of extrusion that have been removed (compared to the v1) added no extra structural strength, and were only there to hang parts off. they have therefore been removed, and the bottom z extrusion part is on a push-fit left and right into holders in the box. removal of the z assembly therefore requires the two box halves to be separated by around 6mm before they will drop out of their push-fit holders.
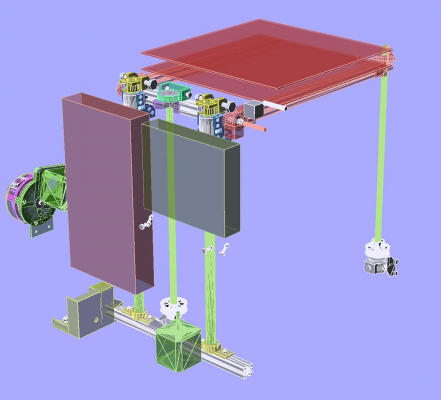
another picture showing the top of the z-assembly. the printbed hinges can also be seen: these contain 625 bearings because positioning is crucial. the M5 bolts will be tightened up hard enough so that the inner hub of the 625 bearing locks onto the LM12UU linear bearing holder (blue). the top hinged 12mm rod holders do *not* use bearings: as earlier mentioned this is a design MISTAKE that will be corrected later. for now, the M5 bolts are held under friction, and there is a "pusher" (or stopper) in the CoreXY part that pushes down on those 12mm rods (and deliberately bends as it does so), holding the rods in place. it's less than ideal but anything else would require significant redesigning of the entire set of hinges, as the entire design and placement is critically interdependent.
this is just a top-to-side-view of the front of the printer (minus frame) with the CoreXY in place, this time, where you can see the hinges (green) of the left front leadscrew bearing holder.
this picture is a CAD render where the earlier (real) photos show the interlock between the box frame and the CoreXY assembly: the idlers are in place (yellow) and you can see how parts critically depend on each other for positioning, even if they do not lock into each other.
the CoreXY assembly actually rests *on top* of the box frame top left (and right) rails - it is actually aligned directly above it, inline. this is so that the box is as wide as half the width of the CoreXY assembly, rather than being half the width... plus-an-extra-15-mm-for-the-width-of-yet-another-bit-of-extrusion. in the v1, this was what was done, and the CoreXY assembly was already a good 382mm wide (or thereabouts), so the box ended up being just over 200mm high. the v2 box is around 141mm high - a significant difference*.
there's a second lock-point between the frame and the left and right extrusions of the CoreXY - further at the back, just underneath the X and Y motor holders. these are slide-fit parts, which slide in the same direction of travel as the front interlock parts, except there is no bolt-and-wingnut. this helps constrain the CoreXY assembly further, as well as ensure that the frame at the back is locked down and cannot twist about. from the original analysis, it is critical that the top CoreXY be used at *each* corner to anchor and stabilise the two halves of the Box Frame.
if any one of those four anchor points is either missing or inadequate, the ENTIRE frame will NOT be rigid. this was something that was not fixed in the v1: there was a 1mm gap between the Box Frame left and right extrusion and the top CoreXY rectangle, which could not be tracked down, and resulted in up to 1mm of wobble of the printhead being transmitted into prints, at higher speed. this is an enormous amount, so a lot of attention is going into this to ensure that, this time, the anchor points are properly rigid.
basically this is a really complex build, with clearances in some places of only 3 to 5mm. this will have to be revisited for a revision 3, because 3 to 5mm if the box is hit hard during transportation, could end up with parts bashing into each other.
the old adage from software engineering springs to mind: plan to build three revisions (throwing away each time) because if you don't, that's what you will end up doing anyway. it's the first version that you don't know what you want, and don't know how to build it. the second version you have a clearer idea of what you want (because the first version doesn't do it), but you still have no idea how to build it (because you don't have one yet). finally on the third revision, you know what you want (because one version now does it), and you know *how* to build it (because the 2nd version wasn't built properly, even though you knew what you wanted).
this 3d printer is definitely turning out to be exactly like that...
Edited 1 time(s). Last edit at 05/03/2016 06:57PM by lkcl.
|
Re: Foldable, portable CoreXY (Fusebox derivative) May 04, 2016 08:57AM |
Registered: 8 years ago Posts: 776 |
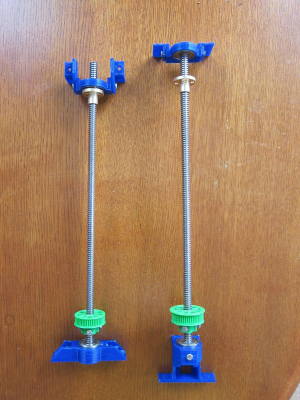
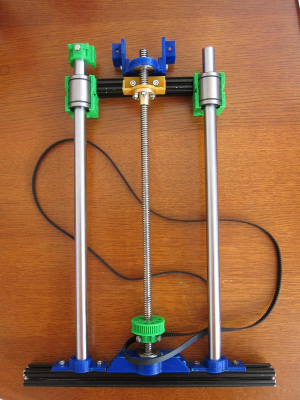
ok so these are the lead screw assemblies:
left, here, is the central (back) leadscrew, right is one of the front ones.
this shows the tops of the leadscrews, each with a single bearing on (non-essential-accuracy) pivots - simple M3 bolts. the pivoting is required for the back one because the z-assembly is hinged on the corexy. and for the front ones, the pivoting is required firstly to ensure that the bearing holder does not smash into the z-assembly when stowed, but also as mentioned previously so that the lead screw is not bent on assembly or disassembly.
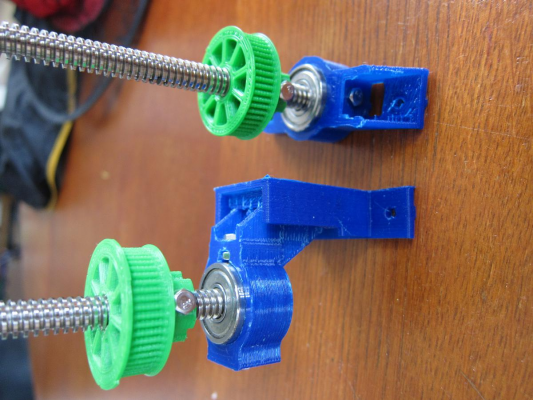
this photo shows the front leadscrew attachment assembly (left), so that the front two lead screws can be removed and stowed inside the box. it's a push-fit. this arrangement is experimental, and it will be necessary to keep an eye on it to make sure that it does a decent job: no movement must be possible, both in the bearing holder or its holder which is fixed to the box.
other progress: i am currently working out the box dimensions, to use the remaining (4) metres of 15x15 extrusion, leaving some gaps but working out a way to maintain structural integrity. the 15x15 extrusion is really quite expensive so it would be a good idea to reduce the amount used, but the real reason is that i am running out of time and budget to keep on ordering parts, so i will make do with what i have.
Edited 1 time(s). Last edit at 05/04/2016 08:57AM by lkcl.
|
Re: Foldable, portable CoreXY (Fusebox derivative) May 05, 2016 12:22PM |
Registered: 8 years ago Posts: 776 |
quick update, main build's started of the box and the z assembly, this photo shows the size difference between the v1 and the v2 - same printbed size but it looks like i will get a 220 or maybe 230mm height, despite a reduction from about 440 down to 316mm in width, and reductions in depth and height as well.
this is the z-assembly, that single bottom extrusion locks into two holders in the box halves. this is just with the back lead-screw, i also remembered to fit the closed loop belt before putting the top on...
more later.
Edited 1 time(s). Last edit at 05/05/2016 12:22PM by lkcl.
this is the z-assembly, that single bottom extrusion locks into two holders in the box halves. this is just with the back lead-screw, i also remembered to fit the closed loop belt before putting the top on...
more later.
Edited 1 time(s). Last edit at 05/05/2016 12:22PM by lkcl.
|
Re: Foldable, portable CoreXY (Fusebox derivative) May 06, 2016 05:33AM |
Registered: 8 years ago Posts: 776 |
|
Re: Foldable, portable CoreXY (Fusebox derivative) May 06, 2016 06:14PM |
Registered: 8 years ago Posts: 776 |
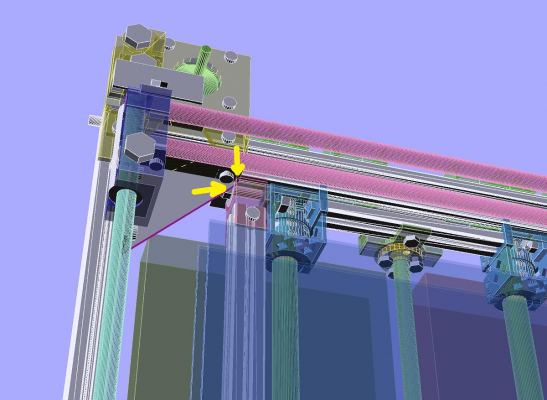
box frame is completed, and i've found a couple of mistakes. likewise when putting the z-assembly together with the corexy assembly, there's overlap that was incredibly hard to spot in the 3D CAD model, such as this:
note where the yellow arrows are? that's the 50mm corner braces hitting the z-bed bearing holder, when stowed. that's almost impossible to spot because due to the complexity of the model the framerate is so slow (about three SECONDS per frame) i can't rotate it around a lot to get a good look. fortunately however all that's needed is some cutting with a craft knife and some minor alterations to the model.
there are about four of these that i've found when assembling, which, surprisingly for the v1, simply didn't occur. it was very straightforward: design, print, assemble. however the v2 is much smaller, more compact, and so the available space is extremely limited: several parts of the design have been compromises and/or near-misses. again, fortunately, none of these design errors are critical, and can all be corrected.
however - and i'll do another video tomorrow to show it - the front and rear corexy interlocks onto the box simply aren't strong enough for me to be totally happy with them. there's a small amount of play, which as already noted, is critical in this design not to have.
the box however, with its missing frame parts and using the hardboard for structural support, is quirky, but is surprisingly fine. hardboard is not exactly flimsy but it can bend significantly, but in its own plane it's extremely strong - surprisingly so for being $EUR 7.50 for the *entire set of box panels*. so, taking that into account, strategic bracing has been put in place using partial extrusion lengths, and amazingly it's worked out well.
i have to say though that this is a ridiculously-complex design, with a heck of a lot of non-obvious structural integrity. it's kinda cool.
|
Re: Foldable, portable CoreXY (Fusebox derivative) May 07, 2016 01:15PM |
Registered: 8 years ago Posts: 776 |
ok so another video showing the design mistakes made, and how they've been corrected. still a couple to sort out but they're not hugely critical. the box frame is relying on the hardboard more, so i am having to do some careful analysis and compensation for using less extrusion.
[youtu.be]
Edited 1 time(s). Last edit at 05/07/2016 01:15PM by lkcl.
[youtu.be]
Edited 1 time(s). Last edit at 05/07/2016 01:15PM by lkcl.
|
Re: Foldable, portable CoreXY (Fusebox derivative) May 07, 2016 04:28PM |
Registered: 11 years ago Posts: 1,049 |
I understand that you will be printing on a bus or train while moving from location to location
and watched your video of design mistakes
What will happen to your current printer used to print parts for your design
Maybe an RV with storage space for 3D printers and machine shop?
Not to pee in your cheerios
but wouldn't a design like this "Backpack printer"
be mo better?
[plus.google.com]
Design by Nicholas Seward
[forum.conceptforge.org]
Goals:
Fit in a backpack.
200x200x150 target work volume
No deploy operations. (Plug in and print)
Quality is important but not speed.

|
Anonymous User
Re: Foldable, portable CoreXY (Fusebox derivative) May 08, 2016 03:32AM |
Quote
cozmicray
I understand that you will be printing on a bus or train while moving from location to location
and watched your video of design mistakes
What will happen to your current printer used to print parts for your design
Maybe an RV with storage space for 3D printers and machine shop?
....
Neat idea ! To 3D print blue crystals in the New Mexico desert

PS: Well thought the printer you showed, combining the Z axis and folding capability.
|
Re: Foldable, portable CoreXY (Fusebox derivative) May 08, 2016 06:09AM |
Registered: 8 years ago Posts: 776 |
Quote
cozmicray
I understand that you will be printing on a bus or train while moving from location to location

Quote
and watched your video of design mistakes
yeahhh, i'm tired - currently doing about 14 hours a day sustained for 2 months so far - and under pressure. have to be out of these premises by the end of the month, and do not have a destination arranged.
Quote
What will happen to your current printer used to print parts for your design
am looking for a home or a buyer for it, or the parts. it's gotta go. i can't take it with me.
Quote
Maybe an RV with storage space for 3D printers and machine shop?
when they make RVs with wings or perhaps that hyperloop transport comes about... yeah.
Quote
Not to pee in your cheerios
but wouldn't a design like this "Backpack printer"
be mo better?
it looks awesome as a concept - however.... short answer: no it most certainly would not.
i did a detailed explanation as to why scissor-lift is not going to work, engineering-wise, in 3d printers, on one of the other sub-forums (the one about z-axis arrangements).... found it [forums.reprap.org]
to reiterate: first reason - the level of accuracy on the lengths of the scissor lifts, the bearings tolerances, all have to be to EXTREME sub-micro-millimetre accuracy. the reason: just like in a delta printer, any discrepancies are multiplied. second reason - the force multiplier is an INVERSE of cos (angle), where the shallower the angle, the more extreme the force required. at zero (flat) that force is infinite (i.e. you cannot get lift at all). but, ultimately, it's not the variation in force that kills this idea (that can be compensated for in software), it's the first reason: with the engineering techniques we have today available to us in 3d printing, we cannot get that level of accuracy... yet.
the second thing that would make this printer design inaccurate: torquing the structure as well as the corexy. it's simply *too* flat. not only will the corexy twist and buckle (not be truly flat), but the scissor-lift 3d printer which... where is it.... ok here we go - the Mondrian:
now, that guy, he made a scissor-lift Z but it's *FIXED*. the scissors go up, and they lock into place. they're *NOT* part of the z-axis (moving) lift. i believe he uses a belt-drive for Z, so that's quite easy to fit just before you lock the Z-scissors into place. the advantage of that approach is:
- micro-discrepancies in each of the lengths used in each of the 4 scissor-lifts is immaterial. once locked into place, the bed may be levelled to compensate (possibly even just the once, depending on how good the bearings are)
- a Z belt-drive has no non-linearity. torque and force will be consistent throughout the entire range of travel
- installing the Z-belt drive during assembly is an easy task
the only down-side is: as the guy probably found out, getting the top corexy to stay stable on only four scissor-lifts like that, well, you can demonstrate it easily enough (and this applies to that backpack design as well):
- put two feet on the base (through the frame),
- stand over the box and bend down
- take the top corexy part in both hands
- twist the top corexy, pretending that it's a bottle-top, and try to unscrew it
that's an easy test to do (it's one that i do on the sandwich200s to test the frame rigidity) and both the scissor-lift mondrian *and* the backpack design will have a *MASSIVE* amount of twist about the z-axis, no matter how expensive the bearings and no matter how thick the plastic housings for those bearings.
also, if you also try to simply push the top corexy part sideways (shear), both of them will shear sideways, too. left and right scissor-lifts will rock sideways (twisting their bearings and the plastic housing, possibly even cracking it), and the front and back ones will rotate. or, if you push either of them forwards-backwards, left and right will rotate (their scissor-lifts will compress and change in height), and the front and back scissor-lifts will rock in their plastic bearing-housings, possibly cracking those. also, because the scissors are at their highest (closest) extension, you get a huge lever-effect on the bearing housings. all the force that's normally absorbed by metal brackets (in good, rigid designs) is now force-multiplied by a factor of 8 or more, and placed onto plastic bearing housings, as well as onto the bearings themselves.
... what do you think the chances are, then, of such an arrangement being accurate or surviving long-term use?
i did consider the scissor-lift arrangement, months back, when i started this - and almost immediately flat-out ruled them out. you *might* be able to get a rigid frame by using *eight* scissor-lifts (two on each side, so you get two at each of the corners, at right-angles to each other), as long as you then used some sort of cross-cable-bracing in all four sides (front, back, left, right. cables because when the box is flat-packed the cables go slack, but when it's assembled they go taut). but, honestly, having to have 8 sets of scissor lifts and 8 sets of cables.... it's not going to be pretty, and... yeah.
.... oh, and then once that's all done you *still* have to have an outer box for transportation which has protective packaging of some kind. so whatever dimensions you have, add an extra 30-50mm on *each side*, so that's an extra 60-100 mm on length, 60-100mm on height, 60-100mm on depth.
there really are good reasons why i've gone with this design. it's the best that i could think of in the available time, which covers a wide range of quite specific non-negotiable requirements.
Edited 1 time(s). Last edit at 05/08/2016 11:41AM by lkcl.
|
Re: Foldable, portable CoreXY (Fusebox derivative) May 08, 2016 04:43PM |
Registered: 8 years ago Posts: 776 |
ok so i have the z-assembly in a preliminary set of parts, it's... ah.... odd, to say the least:
this is a CAD render where the printbed is down by 203mm. with the compactness of this printer i'm basically kinda backing myself into a design corner, this was the best i could do. the motor had to go upside-down and rotated by 45 degrees (!) and inched forward to fit just between the back lead screw and the 12mm rods, without hitting the z linear bearing holder or the lead screw TR8 nut holder. it's completely bonkers.
basically this is a belt-drive, with GT2-6mm-40tooth gears on the rods (in grey), it's a 900mm closed loop and there is *just* enough slack left so that if the motor's drive shaft centre is exactly 43mm away from the centre lead screw, the belt clears the rods and the motor doesn't catch on anything either.
however what i've had to do is make a dog's dinner two-part z motor holder, where the first part is pivoted on a 608 bearing and holds the motor's shaft centre exactly the required 43mm away. there's a single screw going down into the second part of the motor holder, which has an arc hole cut in it. the reason for the arc is two-fold: firstly, the tension on the belt can be adjusted, but secondly, the motor can be swung *inwards* when the printer is stowed, giving more space.
now, the only problem with that is that the motor is so close to the 12mm rod it could bang into it, causing scratches and damage. so i will be placing a small bit of rubber on the side of the motor to stop that.
basically i am not really happy with this, the plastic is not really strong enough, but at least it is strong in the direction that will stop the motor from rotating, which would cause inaccuracies in the z height. one for a v3 i think...
|
Re: Foldable, portable CoreXY (Fusebox derivative) May 09, 2016 07:24AM |
Registered: 8 years ago Posts: 776 |
|
Re: Foldable, portable CoreXY (Fusebox derivative) May 11, 2016 07:49AM |
Registered: 8 years ago Posts: 776 |
okaaay *sigh* i have some box frame adjustments to make, after removing some of the aluminium extrusion.
[youtu.be]
basically i was relying on long lengths of extrusion at the bottom, clamped together at the bottom middle of the box, to provide structural bracing when the printer is assembled. unfortunately i had to cut that middle part out in order to make room for the clasps that keep the CoreXY on the top.
that in turn results in the remaining (short) pieces being able to bend the hardboard, so i've worked out a way to make sure that doesn't happen. it involves putting 3 short pieces of extrusion into each of the corners, and using the strong corner bracing brackets to ensure that all 3 pieces are braced against each other.
it's all quite.... logical but it's a chain. twisting of the extrusion i do not imagine to be an issue, because these are only 50 to 120mm lengths.
Edited 1 time(s). Last edit at 05/11/2016 07:50AM by lkcl.
-- sandwich200: compact portable folding corexy printer [reprap.org]
|
Re: Foldable, portable CoreXY (Fusebox derivative) May 11, 2016 02:58PM |
Registered: 11 years ago Posts: 1,049 |
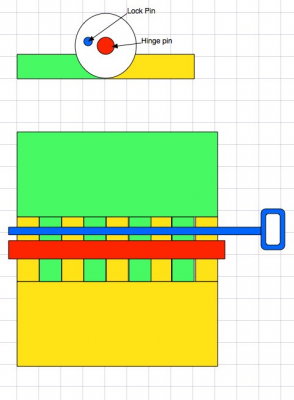
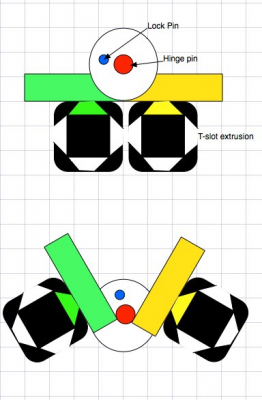
Use a proper hinge at the bottom.
If you use one with large high lobes (where rotation pins go thru)
you could slide a pin in (off the rotational axis) to lock in place
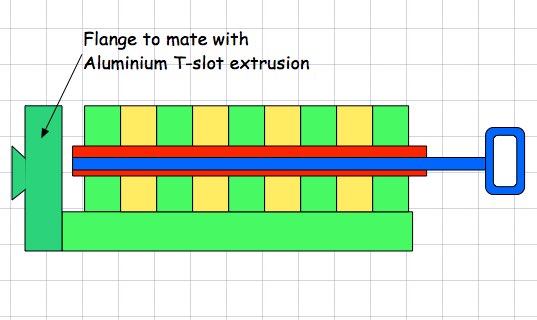
One could incorporate a flange to attach to aluminum T-slot

Edited 1 time(s). Last edit at 05/11/2016 03:15PM by cozmicray.
If you use one with large high lobes (where rotation pins go thru)
you could slide a pin in (off the rotational axis) to lock in place
One could incorporate a flange to attach to aluminum T-slot

Edited 1 time(s). Last edit at 05/11/2016 03:15PM by cozmicray.
|
Re: Foldable, portable CoreXY (Fusebox derivative) May 11, 2016 03:14PM |
Registered: 8 years ago Posts: 776 |
well... i am a damn fool. and pissed off with myself. i *specifically* said that the frame rigidity critically depends on certain factors, one of them being that the two metal pieces that are joined together to make a rigid frame are hinged and themselves rigid. i wrote it on the forums, i wrote it on the wiki, and i've been writing it here.
then i cut the damn middle parts because i had put the corexy supports too far up (so the box would not stow)... and now i *know* that those two middle bottom bars are absolutely critical.
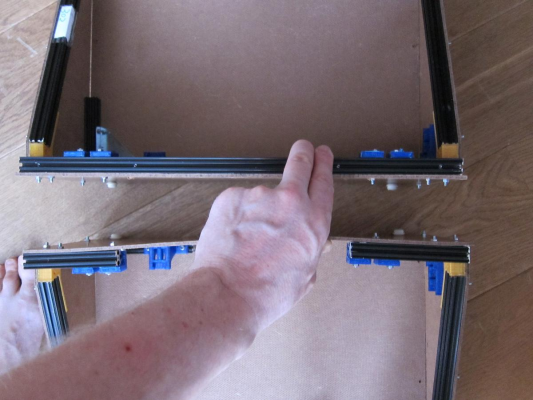
here's what happens when they're not rigid:
now, imagine joining that bottom half to the top half, with that much bend in the hardboard base of the bottom half. it ain't gonna be a rigid frame, is it?? argh. anyway, so as you can see, i've re-replaced one of the struts - i had to take it from the sandwich200v1 because i'm out of time and 1515 extrusion. it's 410mm when ideally i need 415, but that's okay - it will do the job.
it's funny, y'know - it's one thing to do the analysis and feel that it's right, but it's another to completely forget your *own* analysis and to learn the hard way that yeah, you really were right the first damn time. meh

|
Re: Foldable, portable CoreXY (Fusebox derivative) May 11, 2016 03:22PM |
Registered: 8 years ago Posts: 776 |
Quote
cozmicray
Use a proper hinge at the bottom.
If you use one with large high lobes (where rotation pins go thru)
you could slide a pin in (off the rotational axis) to lock in place
ooo, i like it. yes, a *proper* hinge is actually what i need. i'll need to find something in metal because plastic simply isn't good enough here. i'm putting the plastic pieces under stress to keep the metal firmly together with friction: it seems to do the job well, especially when cranking up the tension.
however, much more than just a hinge is needed: that entire middle-base, all the way along the length, *has* to be rigid. so i could use a door hinge (metal one - or a pair of more precisely) but it would need to be attached *to* a piece of extrusion that goes all the length of both base halves, from back to front.
for future improvements, i'd like to set up spring-loaded pins (so they don't get lost). the pins however needs to be *exactly* a precision fit (every time it's removed and reinserted). there must be no "play" or "travel". no lateral movement, no axial movement. any movement at all will result in inaccuracy in the prints as the entire frame will wobble (just as i've found out by not having that long bar in place).
this is why i used clamps. actually, honestly, small metal g-clamps would do much better here, except they're slightly inconvenient (could be placed in the wrong place for example).
so it's like... you need a combination of clamps and detachable hinge. you need the best features of both.
|
Re: Foldable, portable CoreXY (Fusebox derivative) May 11, 2016 03:52PM |
Registered: 11 years ago Posts: 1,049 |
Hey
This is not a tractor truck!
if you printed a hinge like I showed, very wide, many lobes
it would take the load.
Two 20 cm hinges on each end --- if you must piano hinge in middle
(hard to match up rotation axis)
Pin -- piece of piano wire -- you could make 20 of them
make a slot to stow them while running thru airport with printer.
(good luck explaining it to security guys)
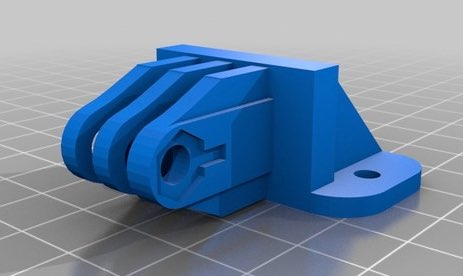
Gopro mount hinges like this take a real beating and still work.
Put some nylon in your printer
I really think beefy PLA would do it?

|
Re: Foldable, portable CoreXY (Fusebox derivative) May 11, 2016 04:16PM |
Registered: 8 years ago Posts: 776 |
Quote
cozmicray
Hey
This is not a tractor truck!
ooaaarrrr.... oooi got a brannnd new commboinearrvester an oilll give you t' keeeeyy... [www.youtube.com]
Quote
if you printed a hinge like I showed, very wide, many lobes
it would take the load.
Two 20 cm hinges on each end --- if you must piano hinge in middle
(hard to match up rotation axis)
what would the hinges attach to? if you mean attach them to the hardboard, without support between the two hinges, the hardboard *will* bend, and that will translate into shearing and rotation of the frame. i've learned the hard way that there really does have to be a stiff piece of metal all the way from front to back.
then, even if they were 20cm long, they would still bend if mounted directly to the hardboard without the metal bracing.
Quote
Pin -- piece of piano wire -- you could make 20 of them
make a slot to stow them while running thru airport with printer.
(good luck explaining it to security guys)

Quote
Gopro mount hinges like this take a real beating and still work.
Put some nylon in your printer
I really think beefy PLA would do it?
no it won't unfortunately - plastic hinges absolutely will not do: plastic simply has too much elasticity. even the slightest amount of twisting in any direction will directly translate to x, y and z movement as the entire CoreXY will be able to move sideways and forwards-backwards, and the z-axis will be able to rotate about the x-axis as well as shear off of true (one rod will be able to move forwards whilst the other moves backwards).
i have enough concern over the angled corner-pieces moving about, and the corexy-to-frame parts (being plastic) are also a pain. creating a type of clamp which forces metal-against-metal was the simplest temporary first-iteration solution i could come up with. all 4 of the 2nd-iteration clamps cracked already: they *all* split (lower-quality PLA) and they were all 5mm thick, at 30% infill.
i really do need a metal-only solution, combining the hinge idea with the clamp one.
|
Re: Foldable, portable CoreXY (Fusebox derivative) May 11, 2016 06:27PM |
Registered: 11 years ago Posts: 1,049 |
Well if your out and about
Find some GoPro fittings
the tripod or attachment hinges --- play with them
those only have two lobes
imagine your hinge with eight lobes and tight fitting
But you could always use your special kitchen mount Haas CNC machine
to crank out some aerospace spec titanium hinges
Hey look no fasteners -- won't have to bugger up screw head with kitchen knife?

|
Re: Foldable, portable CoreXY (Fusebox derivative) May 12, 2016 05:16AM |
Registered: 8 years ago Posts: 776 |
Quote
cozmicray
Well if your out and about
Find some GoPro fittings
the tripod or attachment hinges --- play with them
niiiice. ok made some notes. thanks ray. ahh of course: tripod hinges are designed to be rock-steady. goood ideaaaa.
Quote
But you could always use your special kitchen mount Haas CNC machine
to crank out some aerospace spec titanium hinges
why do that, when off-the-shelf hardware would do the job at a fraction of the price, and burn up the environment in the process? i'm an eco-warrior at heart, cozmicray. oh wait... a _cowboy_ eco-warrior...

Quote
Hey look no fasteners -- won't have to bugger up screw head with kitchen knife?
awww. i _like_ using kitchen knives as screwdrivers: they're like... really sturdy maaan. used to do that aaall the tiiime as a kid... sometimes in other people's houses... whoops ...
|
Re: Foldable, portable CoreXY (Fusebox derivative) May 12, 2016 05:21AM |
Registered: 8 years ago Posts: 776 |
ok here's the "i screwed it up" video [youtu.be]
and here's the "yay i fixed it!" one: [youtu.be]
apart from a couple of niggles which i think i know how to jury-rig, it's pretty much ok now. the corexy to frame back interlocks are rock-solid. the front ones i'm still not totally happy with, they're rather long so tend to twist about. the middle base extrusions i think i can create a stopper on the end of *both* extrusions at *both* ends that will stop them from rotating, by fitting into the cutaway rails. will see how that goes.
flex3drive is due to arrive, along with some 24v fans. the e3dv6 non-bowden 3mm hotend arrived yesterday, i'll put that on... the only thing i'm missing is a 2nd printbed and glass, but i have a PCB MK1 from my friend, i'll drop that onto the sandwich200v1 printer so that it's at least up and running. it's 12v - i'll be running the v2 at 24v.
nearly there... whew.
-- sandwich200: compact portable folding corexy printer [reprap.org]
|
Re: Foldable, portable CoreXY (Fusebox derivative) May 12, 2016 11:55AM |
Registered: 11 years ago Posts: 1,049 |
From your video
It's NOT foldable, it is collapsible
I thought it folded along the bottom split
Where are electronics stowed?
How about a time lapse of the 6 hour long assembly
from packed configuration to ready to use.
You should really remove your doll / action figure from your workbench
or is that for scale?
FWIW
I would think something like a Mendalmax 2 or Aluminatus
with folding gantry would be much better and faster to snap up gantry and print.
3D printing >> Foldable Printer >>> Frustration >>> foldable coreXY >>> insanity >>> ikcl

|
Re: Foldable, portable CoreXY (Fusebox derivative) May 12, 2016 12:25PM |
Registered: 8 years ago Posts: 776 |
Quote
cozmicray
From your video
It's NOT foldable, it is collapsible
*thinks*.... you're right! ok well... it sorta folds up... the bed folds down, the corexy folds down... i don't want to create an entire new category on reprap wiki..
Quote
I thought it folded along the bottom split
no the box splits in half (hence the need for split-pin hinges),
Quote
Where are electronics stowed?
at the back, upright, on the z-assembly. it's ridiculously tight. i had to get a 30mm low-profile PSU so that the thing would fit in the box. i'm just hoping that the planned arrangement to stack the PSU on the back can be made strong enough...
Quote
How about a time lapse of the 6 hour long assembly
from packed configuration to ready to use.
i'll do a practice-run and have proper light next time... plus also i will put on the TODO list, "make some guide rails so that the damn lead screws go in straight away".... if i can work out how to edit videos without needing ridiculous amounts of software (e.g. use ffmpeg) i'll give it a shot for speedy-up.
Quote
You should really remove your doll / action figure from your workbench or is that for scale?
haha that's the living room table, taken over by my daughter, lilyana. she occupies most of the floor and the table of one of the living rooms, i occupy 1/3 (and slowly incrementally creeping) of the other one.
Quote
FWIW
I would think something like a Mendalmax 2 or Aluminatus
with folding gantry would be much better and faster to snap up gantry and print.
yehhhh weell, you start, you go "hmmm..." but it's too late, you got all the bits so might as well carry on - it's three months time invested in the CAD design, which is now a monstrous 9,600-line full-blown python application. double the size of what i wrote for the libre laptop, which is quite deeply impressive and scary.
ok let's look at those two, just for fun, go over their design characteristics. i assume you're referring to the "upright" part, that that would appear to be convenient to make it "hinged"?
mendelmax 2 - that's a standard "moving bed" design, so immediately you're looking at a 450mm+ depth for a 400mm bed. plus space around the side (padding).... minimum 500mm probably more like 550mm. now you're *way* outside of what's acceptable for packing, stowing and practical carrying sizes. in fact, there does exist a portable variant of the mendelmax 2 - called the TeeBotMax. it's a frickin monster. 550 x 250 x 500 or something mad when it's stowed... and that's without any safe-foam packaging! so the external box would need to be.... 650 x 350 x 600 (to be on the safe side). there's *no way* i'm going to consider that "portable". shipping, which is based often on dimensions rather than weight, would be really expensive at that sort of size. then, also, it's not a corexy - bed moving means imbalance plus a lack of speed. i want speeeeed (and accuracy). so a ton of reasons there why i would never start from a mendelmax2.
i've not seen the aluminatus - love the name
 hmmm trinitylabs went belly-up, oh well. anyway, yes, looks like the same as the mendelmax2 - minimum 450mm probably 500mm depth even with a 200x200 bed, then extra on the outside for a packing box.... naah.
i cover this already in some depth, cozmicray - [hands.com] - check out the video link there, you'll love the cardboard mockup including kid's felt-tip pens and sellotape..
Quote
3D printing >> Foldable Printer >>> Frustration >>> foldable coreXY >>> insanity >>> lkcl
 i'd add a few extra steps in there, one being "bang head against brick wall" oh wait that's covered by "frustration"....
Edited 1 time(s). Last edit at 05/12/2016 06:42PM by lkcl.
|
Re: Foldable, portable CoreXY (Fusebox derivative) May 12, 2016 12:48PM |
Registered: 8 years ago Posts: 776 |
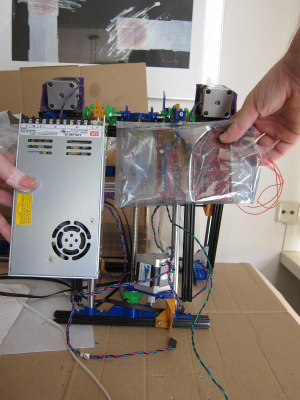
here y'go, ray - PSU and Duet 0.8.5 go at the back, like this:
the PSU will be bridged across at the bottom to that one piece of extrusion, then i will make a dog's dinner bracket that goes over to the M5x50mm bolt on the left-hand 12mm z-rod (you can see green-yellow-green on the top of the rod). getting those M5 bolts on and off is a bitch, i'm not looking forward to it, oh well. anyway it's an experiment, that. i think i'll get away with it...
the Duet 0.8.5 will be hanging off the PSU on one side, then again bridged over to the right-hand M5x50mm bolt on the top of the other 12mm z-rod (green-yellow-green on the other side).
Edited 1 time(s). Last edit at 05/12/2016 06:37PM by lkcl.
|
Re: Foldable, portable CoreXY (Fusebox derivative) May 12, 2016 12:53PM |
Registered: 8 years ago Posts: 776 |
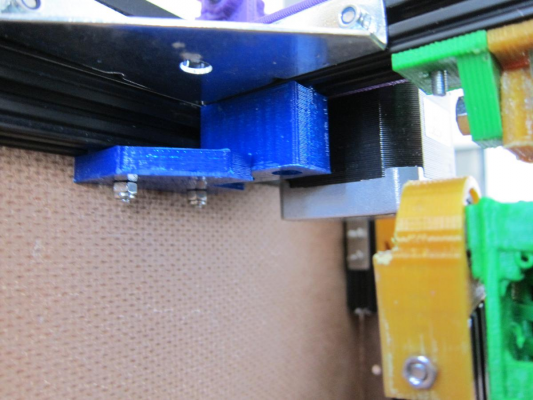
showing how the corexy monster-catch fits into the box frame latch:
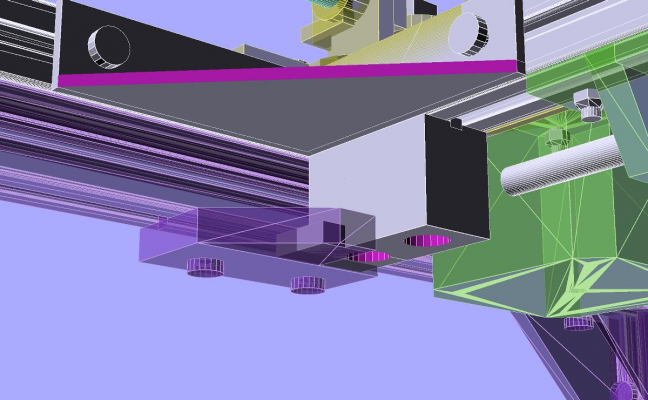
and a CAD render of the same thing, bit clearer with the whole transparency thing:
this is surprisingly secure. not moving anywhere - it's actually quite awkward to get out (cut myself on a sharp edge somewhere as friction gave way...) probably due to not enough trimming meh. but there are two screw-holes in the corexy bit that go deep up into the block. i had to put the *nuts* in the extrusion to do that, and use washers to space out the bolt to the correct depth so that the bolt's end doesn't bite into the extrusion. the catch on the frame is more conventional.
the block on the corexy has one protrusion going forward (which fits in a slot in the frame catch), and one going sideways (left) which comes out underneath the frame extrusion. the forward-facing catch completely surrounds the protrusion, so it can't go sideways, up or down. the (separate, different parts!) interlocks that are fitted on the very front of the frame and corexy are a different style that prevent these two back parts from sliding forwards-backwards. so, two of these (left and right) not only keep the corexy in place, but also prevent the two box halves from splitting apart.
Edited 6 time(s). Last edit at 05/12/2016 06:36PM by lkcl.
|
Re: Foldable, portable CoreXY (Fusebox derivative) May 12, 2016 07:41PM |
Registered: 11 years ago Posts: 1,049 |
Is there a spec that it has to be able to fit in overhead bin on plane?
Do you get seats near the restroom so you can snake in an extension cable to 120V?
About time you get it set up --- "please put your tray tables up and your seat backs upright"
can you assemble / disassemble during take off / landing.
You can print stuff for flight attendants or parts to McGiver the aircraft?
3D printing >> Foldable Printer >>> Frustration >>>
>>> foldable coreXY >>> insanity >>>
>>> Commitment to institution >>>> 3D printer for use in cell????

|
Re: Foldable, portable CoreXY (Fusebox derivative) May 12, 2016 08:00PM |
Registered: 8 years ago Posts: 776 |
Quote
cozmicray
Is there a spec that it has to be able to fit in overhead bin on plane?
as long as it ends up below 15kg...
Quote
You can print stuff for flight attendants or parts to McGiver the aircraft?
... didn't macgyver always get at least an hour to build something to defeat the bad guys?
Sorry, only registered users may post in this forum.
