Design nearly done - construction started...
Posted by Maxx Mayhem
|
Re: Design nearly done - construction started... July 14, 2013 05:36PM |
Registered: 11 years ago Posts: 256 |
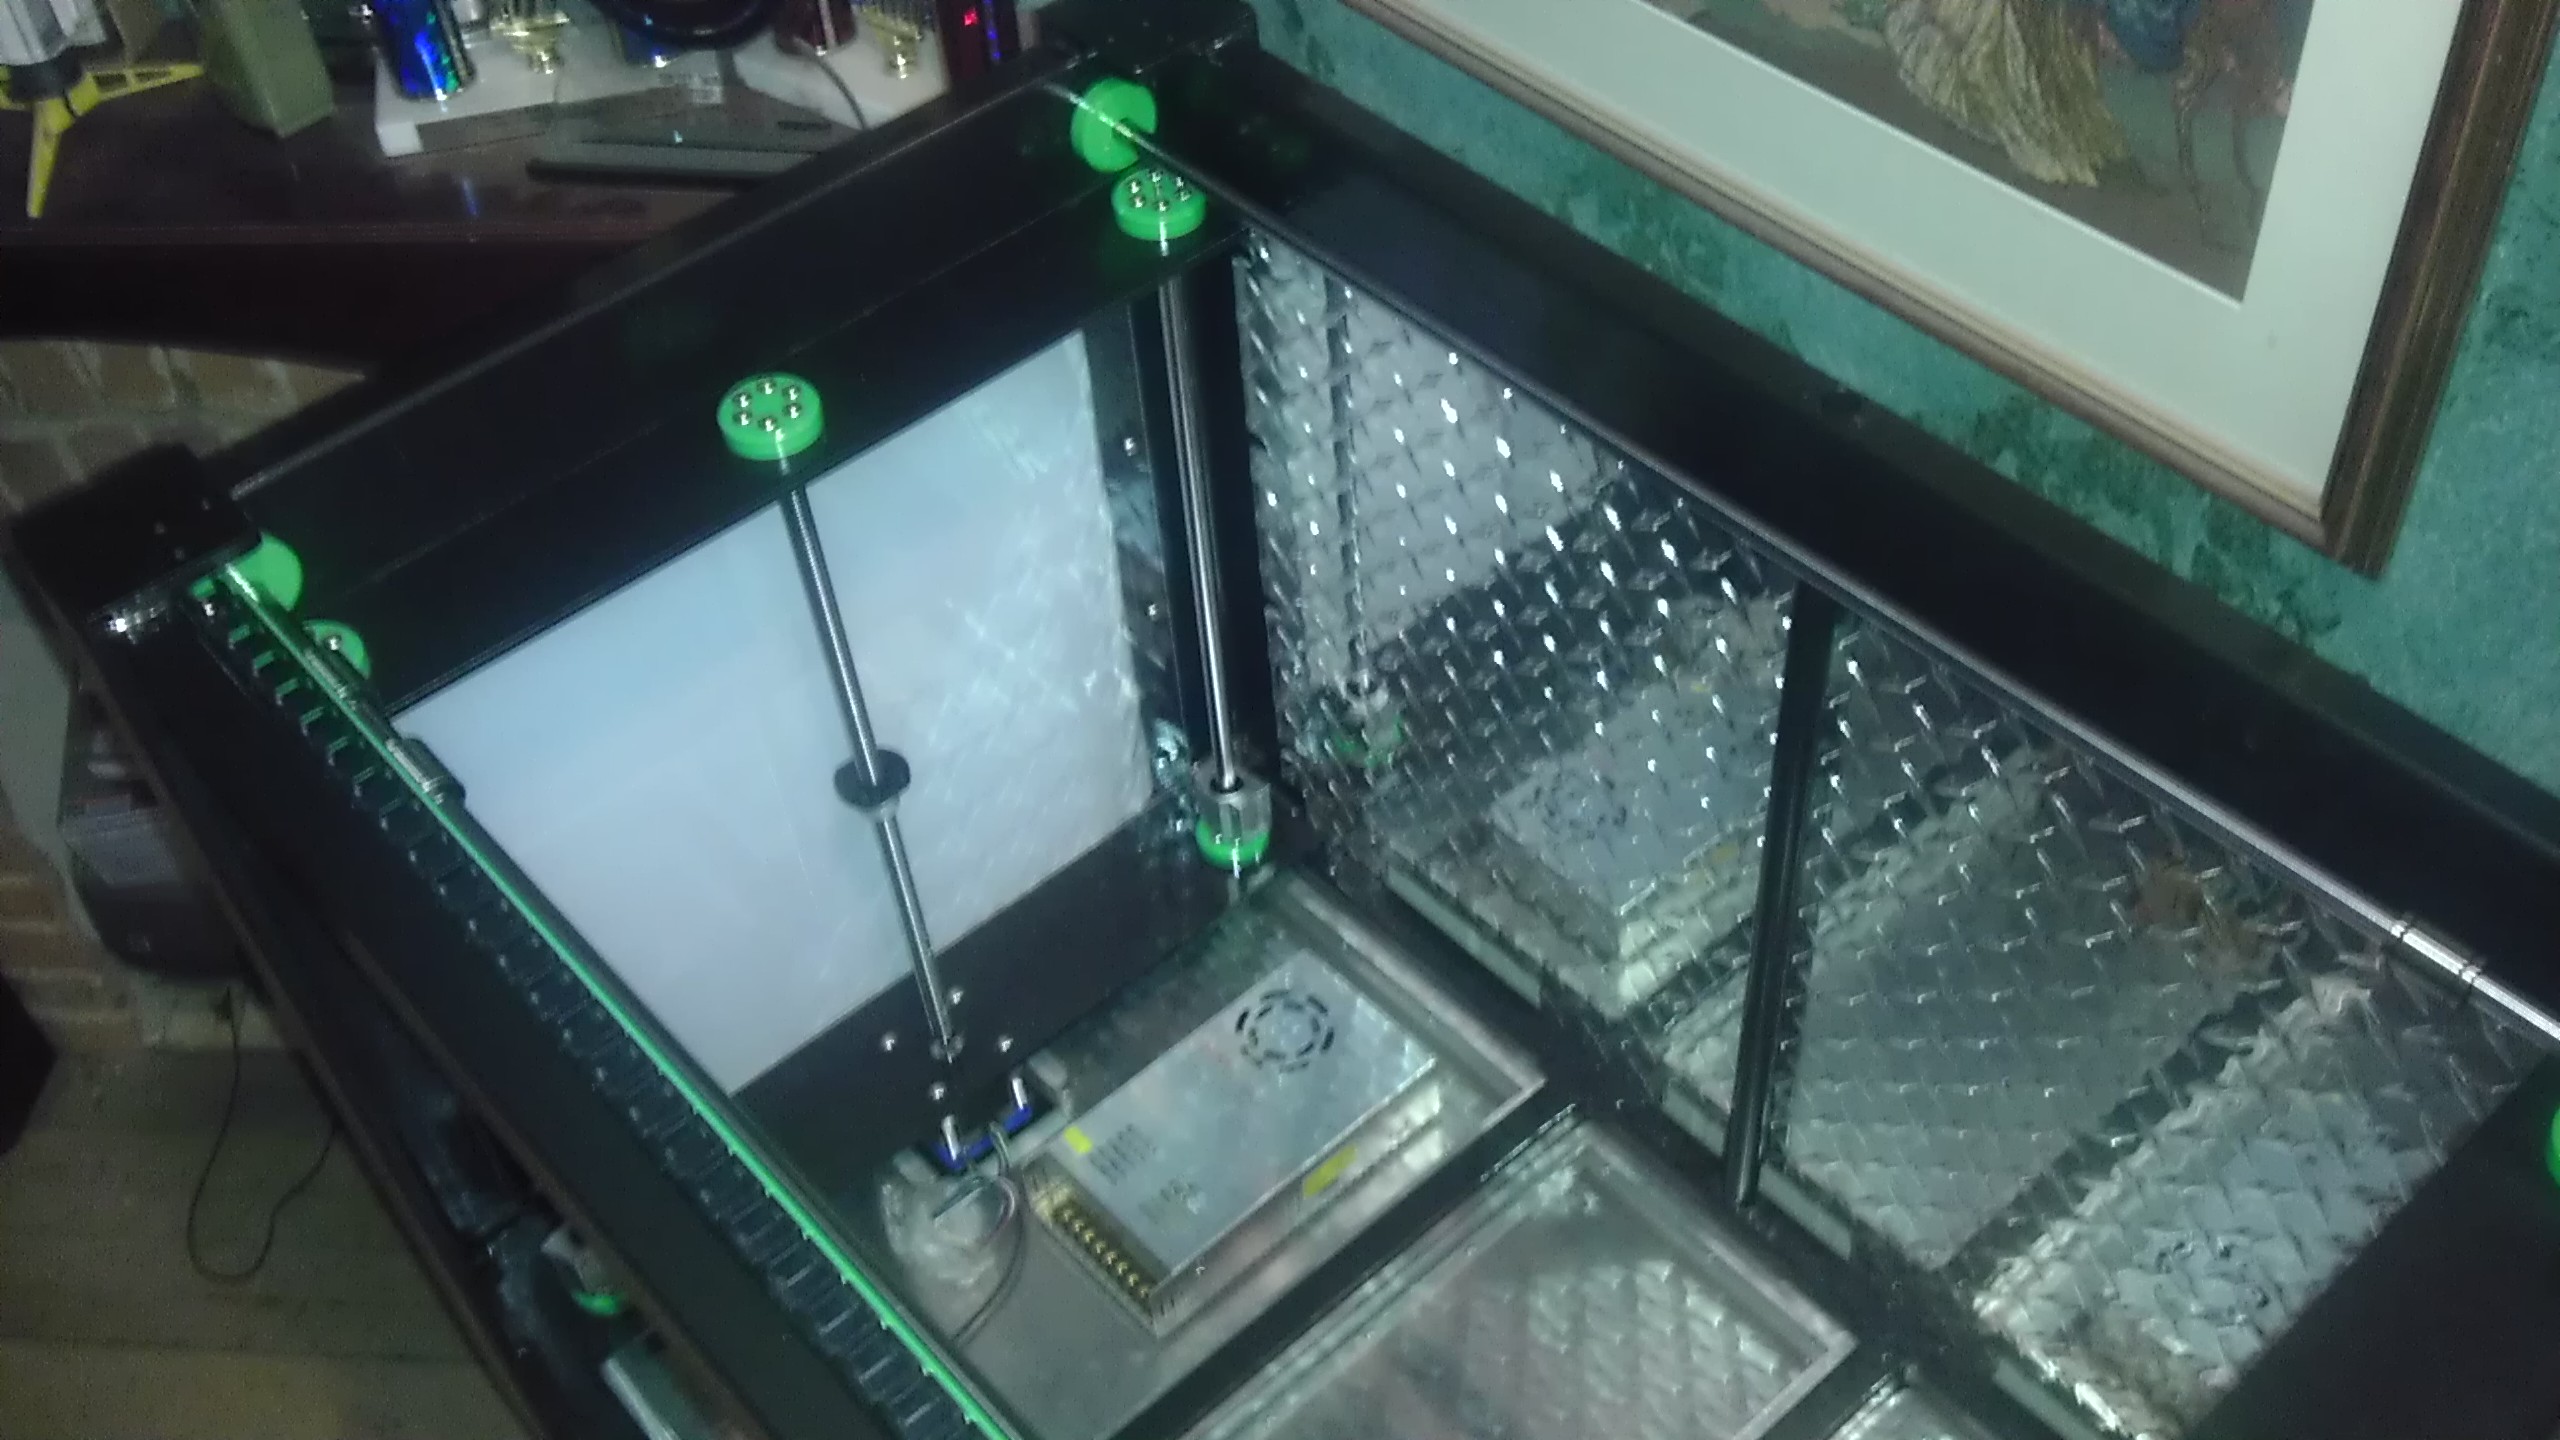
OK, so all the rods and screws are now in place, with adjustments started, though this process will continue as the moving parts go on. You can see now the way the adjustments work, with the green disks locking around the frame to hold the rods in place. This, being a prototype, has been designed to allow for installation of moving assemblies over the pre installed bearings, so that measurements can be finalized in place. Up next is more work on the electrical parts, and then it's on to the mechanicals. 
|
Re: Design nearly done - construction started... July 20, 2013 08:35PM |
Registered: 10 years ago Posts: 474 |
|
Re: Design nearly done - construction started... July 21, 2013 11:12AM |
Registered: 11 years ago Posts: 256 |
It's been about 100f here all week, and I've been working, but today I will install the power connector and start wiring the mains. I still have a few loose ends vis a vis the bed heater (should have told them I need a thousand) and also while on the subject, I wonder if you or anybody has tried tempered glass for a build bed. The glass guy says tempered is good to 700f and stove glass would cost about 400 bucks in the size I need. I'll try to get pix up later or tomorrow. 
|
Re: Design nearly done - construction started... July 21, 2013 03:02PM |
Registered: 17 years ago Posts: 392 |
Borosilicate glass is used to make some types of tempered glass, so that would be heat resistant.
The thing I wonder about is warpage. Some tempered glass I have seen is slightly distorted from the heat treatment. Some even had dimples or pinpricks from being suspened while in the oven(maybe that is old style). It has no impact for most uses, but for a FDM surface... not so good. A big plus is that I think it is more dimensionally stable through variations in temperature. Good for bigger beds.
BTW, have you found a heat source for your massive bed? Are you refering to a thousand watts?
Yvan
Singularity Machine
|
Re: Design nearly done - construction started... July 21, 2013 07:33PM |
Registered: 11 years ago Posts: 256 |
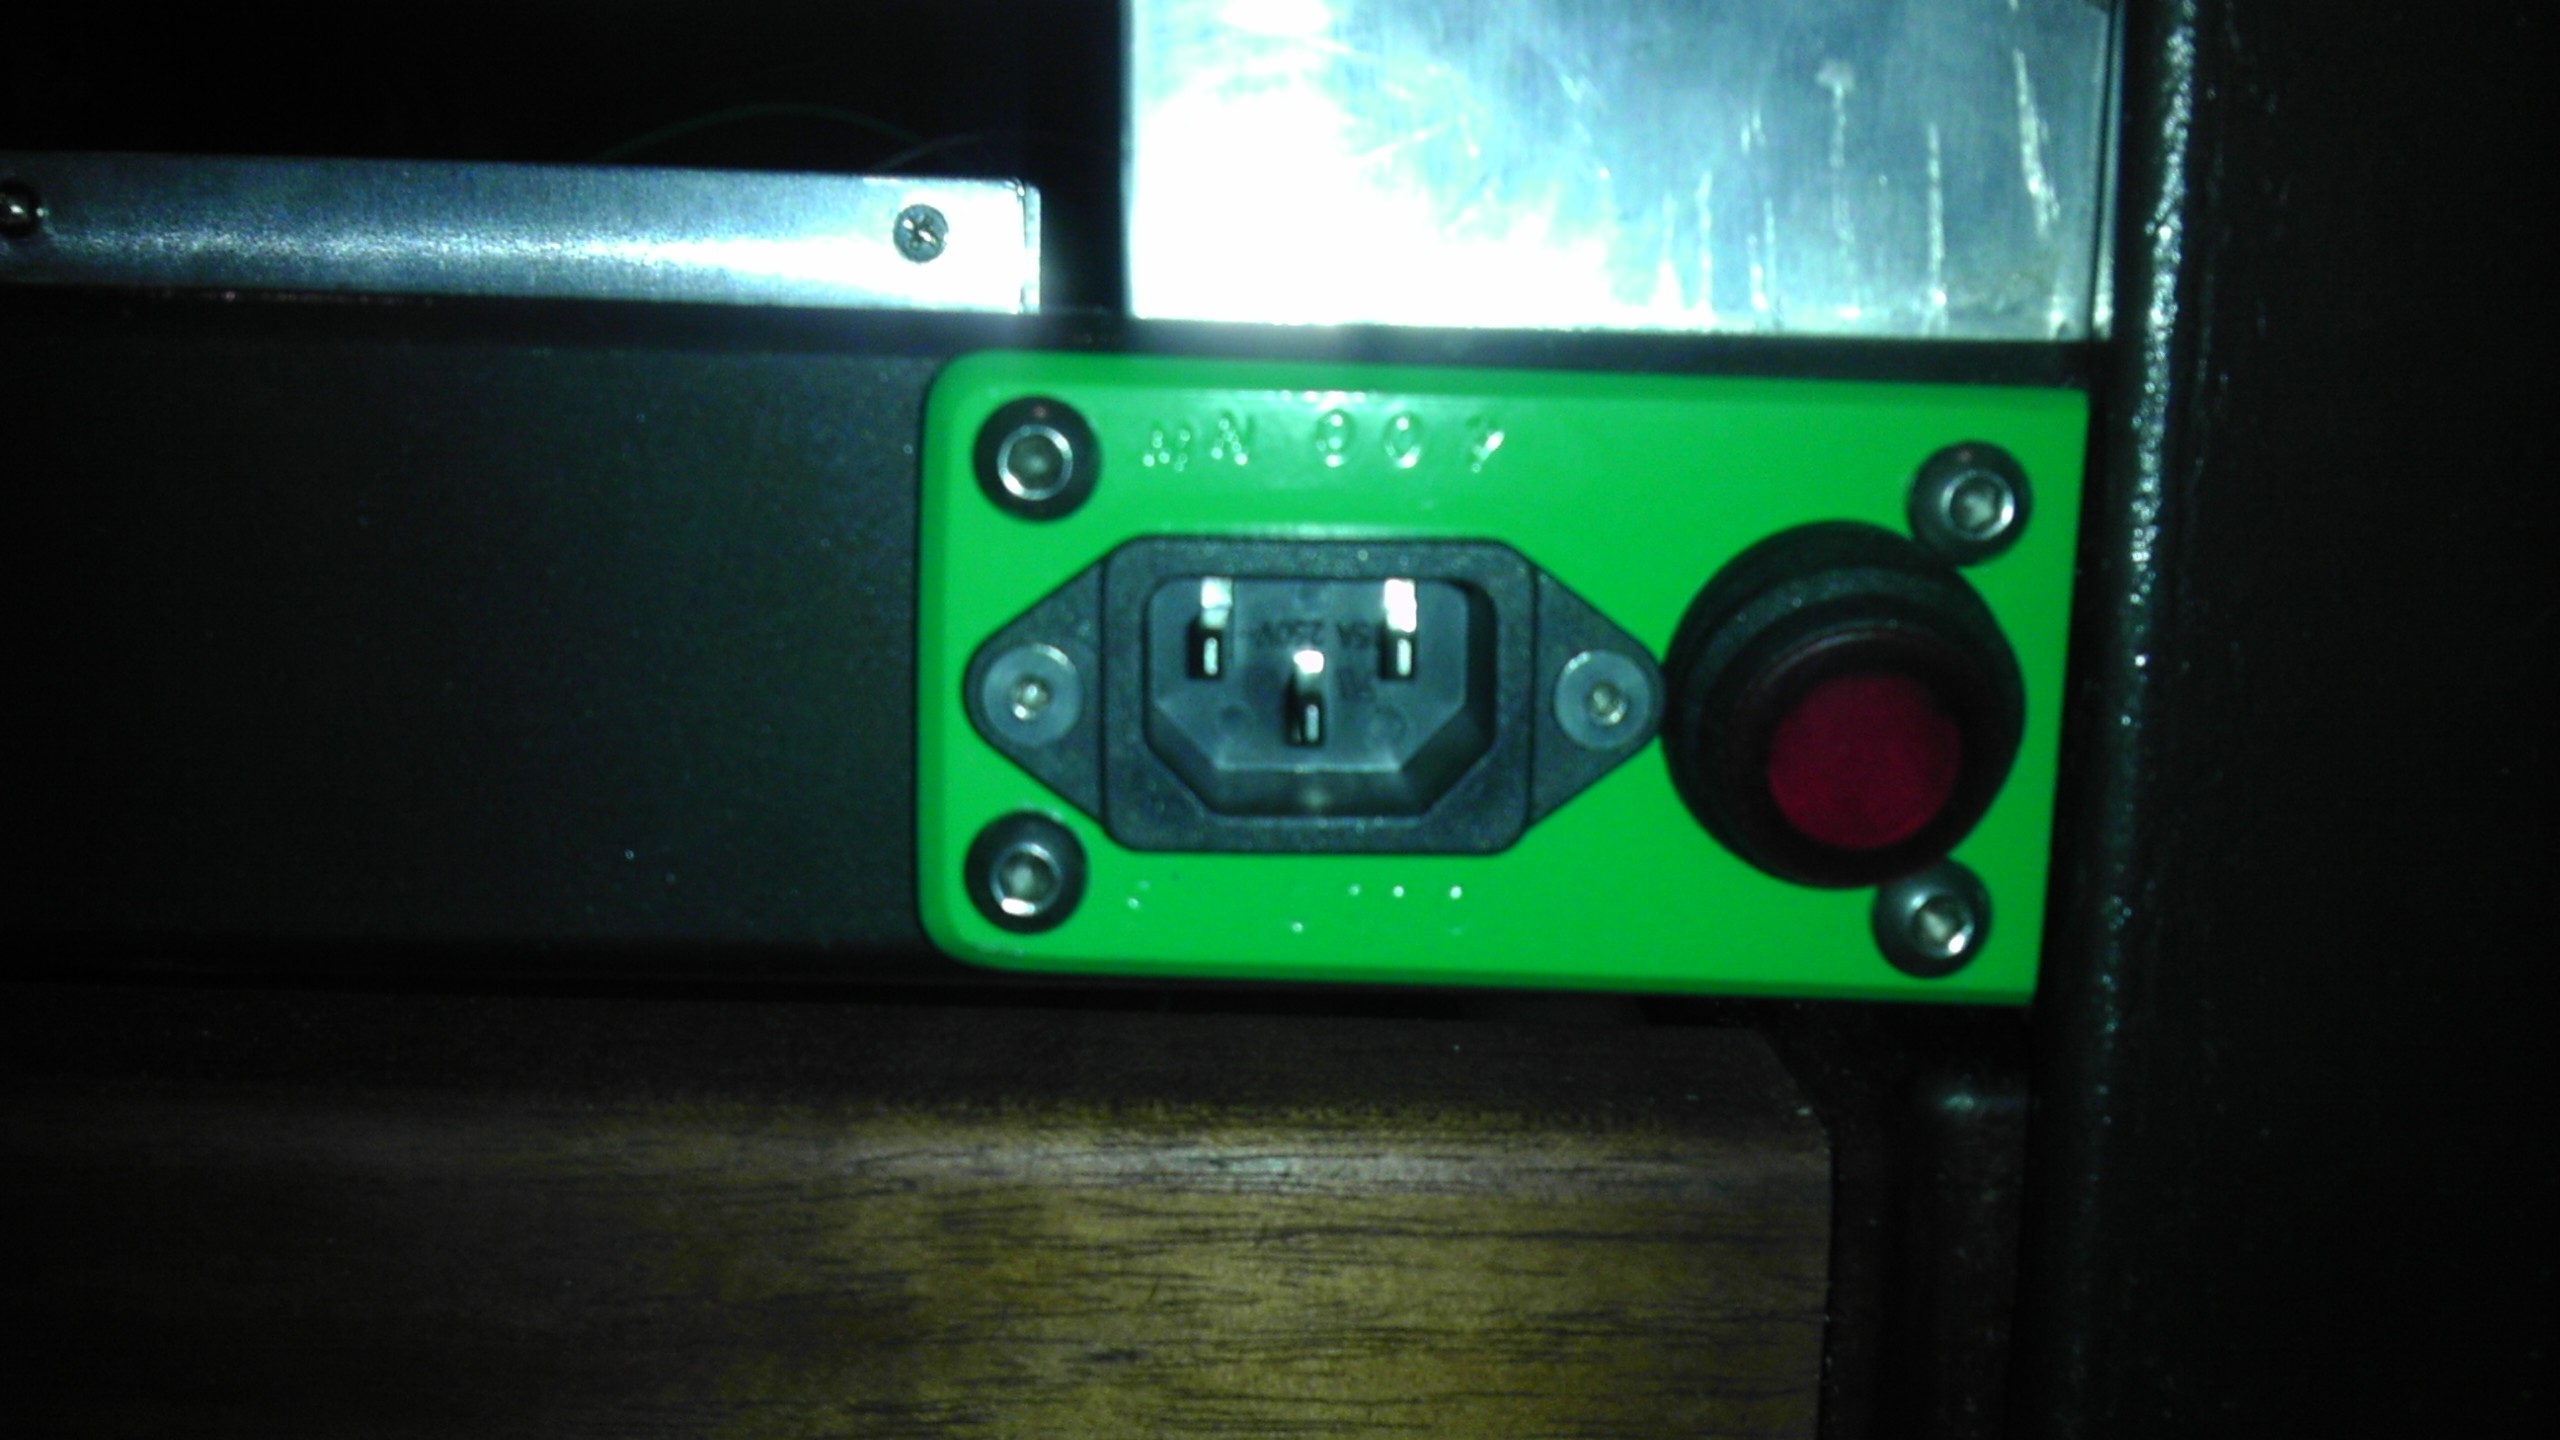
I found a manufacturer called durex who makes silicon heaters in a variety of configurations including the ones we would use and not that dissimilar from that which QUBD appears to use. I'd buy from them if they had the size I need but... So I'm planning on a mains powered unit, and then just use a relay to operate it. It really doesn't take crazy power at 120 VAC. Only thing is, I called them (Durex) a week ago and have yet to hear back. So I've got to get on the phone and make this happen. We've had a heat wave here, and only a small amount of work has happened on the printer in the last several days, however I did finish and install my power inlet today, so things look to pick up this week.
|
Re: Frame welding complete.... July 22, 2013 05:44AM |
Registered: 11 years ago Posts: 791 |
I am using mains powered heater pads for my machines.
I use a solid state relay that is controlled by the thermistor that would normally switch a 12 volt heater pad. The solid state relay switches the mains power and can handle all the power needed without any problem. Because of using mains power, the cheaper and easier to find DC-AC solid state relays can be used. The DC side (control) uses between 3-32 volts, the switched side (AC mains) can handle 390 volts and whatever amperage you have selected from the range of relays available.
To heat up a big bed like you have in your design, two mains powered pads could be used to cover the area.
|
Re: Design nearly done - construction started... July 22, 2013 05:28PM |
Registered: 11 years ago Posts: 256 |
I just got back from the electronic store and I was looking at the relays you describe. But work is keeping me out of the office for a few days, and I need to get the exact specs for the pad before I move forward. (I also have several days of work left to finish the electronics bays) I am looking for a single pad though, because with 2, there is the possibility of them not being at exactly the same temp, which could result in ripples and or warpage. This printer is designed more towards building one big object than many smaller ones at once, though it will ultimately do both. So by having one big pad, I have one relay, one thermistor etc.
|
Re: Design nearly done - construction started... July 22, 2013 08:29PM |
Registered: 10 years ago Posts: 474 |
|
Re: Design nearly done - construction started... July 22, 2013 10:15PM |
Registered: 11 years ago Posts: 256 |
|
Re: Design nearly done - construction started... July 26, 2013 02:41AM |
Registered: 10 years ago Posts: 126 |
|
Re: Design nearly done - construction started... July 26, 2013 08:40PM |
Registered: 11 years ago Posts: 256 |
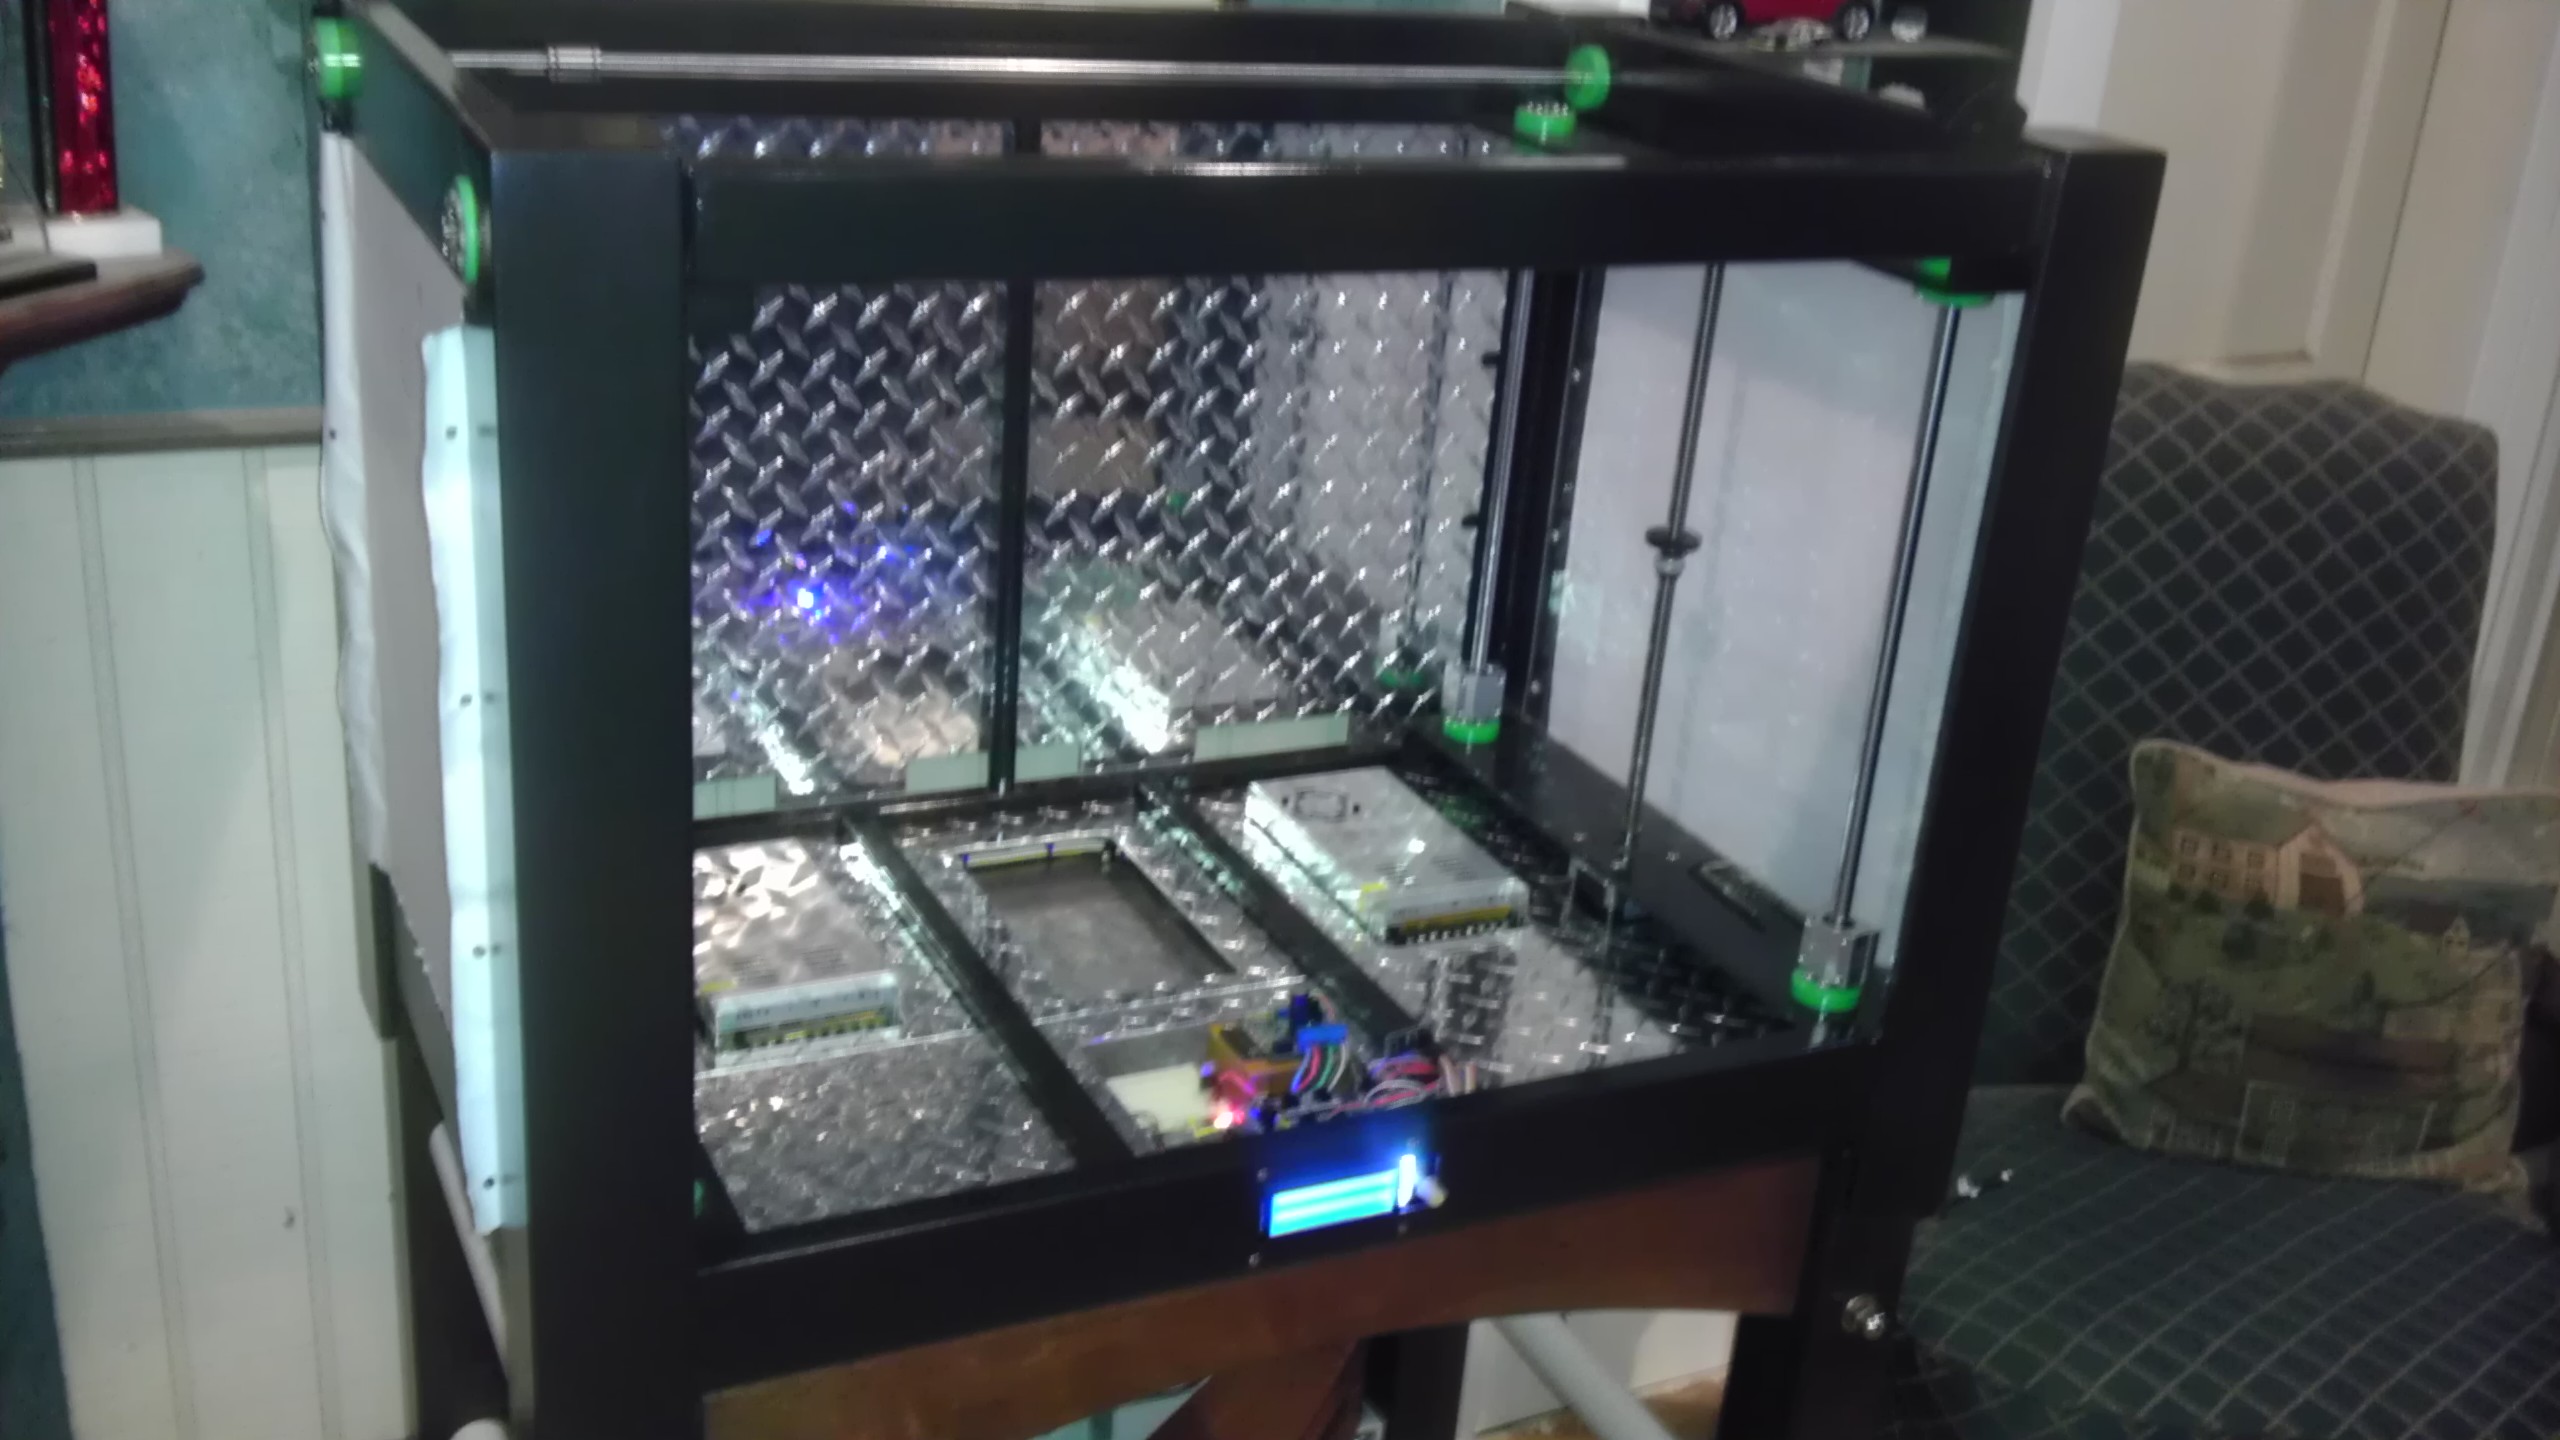
I started wiring this week, I've got the mains in, one of the PSUs in use, the X mots and their fans, as well as a fan for the 6064 driver. For convenience, I've installed a breadboard, I still have to verify a few things before I go for the initial power up. Since I'm using SDramps along with the LCD, I had to wire all that with jumpers, I have to determine whether the LCD is powered with or separately from the SD card on the LCD, which I cannot use, as it cannot be reached. I also need to pull a Pololu and connect the 6064. If all goes well, I will be starting on the electronics covers next. 
|
Re: Design nearly done - construction started... July 27, 2013 01:02AM |
Registered: 10 years ago Posts: 126 |

|
Re: Design nearly done - construction started... July 27, 2013 11:05AM |
Registered: 11 years ago Posts: 256 |

|
Re: Design nearly done - construction started... July 27, 2013 12:21PM |
Registered: 11 years ago Posts: 256 |
I have got LCD up, SD up, 6064 up running Z mots, all for around 45 minutes and still all stone cold.Keeping in mind I have nothing plugged in (hotends, heater) that's supposed to heat up. Other than one bad (slow) motor fan, everything seems good so far.
Edited 1 time(s). Last edit at 07/27/2013 12:39PM by Maxx Mayhem.
Other than one bad (slow) motor fan, everything seems good so far. Edited 1 time(s). Last edit at 07/27/2013 12:39PM by Maxx Mayhem.
|
Re: Design nearly done - construction started... July 27, 2013 04:23PM |
Registered: 10 years ago Posts: 126 |
|
Re: Design nearly done - construction started... July 27, 2013 08:27PM |
Registered: 10 years ago Posts: 474 |
|
Re: Design nearly done - construction started... August 05, 2013 03:31PM |
Registered: 11 years ago Posts: 256 |
I've been a bit busy for the past couple of weeks servicing one of my primary customers, but over the weekend I did have an opportunity to fabricate the deck plates for the electronics. (deck plates for the electronics - really?) This is all a part of temperature control for in this case - the electronics. There will be covers for the PSUs which slant toward the back to vent via the slots in the rear plate. In or out I've yet to determine, that will likely be a part of the calibration process... These plates just drop in, and are cushioned with my favorite material - adhesive felt. They will be in and out numerous times before this is all up and running.
I had gotten a price for the bed heater, but it is about 3 times higher than I expected. So I will continue looking for a source for this item. It is likely that I will have a bit of time this week, maybe I'll even get to the frame for the build stage. I'll keep you posted.
I had gotten a price for the bed heater, but it is about 3 times higher than I expected. So I will continue looking for a source for this item. It is likely that I will have a bit of time this week, maybe I'll even get to the frame for the build stage. I'll keep you posted.
|
Re: Design nearly done - construction started... August 06, 2013 12:51AM |
Registered: 17 years ago Posts: 392 |
Maxx Mayhem Wrote:
-------------------------------------------------------
> I had gotten a price for the bed heater, but it is
> about 3 times higher than I expected. So I will
> continue looking for a source for this item. It is
> likely that I will have a bit of time this week,
> maybe I'll even get to the frame for the build
> stage. I'll keep you posted.
!!! So... what might that price be?
BTW, looks really sharp!
Yvan
Singularity Machine
|
Re: Design nearly done - construction started... August 06, 2013 07:14PM |
Registered: 11 years ago Posts: 256 |
|
Re: Design nearly done - construction started... August 06, 2013 08:09PM |
Registered: 10 years ago Posts: 474 |
Hello Max yes that sounds pricey you have a mill so I would go to eBay look under cartridge heaters there very prominent in machinery still pricey if bought other than eBay but you can pick new ones up on eBay cheap they have various diameters voltages and wattages your heat bed is going to need to be pretty strong to achieve flatness over that size anyway with ribs so if I were you I'd use a ball mill cut radius in underside of bed and make clamps with radius cut and small screws the clamp cartridge heater underneath as an example I just looked and there were plenty there found some four pieces 21 inches long half inch diameter 500 W 120 V lot of four $89 and if you going to control it through reprap controller use solid-state relay on heat bed output
|
Re: Design nearly done - construction started... August 07, 2013 01:34AM |
Registered: 17 years ago Posts: 392 |
Hummm.... that is too bad... But still, if you are planning on selling these machines for a few grand...
Yvan
Singularity Machine
Yvan
Singularity Machine
|
Re: Design nearly done - construction started... August 07, 2013 04:52PM |
Registered: 11 years ago Posts: 256 |
I have yet to lose hope that I can find what I want a bit cheaper, right now parts count is not so much of an issue, but when the time comes to duplicate this machine then it becomes rather important. Add up all the bolts etc, and the frame has well over 100 parts. The machined version will likely have around 20. So I would rather do the work up front to come up with a heater that is reproducible, and priced a bit lower.
|
Re: Design nearly done - construction started... August 18, 2013 08:08AM |
Registered: 10 years ago Posts: 474 |
Hello Max keep us up to date I know you're trying design the finished product for sale and profit but I used to be a prototype engineer is still a lot of things that have to be proven out contrary to everyone's belief very few people have managed to do large prints I think you have to keep your final idea of heated bed for production in mind but come up with something that you can test the process with which may not be economically good in my case because I'm not going to sell anything I'm using DuPont kapton tape I was lucky enough to find two rolls 16 inches wide on eBay very expensive works very well professional machines use a mechanical method for bed thousands of small holes .7 or so millimeter diameter on stiff but flexible material so base can be flexed to remove parts and yes you going to want to remove heated bed top for cool down otherwise takes way too long sitting on the heated portion I don't think hairspray or blue painters tape or ABS slurry is going to work but it may it needs to be tested on large prints
|
Re: Design nearly done - construction started... August 22, 2013 06:30PM |
Registered: 11 years ago Posts: 256 |

|
Re: Design nearly done - construction started... September 08, 2013 02:33AM |
Registered: 10 years ago Posts: 126 |
|
Re: Design nearly done - construction started... September 17, 2013 06:41PM |
Registered: 11 years ago Posts: 256 |
Sorry for the disappearing act, guys... I've been working 15 hours a day on a customer job for about the last several weeks and I'm putting the final touches on his job tomorrow. That means back to work on the printer. I hope to make some progress in the next week or so, and I will be keeping you updated as soon as things start to happen.
|
Re: Design nearly done - construction started... September 17, 2013 09:55PM |
Registered: 10 years ago Posts: 3 |
Looks like you were still looking for heater options. If you haven't seen them, Mcmaster has 12"x24" silicone heater mats: Mcmaster heater mats Might need an aluminum heat spreader to cover your full intended build area though.
|
Re: Design nearly done - construction started... September 18, 2013 06:41PM |
Registered: 11 years ago Posts: 256 |
I'm looking at those and now the price I got for mine seems not that far off. I'm doing 18" x 28" and inch per inch, the pricing seems close. Guess I'm going to end up having to bite the bullet. At least I've been making money this month. I'm also checking into having the heater made up built right into a machined flat aluminum plate, though I don't yet have a price for that option. Also, the ones I'm looking at only come with thermocouples so I'll have to adapt that all to ramps. 
|
Re: Design nearly done - construction started... September 26, 2013 09:27PM |
Registered: 10 years ago Posts: 474 |
Hello Max keep us up to date I have been working on my CNC milling machine here is a couple pictures of a little aluminum part that took 10 minutes
Edited 1 time(s). Last edit at 09/26/2013 09:30PM by cnc dick.


Edited 1 time(s). Last edit at 09/26/2013 09:30PM by cnc dick.
|
Re: Design nearly done - construction started... September 28, 2013 06:03AM |
Registered: 10 years ago Posts: 96 |


Sorry, only registered users may post in this forum.