Design nearly done - construction started...
Posted by Maxx Mayhem
|
Re: Design nearly done - construction started... September 28, 2013 03:06PM |
Registered: 17 years ago Posts: 392 |
CNC, while we are waiting for Maxx to stop wasting his time with stuff like earning money, what kind of mill is that?
I'm building a shed so I can free up room in the workshop for some CNC machines. Maybe a mill, or a router table, not sure yet.
Yvan
Singularity Machine
I'm building a shed so I can free up room in the workshop for some CNC machines. Maybe a mill, or a router table, not sure yet.
Yvan
Singularity Machine
|
Re: Design nearly done - construction started... September 29, 2013 06:12PM |
Registered: 10 years ago Posts: 474 |
|
Re: Design nearly done - construction started... October 02, 2013 09:10PM |
Registered: 11 years ago Posts: 256 |
Well, I had a meeting with the rep yesterday regarding the heat bed for my printer. Needless to say, this is not going to be cheap, but I do get the ability to determine what I want for warm-up time, etc. The ultimate design for the heat bed will incorporate the heater, plate and insulator into a single assembly for optimal reliability. I'm just days away from customer work being done, albeit briefly, so I am going to try to get some more done on fabrication. Coming up are electronics air management (cut out already) and the frame for the build platform (well I at least have stock on hand to make it). Once those bits are done, the real fun begins. And so, the saga continues...
|
Re: Design nearly done - construction started... November 04, 2013 04:34PM |
Registered: 11 years ago Posts: 256 |
Finally made it back into the shop to pick up where I left off. I know it's been a while, but.... The electronics in this printer need to be kept cool as the build space is being kept hot, so air handling is important. Here's a pic of the current state of the covers for the PSUs, and electronics. As you will soon see, once these are installed, they function to use outside air for cooling. I will begin work on the moving parts in the next few days. More pix to follow.
|
Re: Design nearly done - construction started... November 04, 2013 05:47PM |
Registered: 10 years ago Posts: 126 |
|
Re: Design nearly done - construction started... November 07, 2013 02:40PM |
Registered: 10 years ago Posts: 23 |
Really enjoyed following your build. Can't wait to see the results. Did you draft this all out ahead of time?
--------------------------------------------------
Check out my blogs: [oc3dprint.blogspot.com] & [forums.reprap.org]
Hit me up if you have any tips or tricks.
--------------------------------------------------
Check out my blogs: [oc3dprint.blogspot.com] & [forums.reprap.org]
Hit me up if you have any tips or tricks.
|
Re: Design nearly done - construction started... November 07, 2013 07:22PM |
Registered: 11 years ago Posts: 256 |
Heck no. Basically, the approach I prefer for this type of a project is to start trying to answer questions, one after the other, with the ideal result being a thing that works. This is an iterative process. I did start out with a basic overall plan for the frame, initially, and the component layout, but to be honest, I often find that trying to design everything all at once leads to designing myself into a corner. Now at this point in time, I am pretty close to having all of the moving parts designed, at least in part, but certain items like the carriage assembly and the extruder farm (?) will be built in a methodology that I can only describe as somewhat akin to mountain climbing. You get up on this rock, high above the ground, and you have your equipment, and your knowledge, how you traverse the rock is something you determine right then and there. Or you fall down go boom. It may or may not sound all that scientific, but I prefer exploration to empiricism, and that approach always seems to work out best for any of my more complex projects.
Since I am a 1 man shop, I almost never make anything other than the most rudimentary drawings anyway, a page of measurements is really what I depend upon.
Today I started drilling the frame members for the build stage, it is going to take me a few days to build this piece, and I will put up some pix along the way, likely tomorrow.
|
Re: Design nearly done - construction started... November 10, 2013 06:47PM |
Registered: 11 years ago Posts: 256 |
This weekend, I began making up parts for the main frame of the build stage. The vertical frame members, which you can see here are less than a third of the components that go into this piece. Bolt holes and tapping are next. I am still working out a few design details, and hope to finish and mount this item by next weekend. At that time, I can order the custom heat bed, and I'll actually have a moving assembly tested and working. Once this part is done, I am going to start on the carriage right away. Time and temperature permitting, I am also going to weld up the electronics covers sometime this week.
|
Re: Design nearly done - construction started... November 11, 2013 11:42PM |
Registered: 17 years ago Posts: 392 |
I'm glad you made it back to this project. Nice to see more of these cool parts coming together!
What alloy is that BTW? How many amps will it take to weld that?
I have a cheap 140 amp MIG, so I have not tried aluminium.
Edited 1 time(s). Last edit at 11/11/2013 11:44PM by Yvan.
Yvan
Singularity Machine
What alloy is that BTW? How many amps will it take to weld that?
I have a cheap 140 amp MIG, so I have not tried aluminium.
Edited 1 time(s). Last edit at 11/11/2013 11:44PM by Yvan.
Yvan
Singularity Machine
|
Re: Design nearly done - construction started... November 12, 2013 11:26AM |
Registered: 11 years ago Posts: 256 |
Hey Ivan, this is 6061 T-6 - billet, or aircraft aluminum. Though this could be welded, I have opted to bolt it together for accuracy. Minimal strength is required, but absolute accuracy is a must to ensure smooth movement. This piece will never be subject to forces more than say, 50 lbs or so, and each bolt holds a few hundred pounds - there are a lot of bolts. I do have a number of welded aluminum parts going on this machine, however. You generally see TIG used for welding aluminum, I have a mid level machine, and it is no picnic. Someday, if they still make them, I will invest in a pulser, which does make it easier, but aluminum welding does take some patience and a fair bit of practice and reading on the subject. In my observation, selecting a welder is more about the precision and thickness than how often it will be needed. That's due to the fact that each piece of metal will only ever encounter the welder once.
|
Re: Design nearly done - construction started... November 16, 2013 06:59PM |
Registered: 11 years ago Posts: 256 |
I have been rather busy in the machine shop this week lightening the frame for the build bed. I still have the internal cross - bracing to drill, I'm hoping to finish that along with the edge drilling tomorrow, and I'm waiting for one more size of tap to arrive, so I can finish all the machining and get to powder coat and assembly of this part.
|
Re: Design nearly done - construction started... November 17, 2013 12:17AM |
Registered: 17 years ago Posts: 392 |
Looks really good, I can see why you wouldn't want to weld that. At some point I will have to weld stainless and aluminium, but I'm still having fun with my light duty MIG and a small oxy-acetylene kit for now.
BTW, what brand of taps are you using? I just purchased a Greenfield two flute style tap, and it is very very superior to the run of the mill stuff I have been using for decades. Much quicker, easier and cleaner cutting.
Yvan
Singularity Machine
BTW, what brand of taps are you using? I just purchased a Greenfield two flute style tap, and it is very very superior to the run of the mill stuff I have been using for decades. Much quicker, easier and cleaner cutting.
Yvan
Singularity Machine
|
Re: Design nearly done - construction started... November 17, 2013 10:56AM |
Registered: 11 years ago Posts: 256 |
|
Re: Design nearly done - construction started... November 25, 2013 07:27AM |
Registered: 10 years ago Posts: 474 |
|
Re: Design nearly done - construction started... November 26, 2013 05:29PM |
Registered: 11 years ago Posts: 256 |
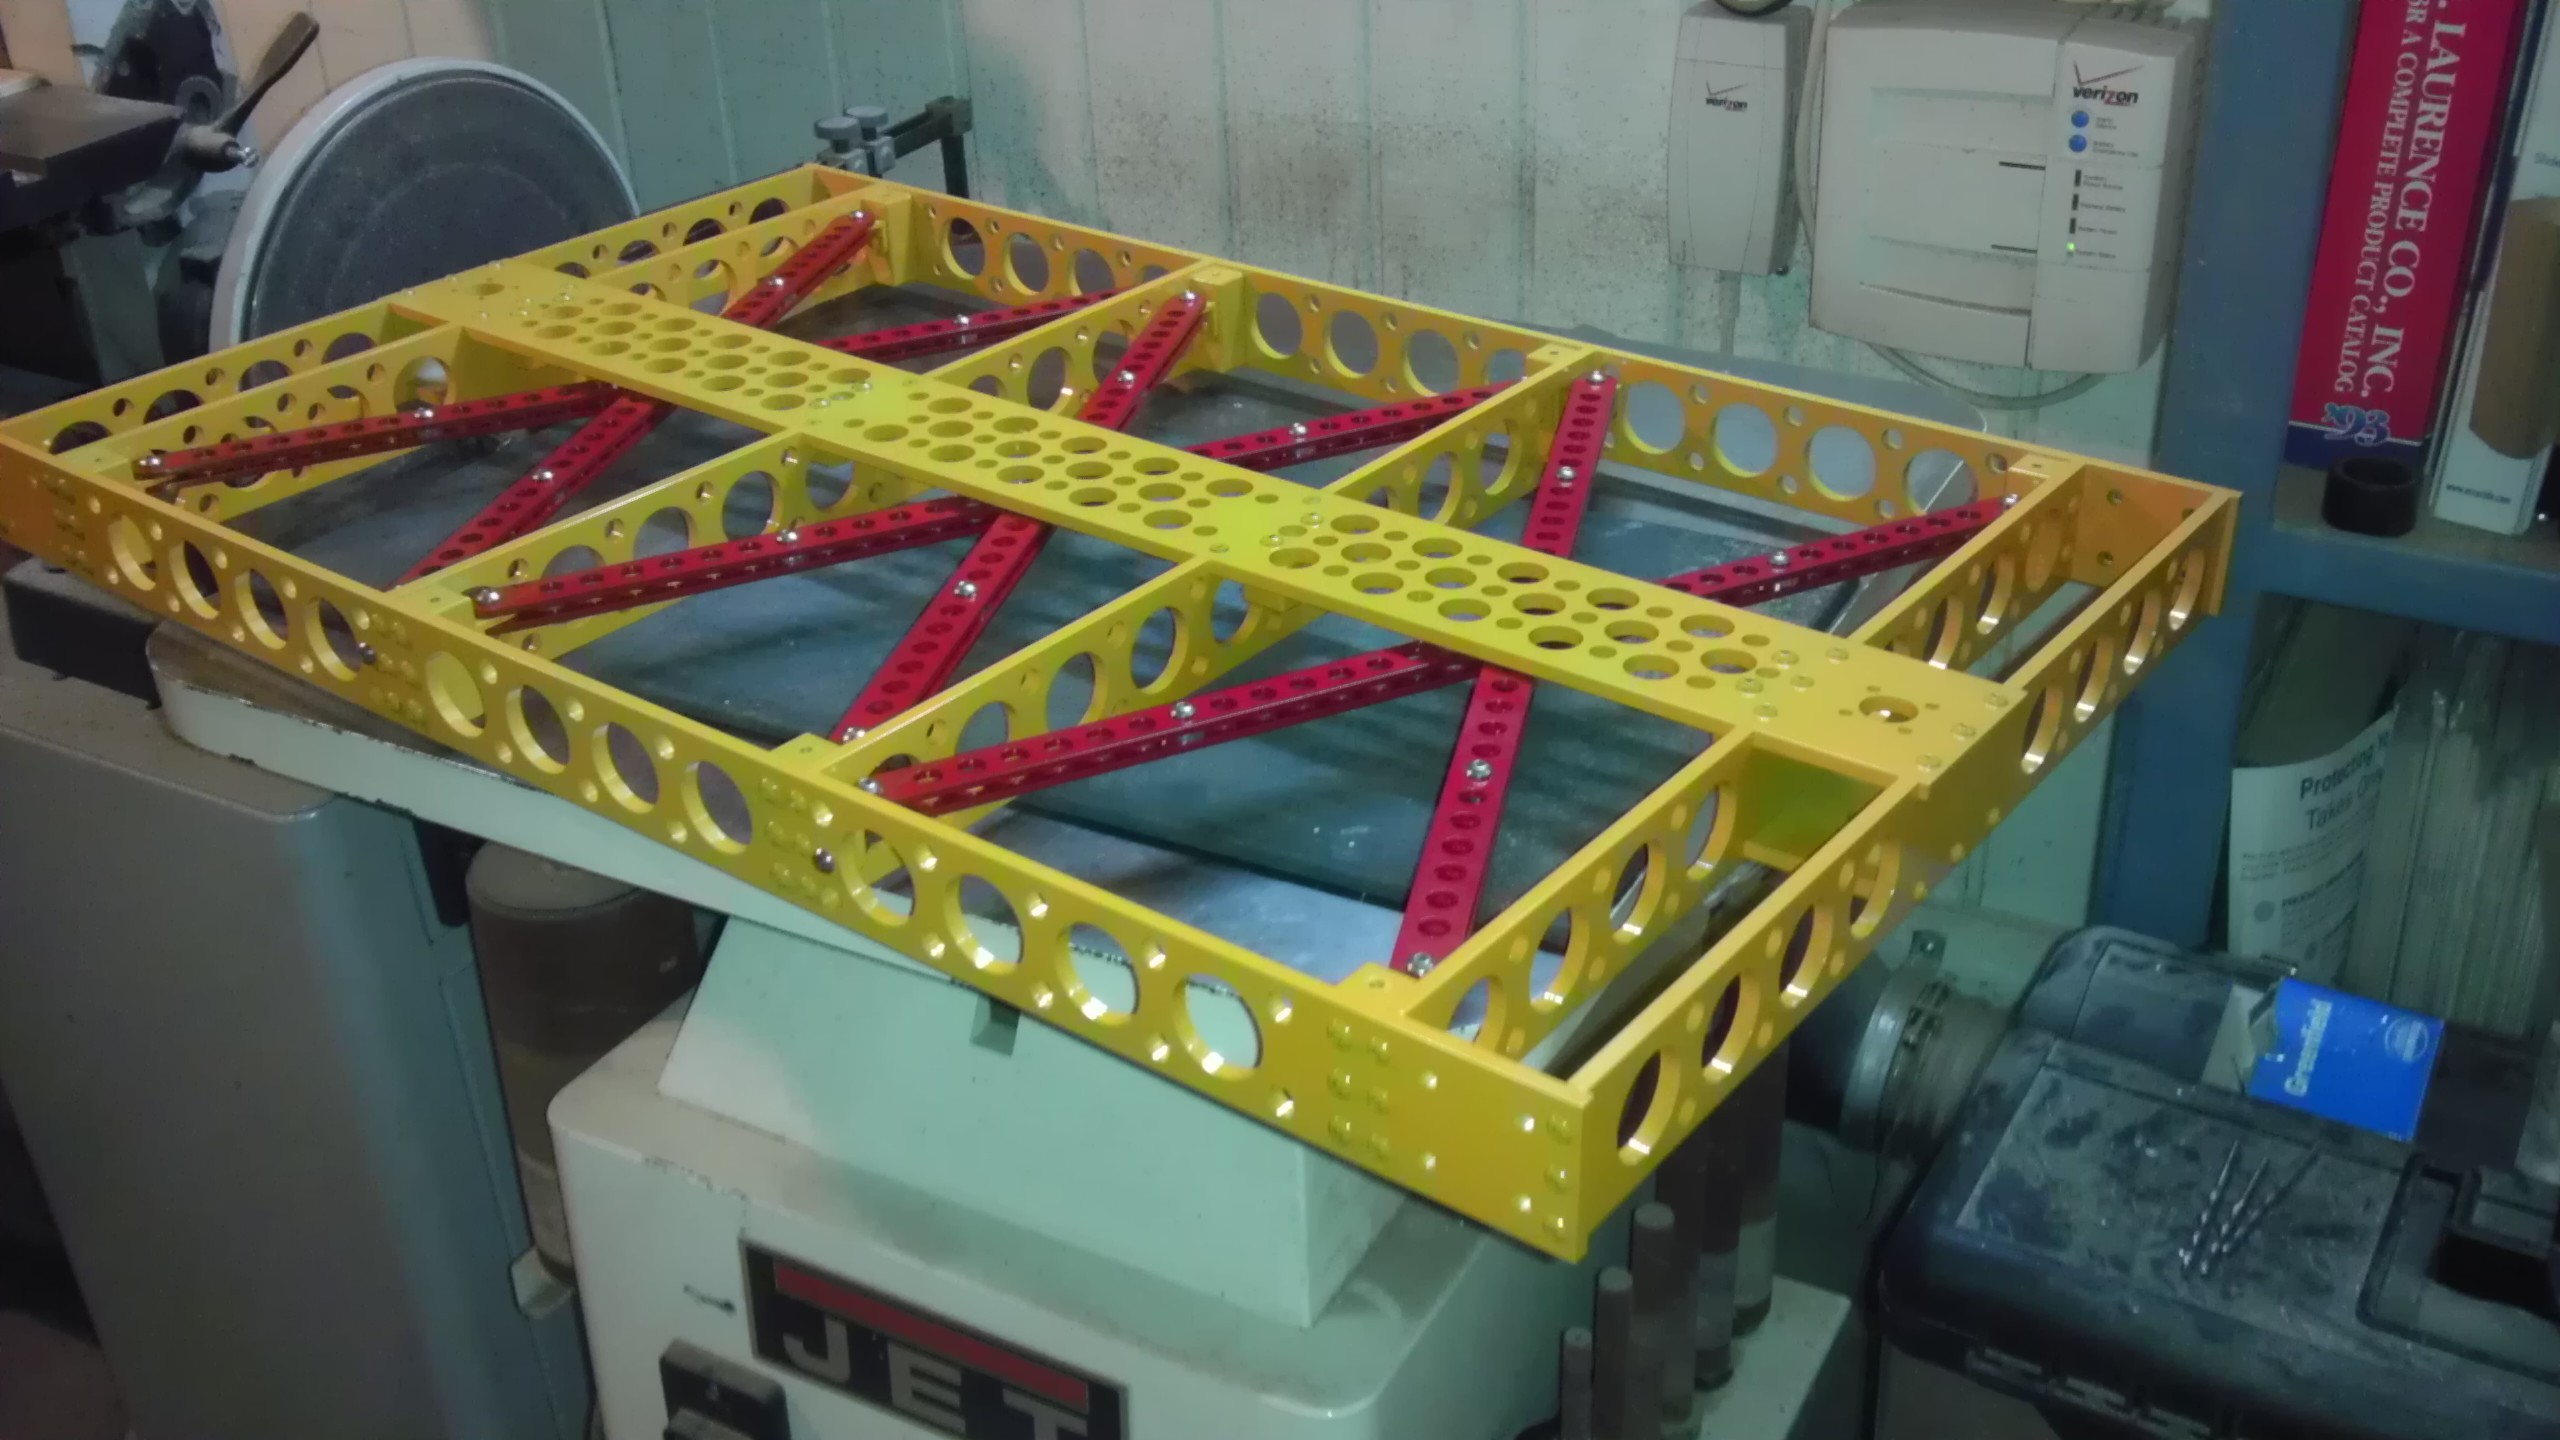
I am ordering the heated bed beginning of next week. ( I assume my rep is on vacation till then.) I have just finished prepping the final parts for powder coating tomorrow AM. I am nearly a month into this part. Ultimately, I wound up making 59 pieces by hand, and milling nearly 950 holes in total. If all goes well in the morning, I will hopefully have this installed by the end of the day, though it will likely take an additional day to level and fine tune. Here's a pick assembled, there is also cross bracing not shown in this view.
holes in total. If all goes well in the morning, I will hopefully have this installed by the end of the day, though it will likely take an additional day to level and fine tune. Here's a pick assembled, there is also cross bracing not shown in this view.
|
Re: Design nearly done - construction started... November 26, 2013 07:27PM |
Registered: 10 years ago Posts: 474 |
|
Re: Design nearly done - construction started... November 26, 2013 07:43PM |
Registered: 11 years ago Posts: 256 |
Thanks, CNCD. There are 12 integral mounting points to attach the bed, I will likely need to fabricate some sort of XY "T" mounts...I first have to talk to the heater rep to see what I would have to work with as far as holes are concerned. They can route the heater wires around holes, but I don't want to lose consistency. I will likely end up doing a thicker plate as well. BTW, you wouldn't happen to know how much pressure there is at the nozzle as extrusion is occurring, would you? (ABS 1.75 in, .4 out) I am trying to finalize my Y travel, the poles are 12mm x 32". There is some flex I may need to counteract.
|
Re: Design nearly done - construction started... November 27, 2013 07:03AM |
Registered: 10 years ago Posts: 474 |
Maxx I don't know the exact amount of force between the nozzle and the bed but I estimate it to be only a few ounces. Watching videos of earlier reprapers printing on flimsy circuitboard beds. My extruder is mounted on a vertical linear way and it is only held down by gravity for adjustment by bolt and in case of a crash but my extruder is very heavy. I don't know the construction of the heat bed you're going to order are and if the bottom of it where the mounts are are going to get hot and the material it's made out of. But the idea is want to keep the heat in the bed and not in the framework but this causes a problem of the bed expanding and a framework staying the same as room temperature or enclosure temperature. As far as the Y axis anything unsupported for 32 inches just with the weight of round shaft and nothing on it is going to sag in the middle and gets worse the larger the diameter. Many years ago when round linear way was the only thing available to purchase and you needed it unsupported we used to order it in very large diameter and hollow to reduce the weight of the shaft so it didn't sag in the middle
Edited 1 time(s). Last edit at 11/27/2013 07:17AM by cnc dick.
Edited 1 time(s). Last edit at 11/27/2013 07:17AM by cnc dick.
|
Re: Design nearly done - construction started... November 27, 2013 01:46PM |
Registered: 11 years ago Posts: 256 |
If it proves to be an issue, I may get the rod with the backing track and the "C" linear bearings, and fit the track to accommodate my adjustment system. VXB carries it [www.vxb.com] .The track I would attach to a piece of machined square tube, or some big chunk of aluminum, either at the side, or overhead. Alternately, I could machine up some supports and adjustable mounting brackets, still requiring the open bearings. I am currently looking at doing a custom made 7 in 1 extruder, though I'll probably play with my J heads first to get a feel for what I will need. I'm making interchangeable extruder carriers for this machine, to streamline testing.
|
Re: Design nearly done - construction started... November 27, 2013 07:45PM |
Registered: 11 years ago Posts: 256 |
|
Re: Design nearly done - construction started... November 29, 2013 12:56AM |
Registered: 17 years ago Posts: 392 |
That is one beautiful piece of Meccano you have there! Very nice work.
I can't help but think there might be a way of replacing all that intricate work with a nice composite assembly. Some structural urathane foam for example, and a bit of carbon fibre?
Not sure how all of this works with the rest of your machine, so maybe that would not be an option...
Yvan
Singularity Machine
|
Re: Design nearly done - construction started... November 29, 2013 03:27PM |
Registered: 11 years ago Posts: 256 |
Well, all I would really need is a somewhat larger printer... Foam is not a good candidate for use in an enclosed printer. It would melt or likely burn. Also, the electronics would fry. I would certainly say this was no easy part to make by hand, but ultimately is the optimal design for the overall goals of this printer. Besides, I had an Erector set when I was little, and always kind of liked that look. The general idea of making the frame in airship style came from an amp rack I built for my Miata, a 2006 I customized in '07, and still show. The idea was to add as little weight as possible, as the car is designed for perfect 50/50 weight distribution. Thru this design, the larger battery in front balanced the 2 amps and capacitor in the trunk, and the wire, the heaviest part runs fore and aft. Instead of building some traction adding fibreglass weighted 200 lb monster with amps that spin around etc, I opted to make a roughly 1/2 lb amp rack from aluminum, minimizing the weight of the installation, and not affecting the engineering of the car. In the case of the printer, where the weight of moving parts is important, as is air flow and temp control, this design seems to me to be the optimum choice. The carriage assembly, which is the next step, is going to be made in a similar style, though it will have fewer parts, and should end up extremely light in weight.
Edited 1 time(s). Last edit at 11/29/2013 03:42PM by Maxx Mayhem.
Foam is not a good candidate for use in an enclosed printer. It would melt or likely burn. Also, the electronics would fry. I would certainly say this was no easy part to make by hand, but ultimately is the optimal design for the overall goals of this printer. Besides, I had an Erector set when I was little, and always kind of liked that look. The general idea of making the frame in airship style came from an amp rack I built for my Miata, a 2006 I customized in '07, and still show. The idea was to add as little weight as possible, as the car is designed for perfect 50/50 weight distribution. Thru this design, the larger battery in front balanced the 2 amps and capacitor in the trunk, and the wire, the heaviest part runs fore and aft. Instead of building some traction adding fibreglass weighted 200 lb monster with amps that spin around etc, I opted to make a roughly 1/2 lb amp rack from aluminum, minimizing the weight of the installation, and not affecting the engineering of the car. In the case of the printer, where the weight of moving parts is important, as is air flow and temp control, this design seems to me to be the optimum choice. The carriage assembly, which is the next step, is going to be made in a similar style, though it will have fewer parts, and should end up extremely light in weight.Edited 1 time(s). Last edit at 11/29/2013 03:42PM by Maxx Mayhem.
|
Re: Design nearly done - construction started... November 29, 2013 03:37PM |
Registered: 17 years ago Posts: 392 |
Quote
Maxx Mayhem
Well, all I would really need is a somewhat larger printer...
??
You mean to print the Z platform you have made out of aluminium?
I'm not sure what you are saying. I was thinking instead of building out of aluminium, composite materials might give you the same results and require less labor. But I don't know how all this works with the rest of your design, so maybe that suggestions wouldn't make sense...
Yvan
Singularity Machine
|
Re: Design nearly done - construction started... November 29, 2013 03:54PM |
Registered: 11 years ago Posts: 256 |
The thing you have to realize about a printer of this size, is that more size means more heat. An 18 x 28 inch heat bed. 7 extruders. And all enclosed. The problem with many kinds of plastic parts in this environment is that the heat would cause them to deform over time either suddenly or imperceptibly slowly, depending on their location. Also there is size to be considered... A 15" build height means a lot of layers. So minor deviations can add up to huge problems. All in all, my goal is to build this printer to successfully fill its envelope with high resolution models, without flaws. I would rather try and eliminate as many predictable potential problems from the get go, so in the end, I have only to tweak and calibrate. Also, this printer was designed from the beginning around complete adjustability. All, my poles are fully adjustable, and there are several adjustments on the build platform as well. I'll put up some more pix later today, but I will tell you I do have this piece moving up and down in the driver's test mode. So, so far, so good.
|
Re: Design nearly done - construction started... November 29, 2013 06:29PM |
Registered: 17 years ago Posts: 392 |
Some epoxies are just fine up and above 120°C, but I don't know what the thermal expansion of composites are compared to aluminium. It might be one of those things that is not worth researching and sourcing for just one prototype.
I love that Frankenstein moment when it moves for the first time!
I'm waiting for the next photos...
Yvan
Singularity Machine
I love that Frankenstein moment when it moves for the first time!
I'm waiting for the next photos...
Yvan
Singularity Machine
|
Re: Design nearly done - construction started... November 30, 2013 01:22PM |
Registered: 11 years ago Posts: 256 |
Thermal considerations aside, the ability to make fine adjustments, and to precisely align my printer are prime considerations. Usually, once you start making things adjustable, you sacrifice simplicity to do so. The machining capacity for a single piece this size I simply don't have, but even if I did I would have to work on the assumption that everything else is perfect, to within about .001 inch. This is about twice the precision of the resolution, and to the best of my knowledge it is, but things move about with heat, and if you cant make the necessary tweaks at that point there's no place left to go. So in comes the complexity. Adjustments are responsible for around 90% of the parts count on my machine, and virtually all of the fasteners. My approach is that the more fundamentally precise the initial alignment of the machine, the more successful you will ultimately be with respect to print quality.
When I began this project and this thread, I posted an incomplete CorelDRAW sketch of my intentions. I have now come close to the end of what I put forth in that and from that point the rest is just going to happen, not drawn but as a series of scribbles and numbers on a post-it note. Again, not recommended but that's often how I do my best work.
Edited 1 time(s). Last edit at 11/30/2013 01:43PM by Maxx Mayhem.
|
Re: Design nearly done - construction started... December 14, 2013 07:20PM |
Registered: 10 years ago Posts: 474 |
|
Re: Design nearly done - construction started... December 15, 2013 03:31PM |
Registered: 11 years ago Posts: 256 |
Hey, CNCD, I've got (9) 400 step n17s sitting on my desk with fans and heat sinks mounted, as well as the extruder gears on 7 of them. I just ordered a couple of belt gears because the ones that came with my electronics kit had too much shaft play, I'll likely use them as idlers, though. I'm working on my extruder cold end design, it will be more compact than any other I'm aware of, and has multiple ways to eliminate strain on the motor shaft. These things need to be as small as possible, owing to the circular array of extruders, and the fact they have to move. I'm also working out the final carriage design, which has changed 5 times already since yesterday. At issue is maximizing print size as well as nullifying the effect the length of travel has on accuracy.  Hopefully, I'll have more pix later in the week.
Hopefully, I'll have more pix later in the week.
|
Re: Design nearly done - construction started... December 16, 2013 10:19AM |
Registered: 10 years ago Posts: 474 |
That's good can't wait to see what you come up with. Once you get this thing moving and printing their is going to be a lot of testing. I was surprised how many things are very important to the print process. I designed and built a lot of things in my life I thought 3-D printer would be a piece of cake and it was not it is very hard to set up to get good prints. Quick acceleration and deceleration the lack of flex and extremely accurate extruder seem to be very important. I have not set up anything other than single extruder but one of the problems with repwrap multiple extruders. Is that they tend to hit the print the one that's not being used as it goes over the print. Professional machines lift the one that's not being used a small amount
|
Re: Design nearly done - construction started... December 16, 2013 11:31AM |
Registered: 11 years ago Posts: 256 |


Sorry, only registered users may post in this forum.