My Replikeo Prusa i3 Rework Build
Posted by Trike
|
Re: My Replikeo Prusa i3 Rework Build August 24, 2014 11:26PM |
Registered: 9 years ago Posts: 137 |
It happens occasionally, and I'm not the only person who this happened to (see Graig's reply above). Certainly not something that happens during actual printing, but during my manual calibration. In one instance I connected endstop incorrectly, and when homing z-axes didn't stop when it hit the glass, and by the time I pressed Emergency stop nuts were outQuote
alvinhochun
If your hotend pushes into the bed, then that's something you really should worry about instead, because it can damage the hotend or the print surface, or both.
In my opinion, it's good that the nuts actually come off, since it can reduce the chance of the hotend pushing into the print surface too hard and damaging them.

|
Re: My Replikeo Prusa i3 Rework Build August 25, 2014 10:31AM |
Registered: 9 years ago Posts: 124 |
|
Re: My Replikeo Prusa i3 Rework Build August 25, 2014 07:42PM |
Registered: 10 years ago Posts: 167 |
Quote
Bratan
this is quite obviously a flaw in the design...
Actually it's a failsafe design. If the nuts were as secure as you think they should be, when the hotend hits the bed, it'll keep getting pulled into the bed, damaging the printer. That the nuts pop out when the hotend hits the bed keeps too much pressure from being applied to the bed, and prevents damage. Don't glue the nuts in!
MakerFarm 8" Prusa i3v
RAMPS 1.4
0.4mm E3D v6 for 1.75mm
|
Re: My Replikeo Prusa i3 Rework Build August 25, 2014 08:59PM |
Registered: 9 years ago Posts: 1 |
|
Re: My Replikeo Prusa i3 Rework Build August 25, 2014 10:55PM |
Registered: 9 years ago Posts: 41 |
Quote
ksb24
Hey guys! Im looking to get into 3d printing and I cant decide whether to get a replikeo prusa i3 or a printrbot simple? Both are the same price. And if you say the replikeo, what vendor is the best to buy from?
Thanks
Wherever you buy from, be prepared to replace parts and upgrade the printer yourself. A DIY kit is different from consumer electronics in the way that you need to do it yourself.
|
Re: My Replikeo Prusa i3 Rework Build August 26, 2014 04:50PM |
Registered: 9 years ago Posts: 137 |
Thanks I was wrong about it, now I see it makes senseQuote
AbuMaia
Actually it's a failsafe design. If the nuts were as secure as you think they should be, when the hotend hits the bed, it'll keep getting pulled into the bed, damaging the printer. That the nuts pop out when the hotend hits the bed keeps too much pressure from being applied to the bed, and prevents damage. Don't glue the nuts in!

I'd say go for prusa i3Quote
ksb24
Hey guys! Im looking to get into 3d printing and I cant decide whether to get a replikeo prusa i3 or a printrbot simple? Both are the same price. And if you say the replikeo, what vendor is the best to buy from?
Thanks
But I don't really know anything about printbot simple, so don't listen to me Guys can you recommend a mount for FAN that would cool PLA on HB? I'm getting really bad bridging issue, and read that cooling PLA should resolve it. I did try playing with temperatures of filament but it didn't help...
Also I took spool off the iron frame, and quality of print seems to improve. I think there was issue with too much flex and vibration. I'm printing Tech2C's version of Z-axes stabilizers now
|
Re: My Replikeo Prusa i3 Rework Build August 26, 2014 06:14PM |
Registered: 9 years ago Posts: 9 |
Hi guys ,
I received my replikeo today. It was shipped via DHL (3 days from China -> Hong Kong -> Belgium) and all the parts were very well packed.
I have just a quick question about the RAMPS board. The power supply connection is a green terminal with 4 pins.
Should the other end of the terminal be included in the package or is this something missing in my box?
If not clear I can post a picture tomorrow.
Regards
Bert
|
Re: My Replikeo Prusa i3 Rework Build August 26, 2014 08:34PM |
Registered: 9 years ago Posts: 137 |
Yeah, there should be power block where you screw 4 wires from PSU and then you just plug that block into RAMPS board. Like on this picture.Quote
Repelsteler
Hi guys ,
I received my replikeo today. It was shipped via DHL (3 days from China -> Hong Kong -> Belgium) and all the parts were very well packed.
I have just a quick question about the RAMPS board. The power supply connection is a green terminal with 4 pins.
Should the other end of the terminal be included in the package or is this something missing in my box?
If not clear I can post a picture tomorrow.
Regards
Bert

|
Re: My Replikeo Prusa i3 Rework Build August 26, 2014 10:24PM |
Registered: 9 years ago Posts: 41 |
The RAMPS should look exactly like this: [item.taobao.com]
|
Re: My Replikeo Prusa i3 Rework Build August 27, 2014 03:56AM |
Registered: 9 years ago Posts: 9 |
|
Re: My Replikeo Prusa i3 Rework Build August 27, 2014 05:28AM |
Registered: 9 years ago Posts: 41 |
|
Re: My Replikeo Prusa i3 Rework Build August 27, 2014 10:00PM |
Registered: 9 years ago Posts: 137 |
I'm trying to print with ABS that came from Replikeo with kit, but so far having strange issue. First layer sometimes prints in wavy lines. I searched for similar issue and didn't find anyone mentioning it. I tried various temperatures from 235C to 220C, best seems to be at 225C, but still fist layer is totally busted.
I suspect it could be problem with ABS material... Any suggestions? Also what temp do you use with Replikeo's black ABS?
I suspect it could be problem with ABS material... Any suggestions? Also what temp do you use with Replikeo's black ABS?
|
Re: My Replikeo Prusa i3 Rework Build August 27, 2014 10:59PM |
Registered: 9 years ago Posts: 41 |
Quote
Bratan
I'm trying to print with ABS that came from Replikeo with kit, but so far having strange issue. First layer sometimes prints in wavy lines. I searched for similar issue and didn't find anyone mentioning it. I tried various temperatures from 235C to 220C, best seems to be at 225C, but still fist layer is totally busted.
I suspect it could be problem with ABS material... Any suggestions? Also what temp do you use with Replikeo's black ABS?
Seeing that wavy line is only on one axis, I suggest you check that axis.
|
Re: My Replikeo Prusa i3 Rework Build August 27, 2014 11:15PM |
Registered: 9 years ago Posts: 137 |
Hmm interesting, I didn't think it could be mechanical issue... It actually happens on both axes, and seems only after I switched to ABS, but that could be coincidence (I did install Z axes stabilizer system at about the same time...)Quote
alvinhochun
Seeing that wavy line is only on one axis, I suggest you check that axis.
|
Re: My Replikeo Prusa i3 Rework Build August 28, 2014 09:02PM |
Registered: 9 years ago Posts: 120 |
Hello everyone...
I just purchased the aluminum Replikeo kit!
I have recently read through this entire thread for tips so far. I am very excited for everything to arrive, and I can't wait to get printing.
So far I have ordered a glass bed plate from McMaster-Carr, PTFE Lubricant from Amazon, Aluminum stepper driver heatsinks from Ebay, and the Intelligent Controller from Banggood.
Any other things I should get that are important?
Also, what are some cool objects to print (or ones I should use to add on to my printer)? I'm looking for something to keep my mind busy while the printer ships
Hopefully it will arrive soon!
Blue Ice
|
Re: My Replikeo Prusa i3 Rework Build August 28, 2014 11:06PM |
Registered: 9 years ago Posts: 137 |
Quote
Blue Ice
Hello everyone...
I just purchased the aluminum Replikeo kit!
So far I have ordered a glass bed plate from McMaster-Carr, PTFE Lubricant from Amazon, Aluminum stepper driver heatsinks from Ebay, and the Intelligent Controller from Banggood.
Any other things I should get that are important?
Also, what are some cool objects to print (or ones I should use to add on to my printer)? I'm looking for something to keep my mind busy while the printer ships
Hopefully it will arrive soon!
Blue Ice
Congrats!
You didn't have to purchase heatsinks for steppers, they come with the kit.I suggest you buy heatsinks for MOSFETs (one for HB and one for HE). I got these from eBay, they fit nicely but you can only fit two, not enough space for 3.
I'd print Z-axes stabilizer and Z axes endstop tuner. Don't forget to a spool mount. You can print one that can be mounted on the frame, but don't use it without stabilizers, or just build one out of PVC.
And order some PLA too. PLA is nice for quick prints because you don't have to heat up bed and hot end too long. With ABS I have to wait forever until HB heats up to 90-100C. And speaking of heated bed, get a piece of cork to insulate it from metal frame and speed up heating. Mine heats up to 60C in less than 2 minutes.
|
Re: My Replikeo Prusa i3 Rework Build August 28, 2014 11:43PM |
Registered: 9 years ago Posts: 120 |
I got a roll of PLA already- but I will order those heatsinks too. Thanks for letting me know about that.
What type of form should the cork be in? Can I use wine corks, or should I get a sheet of cork?
Blue Ice
blog at [contemporarymaker.com]
Quote
Bratan
And speaking of heated bed, get a piece of cork to insulate it from metal frame and speed up heating. Mine heats up to 60C in less than 2 minutes.
What type of form should the cork be in? Can I use wine corks, or should I get a sheet of cork?
Blue Ice
blog at [contemporarymaker.com]
|
Re: My Replikeo Prusa i3 Rework Build August 29, 2014 12:03AM |
Registered: 9 years ago Posts: 120 |
Quote
Bratan
I suggest you buy heatsinks for MOSFETs (one for HB and one for HE). I got these from eBay, they fit nicely but you can only fit two, not enough space for 3.
OK, I just ordered 2 of the heatsink sets- thanks so much for recommending them to me. The part recommendations were helpful as well, and I think I will print those at first.
Quote
Bratan
And order some PLA too. PLA is nice for quick prints because you don't have to heat up bed and hot end too long.
I got the PLA from kbellenterprises on eBay- apparently, they are supposed to be good.
Thanks for all of the help, and I will let you know when everything arrives!
Blue Ice
blog at [contemporarymaker.com]
|
Re: My Replikeo Prusa i3 Rework Build August 29, 2014 10:25AM |
Registered: 9 years ago Posts: 137 |
Sheet of cork, about same size as glass. 1/4" thick or less.Quote
Blue Ice
I got a roll of PLA already- but I will order those heatsinks too. Thanks for letting me know about that.
What type of form should the cork be in? Can I use wine corks, or should I get a sheet of cork?
You ordered 2 sets of heatsinks? There are 10 pieces in each
 I guess you'll have plenty of spares for future projects
 Just be careful when you put them on, make sure none of the other MOSFET's heatsinks touch each other. Also heatsinks are threaded for M3 screws I think, but I was able to easily screw in 4-40 screws which might be easier to obtain if you are in the US... Have fun with your build!
|
Re: My Replikeo Prusa i3 Rework Build August 29, 2014 05:04PM |
Registered: 9 years ago Posts: 120 |
Quote
Bratan
Sheet of cork, about same size as glass. 1/4" thick or less.
I'll probably get it at Home Depot or at Ace. M3 screws are at Ace as well. Thanks.
Quote
Bratan
You ordered 2 sets of heatsinks? There are 10 pieces in each confused smiley I guess you'll have plenty of spares for future projects smiling smiley
Haha yes, I ordered about 20 because I wanted to get a couple extra for some LM317s and other random components that come in the same TO-220 package. Just got a bunch from Electronic Goldmine's random part kit, and I thought they would be fun to toy around with
Also, it's a good price... 10 cents a heatsink isn't that much.Quote
Bratan
Just be careful when you put them on, make sure none of the other MOSFET's heatsinks touch each other.
I understand. Like in this picture:

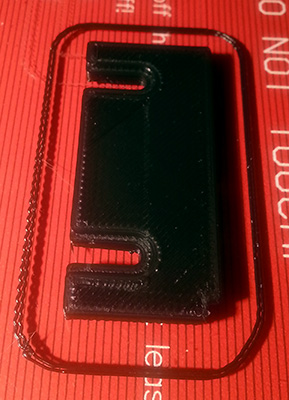
This is why you can't put on all 3 heatsinks, hmm?
Edited 1 time(s). Last edit at 08/30/2014 12:50AM by Blue Ice.
Blue Ice
blog at [contemporarymaker.com]
|
Re: My Replikeo Prusa i3 Rework Build September 01, 2014 10:21PM |
Registered: 9 years ago Posts: 103 |
Hey guys.
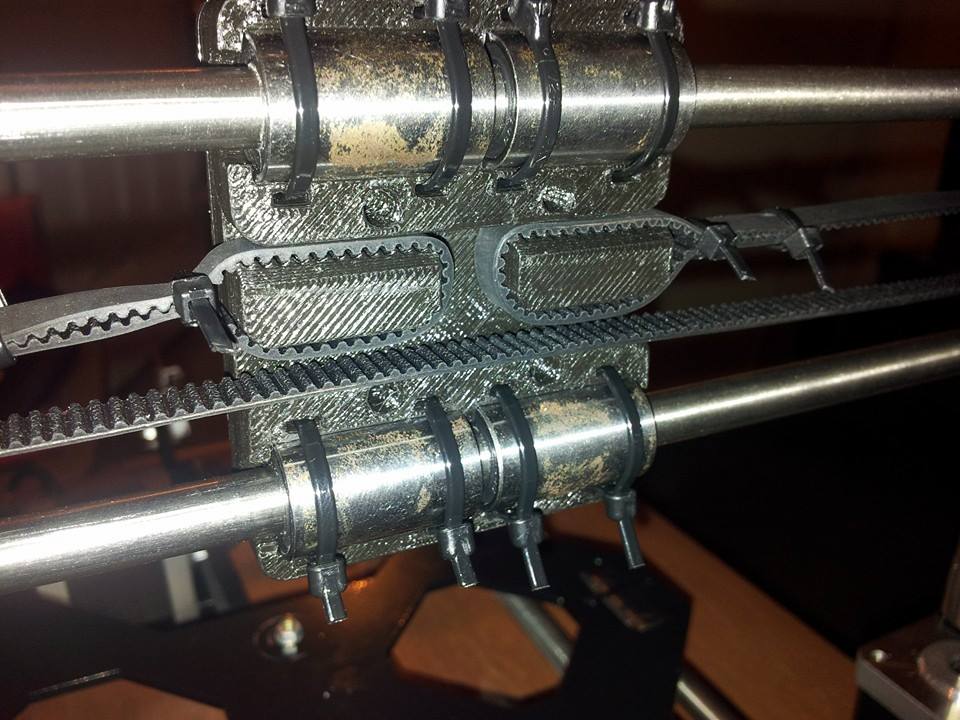
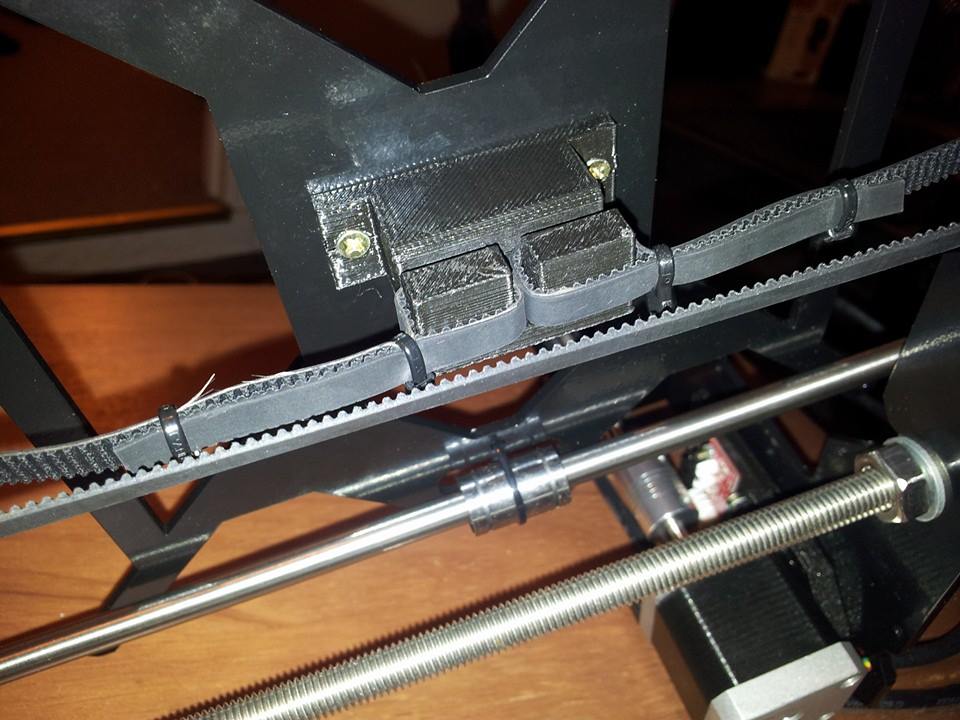
I have had next to zero time to work on the printer lately, so I haven't made much progress. I did have a little time though, and I've reached a snag on getting the belts right. I put both belts on, but neither the x nor the y carriage seem to be able to hit the endstops. They run into the portion of the belt that's ziptied. Should I move the zipties closer? I can't figure out why I don't have enough room. Pics attached.
I have had next to zero time to work on the printer lately, so I haven't made much progress. I did have a little time though, and I've reached a snag on getting the belts right. I put both belts on, but neither the x nor the y carriage seem to be able to hit the endstops. They run into the portion of the belt that's ziptied. Should I move the zipties closer? I can't figure out why I don't have enough room. Pics attached.
|
Re: My Replikeo Prusa i3 Rework Build September 01, 2014 11:21PM |
Registered: 9 years ago Posts: 103 |
I think I figured out my problem. Or at least one of them. Someone please clarify for me, if looking at the printer from the front, which way is the y-carriage oriented? Is the side with the two bearings on the left or the right? Also, which side is the motor mounted to, the left or right? I think I have my y-carriage flipped 180 and the y-holder is hitting up against the motor.
Edit:
Also, is the y motor mounted in the front or the back? Or can you put it in either place?
Edited 1 time(s). Last edit at 09/01/2014 11:26PM by LittleMike.
Edit:
Also, is the y motor mounted in the front or the back? Or can you put it in either place?
Edited 1 time(s). Last edit at 09/01/2014 11:26PM by LittleMike.
|
Re: My Replikeo Prusa i3 Rework Build September 02, 2014 12:00AM |
Registered: 10 years ago Posts: 167 |
|
Re: My Replikeo Prusa i3 Rework Build September 02, 2014 12:47AM |
Registered: 9 years ago Posts: 41 |
Quote
LittleMike
I think I figured out my problem. Or at least one of them. Someone please clarify for me, if looking at the printer from the front, which way is the y-carriage oriented? Is the side with the two bearings on the left or the right? Also, which side is the motor mounted to, the left or right? I think I have my y-carriage flipped 180 and the y-holder is hitting up against the motor.
Doesn't really matter, it should be mostly symmetrical.
Though I see that in your photo the y-belt is aligned at the bottom of the belt holder, you may want to make it align to the top.
Also, make sure that the y-axis smooth rods has snapped into the y-corners. I needed to apply some force for it to snap in place.
Quote
LittleMike
Also, is the y motor mounted in the front or the back? Or can you put it in either place?
Technically, either will work, but you might want all the wires to go through the rear end so you may prefer it being in the rear.
Quote
AbuMaia
Quote
LittleMike
Should I move the zipties closer? I can't figure out why I don't have enough room. Pics attached.
Yes. Either use one zip tie on each side, or put them side by side, and trim off the excess belt.
Using two zip ties feels more secure, in case one of them fails. But try to keep them as close as possible.
|
Re: My Replikeo Prusa i3 Rework Build September 02, 2014 12:52AM |
Registered: 9 years ago Posts: 103 |
Quote
alvinhochun
Quote
LittleMike
I think I figured out my problem. Or at least one of them. Someone please clarify for me, if looking at the printer from the front, which way is the y-carriage oriented? Is the side with the two bearings on the left or the right? Also, which side is the motor mounted to, the left or right? I think I have my y-carriage flipped 180 and the y-holder is hitting up against the motor.
Doesn't really matter, it should be mostly symmetrical.
Though I see that in your photo the y-belt is aligned at the bottom of the belt holder, you may want to make it align to the top.
Also, make sure that the y-axis smooth rods has snapped into the y-corners. I needed to apply some force for it to snap in place.
Quote
LittleMike
Also, is the y motor mounted in the front or the back? Or can you put it in either place?
Technically, either will work, but you might want all the wires to go through the rear end so you may prefer it being in the rear.
Quote
AbuMaia
It's not symmetrical. The "bumps" that hold the y-belt will stop at the motor if it's on the wrong side. Well, I guess you could put the carriage either direction, but the motor would have to go on the other, so in a way symmetrical, in a way not. Haha.
Any particular reason why I should align them to the top? You mean the way the loop goes, correct? I was just following the images in the build manual. Which seems to have gotten me into almost all the trouble I've had in this build with things being backwards.
Yea, I'm moving it to the rear. It seems to make more sense that way. I also have to flip the endstop then, I think, no?
Quote
LittleMike
Should I move the zipties closer? I can't figure out why I don't have enough room. Pics attached.
Yes. Either use one zip tie on each side, or put them side by side, and trim off the excess belt.
Using two zip ties feels more secure, in case one of them fails. But try to keep them as close as possible.
It's not symmetrical. The "bumps" that hold the y-belt will stop at the motor if it's on the wrong side. Well, I guess you could put the carriage either direction, but the motor would have to go on the other, so in a way symmetrical, in a way not. Haha.
Any particular reason why I should align them to the top? You mean the way the loop goes, correct? I was just following the images in the build manual. Which seems to have gotten me into almost all the trouble I've had in this build with things being backwards.

Yea, I'm moving it to the rear. It seems to make more sense that way. I also have to flip the endstop then, I think, no?
Okay, I will trim them down. I have them off now to adjust the motor and everything, but they seemed to catch. They would go smooth in one direction, but when I tried the other direction, they would "skip" so to speak. Same with x-carriage belt. Why is that?
Edited 1 time(s). Last edit at 09/02/2014 12:54AM by LittleMike.
|
Re: My Replikeo Prusa i3 Rework Build September 02, 2014 02:47AM |
Registered: 9 years ago Posts: 41 |
Quote
LittleMike
It's not symmetrical. The "bumps" that hold the y-belt will stop at the motor if it's on the wrong side. Well, I guess you could put the carriage either direction, but the motor would have to go on the other, so in a way symmetrical, in a way not. Haha.
Does it? Mine doesn't.
Quote
LittleMike
Any particular reason why I should align them to the top? You mean the way the loop goes, correct? I was just following the images in the build manual. Which seems to have gotten me into almost all the trouble I've had in this build with things being backwards.
Which manual are you following? I mostly followed the RepRap wiki [reprap.org] and no such problem at all. (Though do note that some instructions may not apply directly.)
Quote
LittleMike
Yea, I'm moving it to the rear. It seems to make more sense that way. I also have to flip the endstop then, I think, no?
Okay, I will trim them down. I have them off now to adjust the motor and everything, but they seemed to catch. They would go smooth in one direction, but when I tried the other direction, they would "skip" so to speak. Same with x-carriage belt. Why is that?
It's difficult to tell from text, but you should not need to flip endstops...?
The thing with DIY is that you can't always just follow instructions, but you also need to apply your own thinking.
|
Re: My Replikeo Prusa i3 Rework Build September 04, 2014 06:43AM |
Registered: 9 years ago Posts: 9 |
|
Re: My Replikeo Prusa i3 Rework Build September 04, 2014 06:07PM |
Registered: 9 years ago Posts: 120 |
Quote
Repelsteler
Hi ,
Can anyone point me in a direction for auto bed levelling for the replikeo?
Thanks
Bert
Never worked with a 3D printer before, but I've seen that this design is popular: http://www.thingiverse.com/thing:182889
And a video for installation is here: https://www.youtube.com/watch?v=awsI9bMndJA
I might try it sometime, so I think it is a good idea.
Edited 1 time(s). Last edit at 09/04/2014 06:07PM by Blue Ice.
|
Re: My Replikeo Prusa i3 Rework Build September 04, 2014 06:11PM |
Registered: 9 years ago Posts: 103 |
Quote
Blue Ice
Quote
Repelsteler
Hi ,
Can anyone point me in a direction for auto bed levelling for the replikeo?
Thanks
Bert
Never worked with a 3D printer before, but I've seen that this design is popular: http://www.thingiverse.com/thing:182889
And a video for installation is here: https://www.youtube.com/watch?v=awsI9bMndJA
I might try it sometime, so I think it is a good idea.
That page says there is a new better way here:
[www.thingiverse.com]
Please note, I have not tried either method. Just pointing that out.
|
Re: My Replikeo Prusa i3 Rework Build September 04, 2014 06:59PM |
Registered: 9 years ago Posts: 120 |
Quote
LittleMike
Quote
Blue Ice
Quote
Repelsteler
Hi ,
Can anyone point me in a direction for auto bed levelling for the replikeo?
Thanks
Bert
Never worked with a 3D printer before, but I've seen that this design is popular: http://www.thingiverse.com/thing:182889
And a video for installation is here: https://www.youtube.com/watch?v=awsI9bMndJA
I might try it sometime, so I think it is a good idea.
That page says there is a new better way here:
[www.thingiverse.com]
Please note, I have not tried either method. Just pointing that out.
I saw that one, but I didn't understand it
Thanks for pointing it out.


Sorry, only registered users may post in this forum.