My Replikeo Prusa i3 Rework Build
Posted by Trike
|
Re: My Replikeo Prusa i3 Rework Build January 05, 2015 11:35PM |
Registered: 9 years ago Posts: 120 |
Quote
LittleMike
Okay guys, so I finally got everything assembled and wired up. I loaded the marlin firmware from Replikeo's website, fired up Pronterface and I'm stuck. I tried hitting the X, Y, Z buttons and it keeps telling me echo:endstop hits: and then coordinates. I hit the Home button and all it wants to do is move the Z axis up. I can't get it to move anywhere else.
As an aside, I'm not sure if something burnt out (aside from an endstop). I manually hit the switch on each one just to test them and the LED lit up on each except for one, I heard a pop and smelled smoke afterwards. Luckily I bought a bunch of spares, so I swapped that one out and the LED works when I hit the switch, but I still have the same issue where none of the axes want to move.
I even tried unplugging the Z motor and then plugging one of the other motors into the Z spot on the RAMPS and the motor worked, but it still was just moving "Z" and none of the other axes. Any ideas? Is there maybe something wrong in the firmware configuration? I'm stumped.

Double check the wiring? Also, see if the motors get hot. If so, at least you know they are plugged in.
|
Re: My Replikeo Prusa i3 Rework Build January 05, 2015 11:36PM |
Registered: 9 years ago Posts: 120 |
Quote
Stigern
From what I've seen on the pictures most people order the Iron version, any reason not to order the Alu version?
Should I change my order to Iron
I'd go for aluminum- it's lighter and more easily modifiable if you need to drill out bigger screw holes. That's what I got. It has a strange plastic/rubber coating over the whole thing, but it is definitely aluminum underneath.
|
Re: My Replikeo Prusa i3 Rework Build January 05, 2015 11:46PM |
Registered: 9 years ago Posts: 103 |
Quote
Blue Ice
Quote
LittleMike
Okay guys, so I finally got everything assembled and wired up. I loaded the marlin firmware from Replikeo's website, fired up Pronterface and I'm stuck. I tried hitting the X, Y, Z buttons and it keeps telling me echo:endstop hits: and then coordinates. I hit the Home button and all it wants to do is move the Z axis up. I can't get it to move anywhere else.
As an aside, I'm not sure if something burnt out (aside from an endstop). I manually hit the switch on each one just to test them and the LED lit up on each except for one, I heard a pop and smelled smoke afterwards. Luckily I bought a bunch of spares, so I swapped that one out and the LED works when I hit the switch, but I still have the same issue where none of the axes want to move.
I even tried unplugging the Z motor and then plugging one of the other motors into the Z spot on the RAMPS and the motor worked, but it still was just moving "Z" and none of the other axes. Any ideas? Is there maybe something wrong in the firmware configuration? I'm stumped.
Double check the wiring? Also, see if the motors get hot. If so, at least you know they are plugged in.
I think the wiring was reversed. The colors on my wires aren't the same as the colors in the build instructions, so I guessed.
 That's what the initial pop/smoke was, I think. Though I don't think the Arduino or the RAMPS fried because I can still communicate with the printer in Pronterface.
Now, with that said, I still think I have a firmware issue. I sent an M119 command and it says all 3 are triggered. However, only the Z one will show as OPEN if I manually hold the switch and run M119 again.
|
Re: My Replikeo Prusa i3 Rework Build January 06, 2015 10:54AM |
Registered: 9 years ago Posts: 103 |
Okay, so I think I got the endstop issue figured out. I was using Marlin 1.04 and I think I had something misconfigured. I switched to Marlin 1.0 and no more issue with them showing as triggered when I send an M119.
Mechanical issue - the nut that is kind of pressure fit into the x-idler that the threaded rod goes through keeps coming out. When that happens, that side no longer moves up or down and so the other side stresses the motor and then finally stops. Can I glue that nut in there or something or do you think it will still come out? Not sure if there is any way around this issue other than trying to get a replacement part with a better printed hole for the nut.
Another issue I'm having that I think is possibly firmware related - when I hit the Home button in Pronterface, the X-carriage moves down on the Z-Axis fine (until the nut comes loose) but the heatbed immediately shoots forward to the front and then grinds before it finally gives up. It's like the Arduino thinks that the bed is longer in the front or something, or it's traveling in the wrong direction.
Obviously the nut issue is the biggest problem. The rest I can tackle after getting that resolved. If I have time I will try to glue that nut in tonight or something and keep everyone updated
|
Re: My Replikeo Prusa i3 Rework Build January 07, 2015 01:31PM |
Registered: 9 years ago Posts: 103 |
|
Re: My Replikeo Prusa i3 Rework Build January 08, 2015 07:33AM |
Registered: 9 years ago Posts: 27 |
|
Re: My Replikeo Prusa i3 Rework Build January 08, 2015 10:36AM |
Registered: 9 years ago Posts: 103 |
Quote
pierrehavelaar
You are probably hitting your bed or some other obstruction that is lifting your X-axis of the nut. Otherwise it should keep in place by gravity. Make sure you place your Z-endstop correctly and the have configured it correctly in firmware.
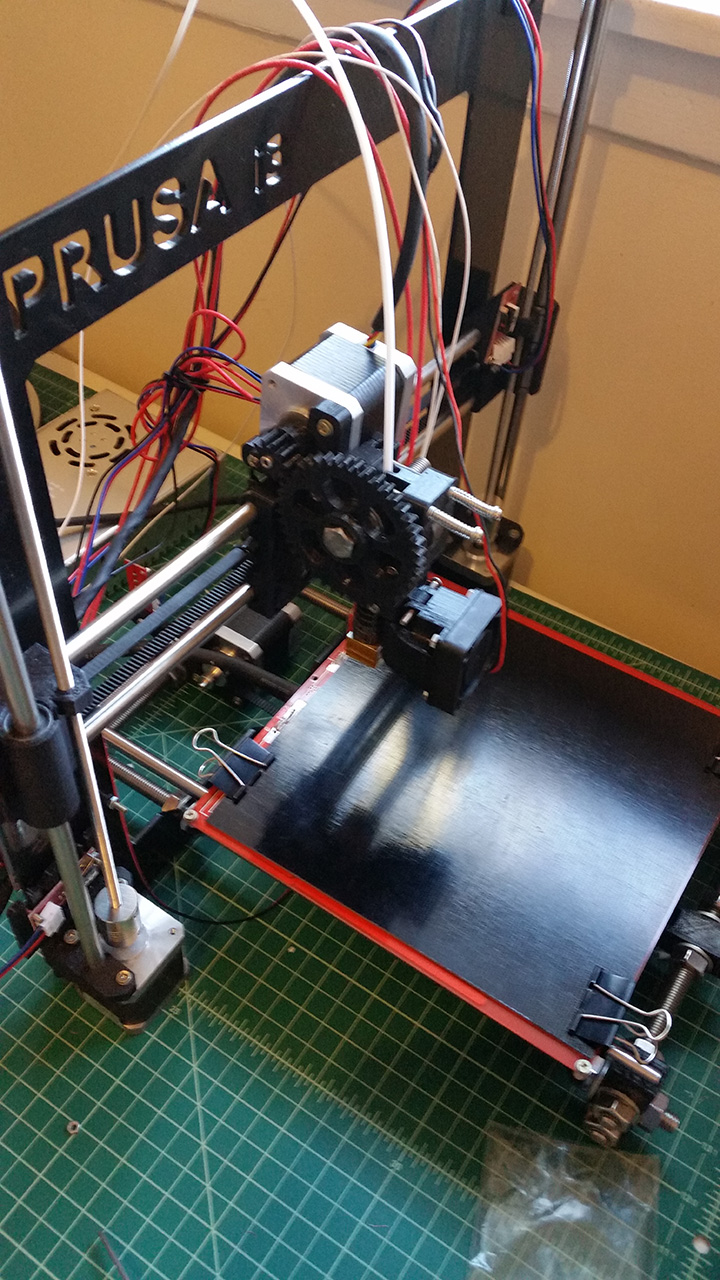
But I'm nowhere near the bed when the nut starts to drop. I believe my Z-Endstop is placed correctly and configured in the firmware properly. Take a look at the pic, maybe that will help. The nut comes loose from the x-idler when the x-carriage is traveling downward towards the bed, wayyyy before the endstop. Also, I'm confused - the nut trap is on the underside if the x-idler. How would gravity hold it in? In fact, it always fights gravity to keep from falling out. I'm not understanding what you mean.
As far as hitting some other obstruction, I'm not seeing any. The x-carriage travels smoothly down the threaded rods, then the nut works itself loose and the left side stops moving and the right side gets strained trying to pull down but cannot because the left is no longer moving after the nut gets loose.
|
Re: My Replikeo Prusa i3 Rework Build January 08, 2015 12:34PM |
Registered: 9 years ago Posts: 27 |
The weight of the x-axis will press down onto the nut with the x-idler. I think you should remove the threaded rod or just move the nuts all the way down so you can check if the X-carriage can move freely and smoothly up and down the Z-axis rods. Perhaps the rods are misaligned causing extra friction in the linear bearings. If that is fixed you could add a little silicone based or lithium grease to the rods to improve the sliding, but down use it as a remedy for any misalignments, you need to get that in order first.
|
Re: My Replikeo Prusa i3 Rework Build January 08, 2015 01:11PM |
Registered: 9 years ago Posts: 103 |
Quote
pierrehavelaar
The weight of the x-axis will press down onto the nut with the x-idler. I think you should remove the threaded rod or just move the nuts all the way down so you can check if the X-carriage can move freely and smoothly up and down the Z-axis rods. Perhaps the rods are misaligned causing extra friction in the linear bearings. If that is fixed you could add a little silicone based or lithium grease to the rods to improve the sliding, but down use it as a remedy for any misalignments, you need to get that in order first.
How would that even work? The x-carriage stays in place because of the threaded rods, no? If I remove one, that side wouldn't have anything to hold it up with and just sag, putting pressure on that side. If I remove the nuts, then the threaded rods have nothing to thread on and then can't move at all. I'm sorry, I'm still not understanding you.
|
Re: My Replikeo Prusa i3 Rework Build January 08, 2015 01:26PM |
Registered: 9 years ago Posts: 27 |
|
Re: My Replikeo Prusa i3 Rework Build January 08, 2015 01:52PM |
Registered: 9 years ago Posts: 103 |
Quote
pierrehavelaar
The idea is that you can move it up and down by hand so you can feel how smooth it is moving.
Right, but it would only show me how smooth it is moving up and down the smooth rods, which doesn't help the issue of the left nut falling out of the trap every time the x-carriage moves down. I removed both threaded rods and put them back together because they got misaligned (the carriage was lower on one side) when the nut dropped. They move just fine on the smooth rods. Because of the vibration of the motors or whatever though, that one nut keeps jumping out of the x-idler.
|
Re: My Replikeo Prusa i3 Rework Build January 12, 2015 12:53AM |
Registered: 9 years ago Posts: 103 |
Looks like I did have an issue with obstruction. I trimmed the bolts holding the RAMPS board to the frame and cleared that up. However, I'm still having an issue where the axes aren't moving correctly.
My Y-Axis goes all the way to the endstop, triggers it, yet it still wants to keep going a little further on one end. On the other end it stops about halfway so that the extruder is positioned about the middle of the heatbed. Oh, and if I try to hit the Home All button in pronterface, the print bed wants to jump into my lap. It moves all the way forward (towards me if I'm looking at it straight on) and tries to keep going, making an awful noise.
My Z-Axis looks like it will go all the way up right off the threaded rods if I let it, but going down, it stops about halfway, with the extruder clearly inches away from the heatbed.
At least the nuts have stopped popping out for now. I used a Loctite brand glue that seems to help keep them from slipping out of the nut traps.
So in my limited knowledge, I sent the printer G1 move codes and all 3 axes do seem to move the exact mm distance I tell it to, so I *think* that means my default steps are set correctly. I just can't figure out why the y and z axes are all screwed up.
Oh, as an aside, the reprap instructions say that it should be 245mm from the frame to the end of the y-holders. I had it like that initially, but after noticing that the extruder was way off the print bed when I pulled it all the way forward, I reduced that. It's now actually closer to 215mm!
This thing is going to put me in an early grave
Edited 1 time(s). Last edit at 01/12/2015 12:55AM by LittleMike.
|
Re: My Replikeo Prusa i3 Rework Build January 12, 2015 02:50PM |
Registered: 9 years ago Posts: 15 |
Does anybody know why this is happening?
I'm printing PLA without a fan. But I'm guessing it has something to do with retraction.
Clickerty click
I'm printing PLA without a fan. But I'm guessing it has something to do with retraction.
Clickerty click
|
Re: My Replikeo Prusa i3 Rework Build January 12, 2015 03:13PM |
Registered: 9 years ago Posts: 120 |
Quote
LittleMike
Looks like I did have an issue with obstruction. I trimmed the bolts holding the RAMPS board to the frame and cleared that up. However, I'm still having an issue where the axes aren't moving correctly.
My Y-Axis goes all the way to the endstop, triggers it, yet it still wants to keep going a little further on one end. On the other end it stops about halfway so that the extruder is positioned about the middle of the heatbed. Oh, and if I try to hit the Home All button in pronterface, the print bed wants to jump into my lap. It moves all the way forward (towards me if I'm looking at it straight on) and tries to keep going, making an awful noise.
Can you post a picture of your whole printer and a copy of your Configuration.h? I have a hunch about the way you set it up- has to do with the Y-axis being reversed.
Quote
LittleMike
My Z-Axis looks like it will go all the way up right off the threaded rods if I let it, but going down, it stops about halfway, with the extruder clearly inches away from the heatbed.
Maybe try just homing Z on its own? Sounds like it thinks the endstop is about halfway up before homing.
Quote
LittleMike
At least the nuts have stopped popping out for now. I used a Loctite brand glue that seems to help keep them from slipping out of the nut traps.
That's good! I had that happen once when my Z-axis was really misaligned. No more- it was an easy setup fix.
Quote
LittleMike
So in my limited knowledge, I sent the printer G1 move codes and all 3 axes do seem to move the exact mm distance I tell it to, so I *think* that means my default steps are set correctly. I just can't figure out why the y and z axes are all screwed up.
Oh, as an aside, the reprap instructions say that it should be 245mm from the frame to the end of the y-holders. I had it like that initially, but after noticing that the extruder was way off the print bed when I pulled it all the way forward, I reduced that. It's now actually closer to 215mm!
This thing is going to put me in an early grave
Yep, I know how that feels. Almost there, though
Edited 1 time(s). Last edit at 01/12/2015 03:14PM by Blue Ice.
|
Re: My Replikeo Prusa i3 Rework Build January 12, 2015 03:34PM |
Registered: 9 years ago Posts: 103 |
Quote
Blue Ice
Quote
LittleMike
Looks like I did have an issue with obstruction. I trimmed the bolts holding the RAMPS board to the frame and cleared that up. However, I'm still having an issue where the axes aren't moving correctly.
My Y-Axis goes all the way to the endstop, triggers it, yet it still wants to keep going a little further on one end. On the other end it stops about halfway so that the extruder is positioned about the middle of the heatbed. Oh, and if I try to hit the Home All button in pronterface, the print bed wants to jump into my lap. It moves all the way forward (towards me if I'm looking at it straight on) and tries to keep going, making an awful noise.
Can you post a picture of your whole printer and a copy of your Configuration.h? I have a hunch about the way you set it up- has to do with the Y-axis being reversed.
Quote
LittleMike
My Z-Axis looks like it will go all the way up right off the threaded rods if I let it, but going down, it stops about halfway, with the extruder clearly inches away from the heatbed.
Maybe try just homing Z on its own? Sounds like it thinks the endstop is about halfway up before homing.
Quote
LittleMike
At least the nuts have stopped popping out for now. I used a Loctite brand glue that seems to help keep them from slipping out of the nut traps.
That's good! I had that happen once when my Z-axis was really misaligned. No more- it was an easy setup fix.
Quote
LittleMike
So in my limited knowledge, I sent the printer G1 move codes and all 3 axes do seem to move the exact mm distance I tell it to, so I *think* that means my default steps are set correctly. I just can't figure out why the y and z axes are all screwed up.
Oh, as an aside, the reprap instructions say that it should be 245mm from the frame to the end of the y-holders. I had it like that initially, but after noticing that the extruder was way off the print bed when I pulled it all the way forward, I reduced that. It's now actually closer to 215mm!
This thing is going to put me in an early grave
Yep, I know how that feels. Almost there, though
I'm not home right now, but I can tell you that I moved the y-motor to the rear side of the frame and not the front part like the instructions originally say. It made more sense to me for wiring. Thanks to the magic of VPN and Remote Desktop, I can post my config file, though
It's based off the one syl-20 posted earlier in this thread. I have a feeling you're right in that it's some config that's off causing the issue, like reversed axes or something. Like maybe something is inverted so home isn't where it thinks it is. Pic is from a couple of days ago that I still had in gmail. If that one doesn't work, I can take another one when I get home tonight. Don't make fun of my messy wiring. I figured I can try and clean that up after I actually get it working. LOL
|
Re: My Replikeo Prusa i3 Rework Build January 12, 2015 09:35PM |
Registered: 9 years ago Posts: 120 |
Quote
Zippit
Does anybody know why this is happening?
I'm printing PLA without a fan. But I'm guessing it has something to do with retraction.
Clickerty click
Hmm. It seems like it has something to do with the way the layers change.
Overall, I would try to cause your printer to "wipe on layer change" and "retract on layer change", probably 2-3 mm at first but then tone it down. Are you using Slic3r? I can give you some tips on your config.ini. Hopefully that helps and good luck.
|
Re: My Replikeo Prusa i3 Rework Build January 12, 2015 11:42PM |
Registered: 9 years ago Posts: 120 |
Quote
LittleMike
I'm not home right now, but I can tell you that I moved the y-motor to the rear side of the frame and not the front part like the instructions originally say. It made more sense to me for wiring. Thanks to the magic of VPN and Remote Desktop, I can post my config file, though
Thanks! So first I would try switching the entire Y-axis around, like the way it said in the manual. I made the exact same mistake that you did, and it caused all sorts of issues (reversed text, no endstop, etc.) I know, it's a pain- you only do it once, though
Make sure you tighten those nuts for frame attachment well. And don't forget to re-level the bed!Now make sure that your motor cables are all plugged in the same way on your RAMPS board. Like have the yellow wire always near the same side.
Put the printer on a power strip with a switch, and just hit the switch when things go wrong over the next couple steps.
When the bed is close to you (it is near the y endstop) and to your right (near the x endstop) and the extruder is down (z endstop), all axes are zeroed. They increase as they move away from those positions. Try starting the printer with each axis in the middle (z might be a pain, so don't worry about it), and move each slowly around in Pronterface to see if they move the right way. Change the values here if they move in the wrong directions:
Quote
#define INVERT_X_DIR false // for Mendel set to false, for Orca set to true syl20
#define INVERT_Y_DIR false // for Mendel set to true, for Orca set to false syl20
#define INVERT_Z_DIR true // for Mendel set to false, for Orca set to true
#define INVERT_E0_DIR false // for direct drive extruder v9 set to true, for geared extruder set to false
#define INVERT_E1_DIR false // for direct drive extruder v9 set to true, for geared extruder set to false
#define INVERT_E2_DIR false // for direct drive extruder v9 set to true, for geared extruder set to false
Then try homing each axis individually in Pronterface. Keep a finger on the switch, and use it if you need to.
I think that should help out, but let me know when you get a chance.
By the way:
Quote
LittleMike
Don't make fun of my messy wiring. I figured I can try and clean that up after I actually get it working. LOL
Yeah, right. You'll be too occupied with the amazingness of the printer to deal with mere wiring at that point
 Voice of experience.
Seriously, though, no worries about the wiring. Putting on the wire cable seems like it would be annoying at this point, given that wires may be connected and reconnected now.
Edited 1 time(s). Last edit at 01/12/2015 11:42PM by Blue Ice.
Blue Ice
blog at [contemporarymaker.com]
|
Re: My Replikeo Prusa i3 Rework Build January 13, 2015 12:12AM |
Registered: 9 years ago Posts: 103 |
Quote
Blue Ice
Quote
LittleMike
I'm not home right now, but I can tell you that I moved the y-motor to the rear side of the frame and not the front part like the instructions originally say. It made more sense to me for wiring. Thanks to the magic of VPN and Remote Desktop, I can post my config file, though
Thanks! So first I would try switching the entire Y-axis around, like the way it said in the manual. I made the exact same mistake that you did, and it caused all sorts of issues (reversed text, no endstop, etc.) I know, it's a pain- you only do it once, though
Now make sure that your motor cables are all plugged in the same way on your RAMPS board. Like have the yellow wire always near the same side.
Put the printer on a power strip with a switch, and just hit the switch when things go wrong over the next couple steps.
When the bed is close to you (it is near the y endstop) and to your right (near the x endstop) and the extruder is down (z endstop), all axes are zeroed. They increase as they move away from those positions. Try starting the printer with each axis in the middle (z might be a pain, so don't worry about it), and move each slowly around in Pronterface to see if they move the right way. Change the values here if they move in the wrong directions:
Quote
#define INVERT_X_DIR false // for Mendel set to false, for Orca set to true syl20
#define INVERT_Y_DIR false // for Mendel set to true, for Orca set to false syl20
#define INVERT_Z_DIR true // for Mendel set to false, for Orca set to true
#define INVERT_E0_DIR false // for direct drive extruder v9 set to true, for geared extruder set to false
#define INVERT_E1_DIR false // for direct drive extruder v9 set to true, for geared extruder set to false
#define INVERT_E2_DIR false // for direct drive extruder v9 set to true, for geared extruder set to false
Then try homing each axis individually in Pronterface. Keep a finger on the switch, and use it if you need to.
I think that should help out, but let me know when you get a chance.
By the way:
Quote
LittleMike
Don't make fun of my messy wiring. I figured I can try and clean that up after I actually get it working. LOL
Yeah, right. You'll be too occupied with the amazingness of the printer to deal with mere wiring at that point
Seriously, though, no worries about the wiring. Putting on the wire cable seems like it would be annoying at this point, given that wires may be connected and reconnected now.
Okay, so quick question (it's too late today to go monkeying around with unbolting everything.)
1. When you say switch the entire y-axis around, you mean completely flip it so that the motor is in the front, but I should also redo the bolts that hold to the frame so that it stays longer in front of the frame like it is now, correct?
2. Can't I just try changing the invert settings without flipping anything around first? That way if I change the invert, it should do the same as physically flipping it, no?
|
Re: My Replikeo Prusa i3 Rework Build January 13, 2015 05:28AM |
Registered: 9 years ago Posts: 27 |
It is not a problem to have your y-motor on the other side as long as your firmware matches.
I have
#define INVERT_X_DIR true
#define INVERT_Y_DIR true
#define INVERT_Z_DIR false
#define X_HOME_DIR 1
#define Y_HOME_DIR 1
#define Z_HOME_DIR -1
Make sure you plug your endstops correctly into the controller board. Axis that have HOME_DIR 1 should have the endstop in MAX en axis with HOME_DIR -1 should have the endstop in MIN.
So looking at your config and the way you have setup your y-axis it looks like you have the y-axis correct, but I think your z-axis is not correct. The use the method that Blue Ice suggested to check your setup.
Good luck!
No worries, you will get your setup working ;-)
|
Re: My Replikeo Prusa i3 Rework Build January 13, 2015 10:25AM |
Registered: 9 years ago Posts: 103 |
Quote
pierrehavelaar
It is not a problem to have your y-motor on the other side as long as your firmware matches.
I have
#define INVERT_X_DIR true
#define INVERT_Y_DIR true
#define INVERT_Z_DIR false
#define X_HOME_DIR 1
#define Y_HOME_DIR 1
#define Z_HOME_DIR -1
Make sure you plug your endstops correctly into the controller board. Axis that have HOME_DIR 1 should have the endstop in MAX en axis with HOME_DIR -1 should have the endstop in MIN.
So looking at your config and the way you have setup your y-axis it looks like you have the y-axis correct, but I think your z-axis is not correct. The use the method that Blue Ice suggested to check your setup.
Good luck!
No worries, you will get your setup working ;-)
So last night I inverted the Y (if you recall, the bed kept on wanting to jump into my lap lol) and left Z alone. So basically instead of the settings syl20 had, I put them back to what the comments say to set for Mendel (I think the Z for Orchid) and now when I home x it goes to the right towards the endstop, for y, it goes back towards the endstop, and for z it goes down towards the endstop. No more craziness!

|
Re: My Replikeo Prusa i3 Rework Build January 13, 2015 11:44AM |
Registered: 9 years ago Posts: 120 |
Quote
LittleMike
Quote
pierrehavelaar
It is not a problem to have your y-motor on the other side as long as your firmware matches.
I have
#define INVERT_X_DIR true
#define INVERT_Y_DIR true
#define INVERT_Z_DIR false
#define X_HOME_DIR 1
#define Y_HOME_DIR 1
#define Z_HOME_DIR -1
Make sure you plug your endstops correctly into the controller board. Axis that have HOME_DIR 1 should have the endstop in MAX en axis with HOME_DIR -1 should have the endstop in MIN.
So looking at your config and the way you have setup your y-axis it looks like you have the y-axis correct, but I think your z-axis is not correct. The use the method that Blue Ice suggested to check your setup.
Good luck!
No worries, you will get your setup working ;-)
So last night I inverted the Y (if you recall, the bed kept on wanting to jump into my lap lol) and left Z alone. So basically instead of the settings syl20 had, I put them back to what the comments say to set for Mendel (I think the Z for Orchid) and now when I home x it goes to the right towards the endstop, for y, it goes back towards the endstop, and for z it goes down towards the endstop. No more craziness!
All right! I recommended to invert it because after messing with Marlin for mine for a long time it still printed everything backwards. So try out something with text on it (or a letter) and see if it prints backwards when you start out- I really don't know how to fix that except for flipping the Y. Pierrehavelaar, are your prints coming out reversed?
After looking at your config file yesterday, I noticed that all of my options were the exact opposite of yours and the same as Pierrehavelaar. I thought that it might have to do with the issue
Blue Ice
blog at [contemporarymaker.com]
|
Re: My Replikeo Prusa i3 Rework Build January 13, 2015 12:21PM |
Registered: 9 years ago Posts: 103 |
Quote
Blue Ice
Quote
LittleMike
Quote
pierrehavelaar
It is not a problem to have your y-motor on the other side as long as your firmware matches.
I have
#define INVERT_X_DIR true
#define INVERT_Y_DIR true
#define INVERT_Z_DIR false
#define X_HOME_DIR 1
#define Y_HOME_DIR 1
#define Z_HOME_DIR -1
Make sure you plug your endstops correctly into the controller board. Axis that have HOME_DIR 1 should have the endstop in MAX en axis with HOME_DIR -1 should have the endstop in MIN.
So looking at your config and the way you have setup your y-axis it looks like you have the y-axis correct, but I think your z-axis is not correct. The use the method that Blue Ice suggested to check your setup.
Good luck!
No worries, you will get your setup working ;-)
So last night I inverted the Y (if you recall, the bed kept on wanting to jump into my lap lol) and left Z alone. So basically instead of the settings syl20 had, I put them back to what the comments say to set for Mendel (I think the Z for Orchid) and now when I home x it goes to the right towards the endstop, for y, it goes back towards the endstop, and for z it goes down towards the endstop. No more craziness!
All right! I recommended to invert it because after messing with Marlin for mine for a long time it still printed everything backwards. So try out something with text on it (or a letter) and see if it prints backwards when you start out- I really don't know how to fix that except for flipping the Y. Pierrehavelaar, are your prints coming out reversed?
After looking at your config file yesterday, I noticed that all of my options were the exact opposite of yours and the same as Pierrehavelaar. I thought that it might have to do with the issue
No worries, you got me to the right section in the config that I needed to fix the issue, so even if it's different, it fixed my problem
I have to move the bed slightly because it's not exactly centered, but that's an easy mechanical fix. So basically I'm in the tweaking stage right now.
I will try and print something with text in it and see if it prints backwards or not. I know that in Pronterface, everything is reversed, so when I hit right on the x, it goes left, etc. I'm not overly concerned with that but if there is a way to fix it, that would be cool.
|
Re: My Replikeo Prusa i3 Rework Build January 13, 2015 01:30PM |
Registered: 9 years ago Posts: 15 |
Quote
Blue Ice
Quote
Zippit
Does anybody know why this is happening?
I'm printing PLA without a fan. But I'm guessing it has something to do with retraction.
Clickerty click
Hmm. It seems like it has something to do with the way the layers change.
Overall, I would try to cause your printer to "wipe on layer change" and "retract on layer change", probably 2-3 mm at first but then tone it down. Are you using Slic3r? I can give you some tips on your config.ini. Hopefully that helps and good luck.
Hey,
I'm using Cura currently with 4,5 mm retraction. I had it set to 40mm/s (or is it mm/m) but that is for a geared extruder. I've bumped it up to 100mm/s for my MK8 direct drive bowden. (I didn't try these settings yet)
Should I try wil Slic3r instead maybe? I only have this issue with organic models. Printer parts and such print flawlessly.
Edited 1 time(s). Last edit at 01/13/2015 02:28PM by Zippit.
|
Re: My Replikeo Prusa i3 Rework Build January 13, 2015 01:55PM |
Registered: 9 years ago Posts: 103 |
|
Re: My Replikeo Prusa i3 Rework Build January 13, 2015 03:16PM |
Registered: 9 years ago Posts: 120 |
Quote
LittleMike
Oh - another quick question. Aside from the bed levelling screws, what is the best way to get the extruder closer to the bed? Should I move my z-endstop down (or a combination of both? Because right now it triggers the endstop but it's still like half an inch or so above the bed.
My z-endstop is a huge pain to move, so I preferred to move it only once. Too many screws. The bed levelling screws are the best way for me to move the bed closer to the extruder.
What I did was tighten all of the bed screws down, then lower the z-endstop part so that the extruder stops about 2mm above the bed. Then I raised the bed screws and moved the extruder around the bed until it was level.
Once you print enough, you can just "know" by the starting rings around the print whether it is level or not. I usually adjust it on the fly.
Blue Ice
blog at [contemporarymaker.com]
|
Re: My Replikeo Prusa i3 Rework Build January 13, 2015 03:24PM |
Registered: 9 years ago Posts: 103 |
Quote
Blue Ice
Quote
LittleMike
Oh - another quick question. Aside from the bed levelling screws, what is the best way to get the extruder closer to the bed? Should I move my z-endstop down (or a combination of both? Because right now it triggers the endstop but it's still like half an inch or so above the bed.
My z-endstop is a huge pain to move, so I preferred to move it only once. Too many screws. The bed levelling screws are the best way for me to move the bed closer to the extruder.
What I did was tighten all of the bed screws down, then lower the z-endstop part so that the extruder stops about 2mm above the bed. Then I raised the bed screws and moved the extruder around the bed until it was level.
Once you print enough, you can just "know" by the starting rings around the print whether it is level or not. I usually adjust it on the fly.
I have to check again, but I believe my extruder is actually more than 2mm above the bed (it seriously looks like 3/4") so I may have to move my z-endstop down a little first. Good to know that the leveling screw method works, though, thank you. I think the first thing I'm going to print is a new z-endstop holder. There has GOT to be a better design than the one sent. I want something less of a PITA to work with/adjust.
|
Re: My Replikeo Prusa i3 Rework Build January 13, 2015 03:29PM |
Registered: 9 years ago Posts: 120 |
Quote
Zippit
Quote
Blue Ice
Quote
Zippit
Does anybody know why this is happening?
I'm printing PLA without a fan. But I'm guessing it has something to do with retraction.
Clickerty click
Hmm. It seems like it has something to do with the way the layers change.
Overall, I would try to cause your printer to "wipe on layer change" and "retract on layer change", probably 2-3 mm at first but then tone it down. Are you using Slic3r? I can give you some tips on your config.ini. Hopefully that helps and good luck.
Hey,
I'm using Cura currently with 4,5 mm retraction. I had it set to 40mm/s (or is it mm/m) but that is for a geared extruder. I've bumped it up to 100mm/s for my MK8 direct drive bowden. (I didn't try these settings yet)
Should I try wil Slic3r instead maybe? I only have this issue with organic models. Printer parts and such print flawlessly.
After looking at Cura's manual and screenshots, I think you should probably switch to Slic3r for more fine control over your printer. Seems like Cura does not have a "wipe on layer change" setting, but I know Slic3r does.
Hopefully that will help you out- let me know.
Blue Ice
blog at [contemporarymaker.com]
|
Re: My Replikeo Prusa i3 Rework Build January 13, 2015 05:08PM |
Registered: 9 years ago Posts: 120 |
Quote
LittleMike
Quote
Blue Ice
Quote
LittleMike
Oh - another quick question. Aside from the bed levelling screws, what is the best way to get the extruder closer to the bed? Should I move my z-endstop down (or a combination of both? Because right now it triggers the endstop but it's still like half an inch or so above the bed.
My z-endstop is a huge pain to move, so I preferred to move it only once. Too many screws. The bed levelling screws are the best way for me to move the bed closer to the extruder.
What I did was tighten all of the bed screws down, then lower the z-endstop part so that the extruder stops about 2mm above the bed. Then I raised the bed screws and moved the extruder around the bed until it was level.
Once you print enough, you can just "know" by the starting rings around the print whether it is level or not. I usually adjust it on the fly.
I have to check again, but I believe my extruder is actually more than 2mm above the bed (it seriously looks like 3/4") so I may have to move my z-endstop down a little first. Good to know that the leveling screw method works, though, thank you. I think the first thing I'm going to print is a new z-endstop holder. There has GOT to be a better design than the one sent. I want something less of a PITA to work with/adjust.
Yeah, I only adjusted mine twice over the past six months, so it hasn't really bothered me much. But when I do need to adjust it, it's quite a chore. One thing that I would like to see are captive nuts in the parts- that way you don't have to do all of the painful "hold the nut on one end and screw on the other" work. Instead, you would just screw in the screw. Maybe someday....
Blue Ice
blog at [contemporarymaker.com]
|
Re: My Replikeo Prusa i3 Rework Build January 13, 2015 05:14PM |
Registered: 9 years ago Posts: 137 |
You lucky. It's such a pain to adjust bed level, and I have to do it almost every time I print. I made better z-endstop bracket that uses long screw that I can move up or down and it presses on the switch, but nuts on it keep unscrewing from vibration. I'm going to try proximity sensor next...Quote
Blue Ice
Yeah, I only adjusted mine twice over the past six months, so it hasn't really bothered me much. But when I do need to adjust it, it's quite a chore. One thing that I would like to see are captive nuts in the parts- that way you don't have to do all of the painful "hold the nut on one end and screw on the other" work. Instead, you would just screw in the screw. Maybe someday....
|
Re: My Replikeo Prusa i3 Rework Build January 14, 2015 04:49AM |
Registered: 9 years ago Posts: 27 |
@Blue Ice I had inverted Y on my prints at first, so in Marlin I reversed the Y direction, home direction and plugged the endstop into the MAX setting in order to flip it.
The Z-stop is in a really bad spot, I simply cannot access the nuts and bolt properly to fix it in place. I fixed it in place as good as I could and then used the bed screws to do the final leveling. I haven't touched the z-stop since.
I have looked around and I like this z-stop, but I haven't tried it myself yet.
adjustable z-stop


Sorry, only registered users may post in this forum.